The Bread Monk
  • Home
  • My Bread Blog
  • Breadhead Videos
  • Recipes
  • Fr. Dom's Books
  • Events/Programs
  • Shortcut Stollen
  • New Page

Pizza Sauce 2016

8/24/2016

1 Comment

 
Last year's pizza sauce was a disappointment, because many of the tomatoes I used were rather flavorless---not the best year for growers, from what I understand. I still have a little bit of last year's vintage in the freezer, but it may end up in soup rather than on a homemade crust.

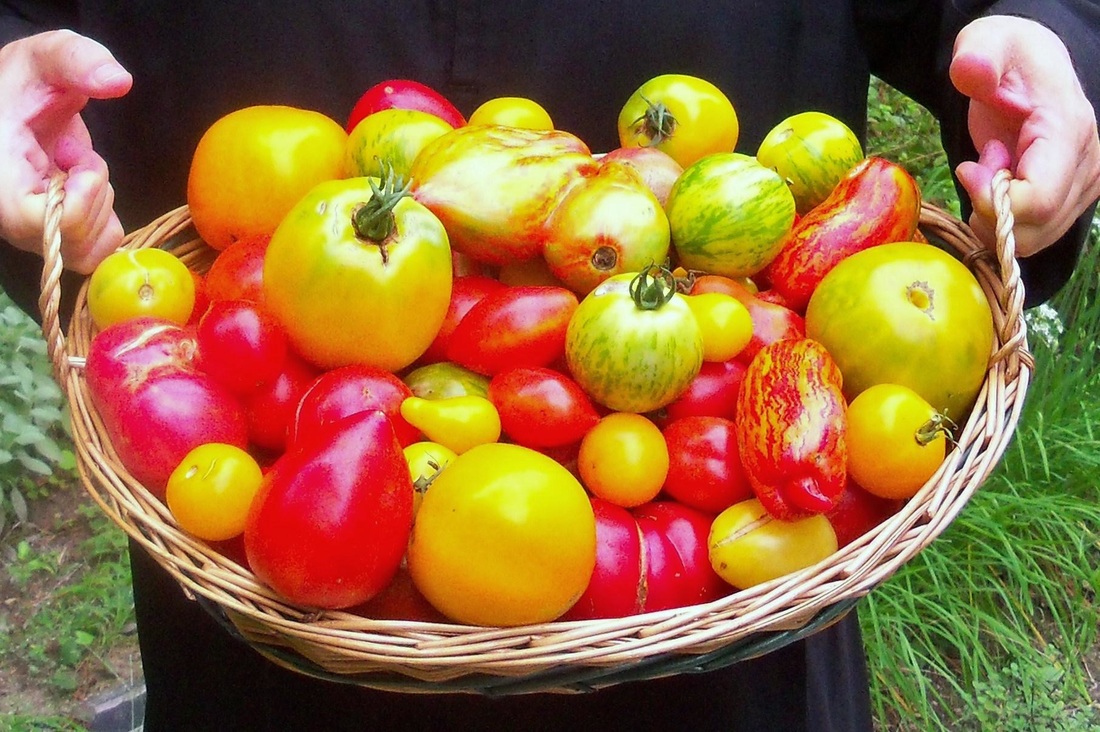
​This year's harvest is much more promising, flavor-wise, but our usual grower Br. Luke had classes all summer and leaves this weekend for school at Lewis University, so he didn't plant a garden at all. I put the word out to my students and fellow teachers and they came through in a big way. My usual method is to do about a gallon of sauce at a time, since I have to work at night when the kitchen isn't being used for the school, and I don't want to be up until midnight washing Mason jars. It feels rather artisanal, like I'm making small batch bourbon.
Picture
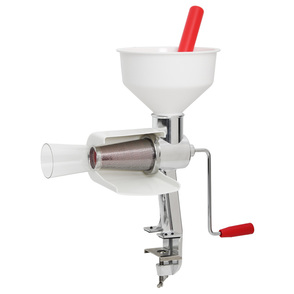
The work has been facilitated by my purchasing a Victorio tomato mill (the company also makes grain mills) at a second hand shop in Chillicothe IL. The $59 to $69 retail price had kept me from getting one at Ace Hardware---this one cost me five bucks. It makes short work of quartered tomatoes, spewing puree out the side and the seeds and skins out the front. I think you could produce a lot of applesauce with this device as well. It is certainly more efficient than a Foley food mill, which does the job but requires a bit more stamina to process 50+ pounds of tomatoes. The Stage Rats who came out that helped me in previous years were as grateful for the purchase as I was!

Picture
Big Ol’ Batch o’ Pizza Sauce
 
About 25 pounds fresh tomatoes (enough to produce 2 gallons puree)
4 (12 oz) cans of tomato paste
1 Tbs. minced fresh thyme
1 Tbs. minced fresh basil
2 Tbs. minced fresh chives
2 Tbs. minced fresh oregano
4 cloves of garlic, minced extra fine
½ tsp. black pepper
¼ cup grated parmesan cheese
2 Tbs. granulated sugar (optional)
1 to 2 tsp. salt (optional)
 
Remove stems, skins and seeds from ripe tomatoes; chop tomatoes into 2-inch pieces.  Process, in batches, in a blender or food processor until smooth.  Transfer puree into a 9- or 10-quart stainless steel pot.  Simmer, uncovered, over low heat, stirring occasionally, for three or four hours, until reduced by half.  Do not allow to come to a full boil or it can scorch on the bottom—be patient.
 
Add tomato paste; mix thoroughly.  (You might want to transfer sauce to a smaller pot.)  Add thyme, basil, chives, oregano, garlic, pepper and cheese; stir to mix.  Simmer, covered, for about 30 minutes.  Add salt and/or sugar to taste (your tomatoes may be sweet enough; the salt may be unnecessary if you use salty toppings like pepperoni, bacon, or anchovies). If the sauce seems to acidic, add 1/2 tsp. of baking soda and stir thoroughly.
 
Place the pot in a sink full of ice to cool the sauce.  Divide into freezer bags or other airtight plastic containers.  Store in freezer until needed.  You may also can this sauce in mason jars.
 
If you use dried herbs, cut the amounts in half.  The flavor of dried chives is a bit bland, so you might substitute 1 or 2 teaspoons of onion powder.


1 Comment

The Multiplication of the Loaves

8/22/2016

1 Comment

 
Picture
Last week I gave a reflection on the multiplication of the loaves at a Methodist parish in Aledo, IL, where my college buddy Mark Harris is pastor. We refer to each other as "brothers from another mother" since we look so much alike! We became fast friends as freshman theatre majors at Illinois Wesleyan and we're closer than ever now that we can talk shop about theatre, music AND ministry--plus he's a Cardinals fan! I gave my talk "What kind of bread shall we be?" which seems to have been a big hit. They began the evening with a free chicken dinner, which included the best bread pudding I've ever eaten, and I mean that without any exaggeration. I'll see if I can get a recipe from the man who made it, but I'm not even sure I want one. I'd rather have an excuse to visit my friend again. 

I'm bringing this up because I want my readers to know that although I do a lot of bread demos and lectures at Catholic parishes around Illinois, I'm just as comfortable speaking to Methodist and Lutheran parishes, civic groups and women's clubs. I know of several Lutheran parishes that have used my book Bake and Be Blessed for a sermon series or for staff formation. One of the first fan letters I ever received for my PBS show Breaking Bread was from the leader of a charismatic prayer group who said that they were "lifting you up to the Lord" at their weekly meeting. Bread has a universal appeal. 

It all boils down to this: I want to multiply the loaves. I want the number of people who bake for their families to increase every day, to multiply the confidence and creativity of as many people as I can, in books and demos and posts online, through Pinterest and Facebook and Twitter and Craftsy and whatever the next big thing is. And whether I feed someone's hunger for cinnamon rolls or for companionship, for recipes or for reasons to bake, I'd like to believe that I'm doing the work of my Master. 

Picture
1 Comment

Challah Babka

8/19/2016

2 Comments

 
Picture
Chocolate Babka. Photo by Craftsy.com
Most people only know about babka because of the episode on Seinfeld in which Jerry and Elaine miss out on the last chocolate babka and have to settle for cinnamon version, which Elaine thinks of as “the lesser babka.” Both are excellent, and I'm partial to the cinnamon variety, but the chocolate kind is what I made for my Craftsy class, so here's a description and recipe.

The word babka means “grandmother” in Polish, and may have been applied to the pastry because it was often made in a tall, fluted cylindrical pan that produced a cake shaped like a pleated skirt.  Some people make it in a loaf pan or as a wreath on a sheet tray. 
When I make babka, I like to use a Bundt pan so the resulting loaf has a decorative shape and some height.

Challah featured prominently in my Craftsy Class---the last three lessons, actually---with "Half-Pipe Chocolate Babka" being the crown of my instruction. 
For my class I used a Holiday Challah dough recipe that makes a HUGE batch and has to be kneaded by hand unless you have a larger stand mixture that can manage the equivalent of three loaves of bread. Here's the recipe for a simpler dough you can make in an ordinary KitchenAid.

3¼ to 3½ cups of all-purpose flour, divided
¼ cup of granulated sugar
1½ teaspoons of salt
1 pkg. instant yeast
¾ cup warm water
2 eggs, room temp
1 egg yolk (save egg white for the glaze)
¼ cup neutrally flavored oil (canola or a very light olive oil), 

Place 3 cups of flour, sugar, salt and yeast into a medium size bowl and whisk them together. Place water, eggs and egg yolk into the bowl of a stand mixer. Blend with a paddle attachment, then add flour mixture a small scoop at a time, with the mixer on medium speed. Once all the dry ingredients are incorporated thoroughly, beat in oil at a slightly higher speed into smooth.

Switch to a dough hook attachment. The remaining flour is added gradually until you have a mass of dough that pulls away from the side of the bowl. Knead with hook for 5 minutes. The dough should be smooth, elastic and a little bit sticky. Remove dough hook and cover bowl with a clean dry towel. Allow to rise for 60 to 90 minutes---a richer dough usually means a slower rise.

Lightly grease a Bundt cake pan. Roll dough out to 20” x 24”. Spread filling (recipe below) evenly over the surface, leaving the top wide edge 1” uncovered. Brush top edge lightly with water. Roll up from bottom wide edge and pinch to seal. Place the roll on a cutting board seam side up and cut down the middle with a large sharp knife or large pizza cutter. (Photo below.) Turn halves with the filling side facing upwards. Starting from the middle, twist the two side together towards one end. Repeat with other side. Carefully lift the twist into the prepared pan and arrange so it’s even. Cover and let rise for 30 to 45 minutes or until nearly doubled. Bake in a preheated 350 F. oven for 40 to 45 minutes. Interior temp of the bread should 190 F. on an instant read thermometer.   

Filling
¾ cup semisweet chocolate chips
⅓ cup unsalted butter
¼ cup powdered sugar
⅓ cup cocoa powder

In a small saucepan, melt butter over low heat and whisk in chocolate chips. Sift powdered sugar and cocoa powder together into the pan and whisk until smooth. Remove from heat.
Picture
Chocolate babka slice. Photo: Fr. Dominic
This has to be served on the nicest china cake plate you have, preferably one from your grandma. Seasonally decorated plates are nice, too. Some people add a little chocolate drizzle to dress it up or a light dusting of powdered sugar. But once you cut the first wedge, the interior is so beautiful you won’t care about the loaf’s surface, and the tender crumb and sweet filling don't need any additional sugar.
Picture
The filing in this oicture is almond, and you're supposed to cut all the way through at the top, but you get this idea.
I make two other versions of babka, one with a sugar and spice filling, and the other as the pinnacle of sweet bread decadence: Nutella salted caramel babka. For the spice variety, I spread melted butter over the surface of the dough, and then sprinkle on a half-cup mixture of equal parts white and brown sugar with a teaspoon of Chinese five spice (you could use just cinnamon, or pumpkin pie spice, too). In my opinion, no need for streusel, just butter and hot coffee.
Picture
For the richer version, I heat a 13 oz. jar of Nutella in the microwave for about 10 seconds, and then spread it over the rolled out dough using an offset spatula or plastic bench knife. Then I sprinkle on 5 or 6 oz. of Kraft Premium Caramel Bits (about half an 11-oz. package) and then 1/4 tsp. of kosher salt. Roll it up and continue as directed--the result is below.
Picture
Forgive me, dieters, if I have led you into temptation.
Picture
2 Comments

Craftsy Shoot, Day 4

8/13/2016

2 Comments

 
Picture

​
The final installment of my adventures at Craftsy in Denver CO,
taping a six part online class in baking:
"Bake Your Best: Sweet Yeast Breads, Challah and More."

The final lesson of my Craftsy class is for Holiday Challah, which includes a variation on the Challah recipe featured in my most recent book The Breadhead Bible. The only change was that I used honey instead of sugar, and light olive oil instead of canola. These ingredients are more traditional and seemed appropriate for breads that are often served for Jewish holidays like Purim and Rosh Hashanah. Read a blog I wrote about it in 2012 and find a recipe HERE.
Picture
Traditional Challah. Photo: Craftsy.com
A crown braid makes an impressive addition to the holiday table, and when I teach comparative religions I make it when we study the feast of Purim, which commemorates the courage of Queen Esther. It's also traditional for Rosh Hashanah. I don't have a photo tutorial yet, but you can see from the finished product that it's a culinary tour de force.
Picture
Crown braid, using a pattern of shaping I adapted from more traditional methods. Photo: Craftsy.com
My last recipe for the class is for Halfpipe Twist Babka. Again, I don't have a series of photos to show you, and I haven't found anything online with enough details to be helpful. I promise you, I'm not just being coy so you'll subscribe to my class! Once I get a decent set of photos, I'll share them. Here's what the finished product looks like.
Picture
Chocolate Babka Photo: Craftsy.com
PictureMaggie, Brian, Me and Samantha in the kitchen with the fruits of our labor.
After we wrapped taping the lessons, we had to make some LTV's ("Little Tiny Videos") to be used for the title cards for each lesson, and then shoot all the still photography. The kitchen crew had been saving product all week, and had made some of their own based on my instruction, and we had a sizable collection of goodies. 
​


​There was a Saint Bede Academy alumni gathering that evening at the Craftsy headquarters, so I went straight there from the studio. After shooting pictures of the stained glass in the Denver cathedral and then lunch at Biker Jim's Gourmet Dogs on Saturday with my cousin (there's a non-sequiter if ever I saw one), I flew back to Illinois.

Best. Week. Ever.
​
You'll be seeing more about my class and the Craftsy platform in future blogs, but for right now . . .

2 Comments

Craftsy Shoot Day 3

8/13/2016

0 Comments

 
Picture
The ongoing account of my days of shooting a six part online class for Craftsy.com August 2- 5 . . .

The class is titled "Bake You Best: Sweet Yeast Breads, Challah and More" and will launch by early September. Stay tuned to this blog for a chance to be enrolled in the class for FREE and for other special discounts.
​

Thursday's shoot began with a blossom and ended with a braid. Apricot Blossom Coffeecake is a monastery favorite which has not yet made it into a cookbook but has been featured in this blog before (clock HERE for the photo tutorial). There was one error that could have been disastrous if we had been baking for something other than a taped class and the accompanying photos. Brian, one of my kitchen angels, had never used nor seen coriander before, and it was one of the ingredients in the apricot filling. Evidently the jar lids had been switched, and he used garam masala instead, which has coriander in it but a LOT of other spices as well, including a healthy amount of black pepper! The bread was unexpectedly spicy, but if he had used about half the amount, it would have been one of those sweet/hot flavor profiles that would pair well with a creamy cheese. A happy accident might yield a new recipe . . .
Picture
Apricot Blossom, black pepper and all! Photo: craftsy.com
Next we started on the challah portion of the class. My orginal class proposal had been just for breakfast breads, but the green light committee had decided they wanted challah added, first as a single lesson and then they expanded it to three lessons. I must admit, the class is much more interesting and educational thanks to their input.

Challah is a part of Jewish baking tradition and is often served for the Sabbath and for holidays. It's a bread rich with eggs, slightly sweet and utterly delicious. I made my first loaf for a cast party for Fiddler on the Roof  when I was a senior in high school and have been baking it regularly ever since. A braided loaf is the traditional shape, but until I started researching for this class, I had no idea just how many kinds of braids are out there. Challah is often served as pull-apart rolls as well, which is the first shape we featured in the class.
Picture
Pull-apart challah rolls with poppyseed. photo: Craftsy.com
The recipe I used was one a developed specifically for the class (I promise I'll share it eventually) to be made in a KitchenAid or other stand mixer. Challah dough often comes in huge proportions, since people are baking for larger groups for the holidays---recipes using 5 lbs. of flour are not uncommon. This one can be made in the very smallest model of KitchenAid, the one you buy first and use until you realize you want to make biggest batches of challah! I showed how to make braided sandwich rolls, another common shape for challah.   
Picture
Braided sandwich rolls made with challah dough. photo: craftsy.com
Lastly for this lesson I showed a slab braid, which I've featured on this blog several times. HERE is the YouTube video that I made a few years ago. A slab braid is a lot easier to shape than one that requires you to roll out ropes or strands to exactly the right size and shape. But that is exactly what we did in the next lesson, showing a three and a six strand braid using the traditional method.
Picture
Clockwise from left: slab braid, six strand braid (both with an egg white wash) and three strand braid with a whole egg wash and sesame seed topping. Photo: Craftsy.com
Shooting on Thursday went a little overtime, and when I got back to the hotel my cousin was already waiting for me with two large pizzas from Amici's in Wheat Ridge (a family favorite) and we went to my uncle and aunt's house for a little family reunion. Lots of love and laughs and red wine, and way more food than we needed---which is to say, just as it always is in our Italian family!

Next up: Crown braid and chocolate babka!

0 Comments

Craftsy Shoot, Day Two

8/13/2016

0 Comments

 
The ongoing account of taping my Craftsy class August 2 - 5. . .
Picture
Makeup call for the shoot was always at 8 a.m.--the stylist Lillian was a pleasure to work with and a good conversationalist. The biggest struggle of course was keeping the shine off my bald pate, and frequent blotting and powdering was required throughout the day. It wasn't as bad as when I shot Breaking Bread in St. Louis, which is the humidity sinkhole of the Midwest---all of the humidity of the Great Plains drains into center field of Busch Stadium. The air is so dry in Denver that I walked the 16th Street Mall in 90 degree heat and it felt like 75 degrees in Illinois. 

Day One included the Basic Sweet Dough recipe (an adaptation of Best Ever Crescent Roll Dough) and rose rolls, but not made for dinner, but as cinnamon rolls with bright red frosting (see previous post). I've made the rose rolls for nearly every monastery holiday meal, but only as cinnamon rolls a couple of times, once on the feast of our Lady of Guadalupe, and another time for my mom's birthday.  

Picture
Rose rolls with cinnamon filling and red frosting. Photo: Craftsy.com
We continued shooting the lessons in order, Lesson 2 being for jellyroll variations. The class is meant for advanced beginner or intermediate bakers, so I figured expanding on the jellyroll technique used for cinnamon rolls would be the next step. The first recipe was for Breakfast Butterflies, an old fashioned roll you don't see much these days. I like them with brown sugar cinnamon or almond filling, but we decided to use blueberry. You can find the recipe for the blueberry filling HERE, but I find that Solo Blueberry pastry filling also works well.  The recipe for the rolls came from my book The Breadhead Bible. 
Picture
Luscious blueberry filling--lemon zest gives it a fresh test, even with frozen berries. Photo: Craftsy.com
The segment for Sweetheart Coffeecake followed, which I featured in an earlier blog--find the photo tutorial HERE. Craftsy is the perfect platform for this kind of teaching, because a well-shot video is always better than my amateur photographs! The other feature on the Craftsy platform that Breadheads will appreciate is that at the bottom of the window where the lesson plays, there is a "30 second replay" button--click it and the last 30 seconds of the video plays on a loop for as long as you want. People learning to knit, crochet and quilt on Craftsy really like this feature!
Picture
Sweetheart Coffee Cake, with cherry filling and sliced almonds. Photo: Craftsy.com
Producer Jon Clark had scheduled one more segment for the day, so we went on to Lemon Fantans, another old-fashioned roll but usually made with butter between the layers and served at dinner. To make it into a sweet treat, I added granulated sugar mixed with lemon zest to the layers, and drizzled on a thin icing made with lemon juice. The cameraman Marshall declared this roll his favorite and would have consumed more of them if we hadn't had to keep some idea for product shots! My photo tutorial from last summer is HERE, and the results from the shoot are below.
Picture
The shoot ended about 6 p.m., after which I took off my apron and my habit, threw on a Rockies jersey and walked the four blocks to Coors Field---yep, that's how close the studio is to the ballpark! The Rockies pounded the Dodgers 12 - 2, a typical Mile High home run fest. DJ LaMahieu hit one that just barely cleared the wall, and Dodger center fielder Joc Pederson jump for it, missed, and lost his glove over the wall in the shrubbery around the fountains! As he stood there waiting for an usher to throw his glove back over, you could tell from his stance that he was NOT happy with himself. I celebrated by going back to the concession stands. Bread in the studio, bratwurst in the ballpark---not sure it gets much better.
Picture
Photo credit: www.denver.com
0 Comments

Craftsy shoot, Day 1

8/10/2016

1 Comment

 
PictureConsulting with the producer about a close-up shot. Photo: Craftsy.com
Day one of my Craftsy class taping was spent consulting with the Jon Clark, the producer. Given the number of their teachers who have little or no television experience, Jon is the ideal Craftsy producer: utterly unflappable, endlessly patient and unfailingly kind. I was also to discover that logistical skills rival those of the Allied invasion, and as a person who has produced and directed videos myself, I know how valuable that skill is. 

Samantha Sherman, the kitchen production manager, was just as well-organized, and only once did she and her crew produce a dough that was a little stiff—their first time making challah in the mixer. Otherwise, everything that came on set was the perfect consistency and timed to be sufficiently risen for use. Some dough we had to slow down in the fridge and once we had to wait while something proofed. But every time we got off schedule, we adjusted, did something else in the meanwhile, and still ended pretty much on time.
Picture
Rose rolls were the first treat we worked on together. Photo: Craftsy.com
​
After our prep and practice day, I went back to the hotel, changed into more casual clothes, and headed off to the ballpark with my cousin Chris. My parents were from Denver originally before moving to Peoria when my dad got a job with Caterpillar, so I still have family out there. The Rockies played the Dodgers. We sat above the scoreboard in right field, and the right fielder for the Dodgers, Riddick, had just been traded from the A’s, a National League team, and so he hadn’t played against much against the American Leaguers. Periodically he would take off his hat, and from our vantage point we could see that he had a cheat sheet hidden in his cap! He’d steal a glance as a hitter came up to bat and then adjust his position. As with many cheat sheets, it didn’t help much: Rockies won 7 to 3.

On our way to our seats I saw a touching sight. There was a large bearded man escorting his family to their seats. His eldest daughter appeared to be about 12 years old and seemed to be especially unnerved by the crowds. He held her hand, the rest of the family trailing behind, without a sign of annoyance or impatience on his face, matching his pace to hers. 

There was a bit of a rain delay early in the game, which mean that I got back to the hotel a little later than I would have liked. But after a successful prep session, I went to sleep without anxiety about the first day of shooting. I woke up the next morning with a kind of pleasurable nervous anticipation, like actors have before opening night of a revival of a successful show: familiar but new, confident but not complacent. 

Next blog: First day of shooting!
1 Comment

I'm gonna be on CRAFTSY!

8/8/2016

5 Comments

 
PictureThat's a wrap!
 The first week of August I flew to Denver to tape a bread baking class for Craftsy, an amazing website dedicated to online learning for fiber arts, cooking, photography and more. Craftsy has over 8 million students in 200 countries, and started out with just four classes taped in the basement of the CEO's house. That CEO, Jon Levisay, just happens to be a former student of our St. Bede Academy, so when I heard that his company was beginning to expand their offerings in the food category, I sent an email inquiry. That was about 18 months ago, and soon I'll be launching an online class: Bake Your Best: Sweet Yeast Breads, Challah and More. (My class won't be available until next month, but don't sign up from the Craftsy site---Breadheads who read this blog will be able to sign up for a chance to win a free class and get a link for a discount. Stay tuned!)

The whole process of creating the class was challenging, exciting, demanding and great fun, all at once. Denise Mickelson, the acquisitions editor, guided me through the process of developing a class proposal, which was then sent to a committee who eventually gave it the green light, after making some suggestions about content. Several weeks of scripting with content editor Phil Gutensohn followed, and about three weeks of consultation with the in-studio producer, Jon Clark. All of this collaboration was done online via Google Docs, and I was even able to do some work while I was on vacation.

PictureA small fraction of what I sent to Craftsy.
The week before the shoot, I sent seven boxes of kitchen equipment via UPS to the studio, including my full set of Autumn Harvest Pyrex bowls! Naturally my polka dot rolling pin and dough whisk were packed carefully along with other favorite utensils, my habit and all my aprons. Arriving in Denver, I was met by a Moroccan limo driver who gave me tips on how to prepare lamb kabobs and where to get good tacos near my hotel. The rest of the week I used Uber to get to and from the studio---also a new experience.

PictureThis unique image was painted on the wall above my bed.
I stayed at the Curtis Hotel, which was a wildly different environment from the monastery: relatively quiet, but uniquely decorated according to different themes by floor. I was on 12, the "Dance Floor"---there was a bright yellow silhouette of disco John Travolta on the wall outside the elevator, and the hallway mirror was adorned with the Dirty Dancing quote "Nobody puts Baby in the corner" just to give you an idea of the decor. The "Fun and Games" floor had a wall that was a giant mural of the PacMan playing field. I recommend you stay there if you have the chance. The breakfast buffet is excellent, and it's located close to the 16th Street Mall, which is just about the best locale for people watching I have ever encountered.     

I'll be posting another blog in a day or so about the whole experience of getting back to taping after such a long hiatus. For now, here's an idea of what I did during the three days of shooting.
Picture
5 Comments

Breakfast Butterflies

8/6/2016

0 Comments

 
Picture
Recently I've been experimenting with breakfast breads and I remembered that it's been awhile since I made Breakfast Butterflies. Butterfly rolls are an old-fashioned recipe one never sees anymore in cookbooks but which needs to be revived. You can use just about any filling, from cinnamon sugar to pesto, but I like mine with blueberry or almond filling. (A quick aside--I highly recommend the Solo brand Cake and Pastry Filling, which comes in a great many flavors and is every bit as good as homemade, in my experience. They are a member of the Home Baking Association, which has sponsored some of my videos, but I've not been paid or otherwise compensated for this little plug!)

Butterfly rolls are not much much harder to make than cinnamon rolls, with just a couple of other steps. You can use your favorite roll dough and your favorite filling, so what's not to love? I find that they are plenty sweet without a powdered sugar icing, but if you want a nice finish on them, heat up some light corn syrup in the microwave for about 15 seconds and brush that over the tops. As you can see from the photo above, it gives them a lovely shiny appearance but without adding a lot of extra sugar that will obscure the taste of the filling.

So have I convinced you to make them? I hope so. Click HERE for the recipe page. 


0 Comments

Happy Birthday---have some spudnuts!

6/2/2016

2 Comments

 
Picture
Yesterday was my buddy Ken's birthday (he's in the green shirt---his son Collin had his eyes shut for four successive photos, so I gave up trying!), so I invited him via Facebook to come out for some homemade donuts. He became a fan of my sour cream old fashioned donuts at a football game when Collin was a junior at our Academy. I decided to do a random act of kindness and make fresh donuts to give out to the fans. I made a big batch of sour cream donuts with my vintage Popeil donut maker (read about it HERE) and had Collin take them out into the stands. Naturally he took some to his folks, prompting Ken to abandon the game at half time and come into the kitchen for more donuts! He's been a fan ever since.

So after supper I mixed up a batch of my Best Ever Crescent Roll Dough, which is a pretty close approximation to the dough for "Spudnuts." I don't know if you can find Spudnut donut shops around anymore, but they used to be a franchise all over Idaho and the Pacific Northwest---I seem to remember seeing one at Pike's Market in 2004. Anyway, the addition of mashed potatoes or potato flour to a rich sweet dough makes for some mighty fine donut dough. I wrote a blog about it last year, which you can find HERE along with a link to the recipe I used. I blogged about donuts the year before, about this same time. Why?

Because tomorrow is National Donut Day.    Get out the fryer.

2 Comments
<<Previous
Forward>>

    Author

    Fr. Dominic Garramone AKA 
    the Bread Monk

    Categories

    All
    Breadhead Bookshelf
    Breakfast Breads
    Buns Rolls And Biscuits
    Craftsy
    Donuts
    Equipment
    Ethnic Breads
    Events
    Gluten Free
    Herbal Breads
    Holidays
    Lake Thunderbird
    Memories Of Mama
    Multigrain Breads
    Pastries
    Pizza
    Places To Visit
    Quick Breads
    Reflections While The Bread Is Rising
    Savory Breads
    Sourdough
    Spirituality
    Stuff Besides Bread
    Sweet Breads
    The Classics
    Tools Of The Trade

    RSS Feed

    Archives

    June 2024
    December 2023
    September 2022
    April 2022
    March 2022
    February 2022
    January 2022
    October 2021
    May 2021
    April 2021
    March 2021
    February 2021
    August 2020
    July 2020
    May 2020
    February 2020
    October 2019
    June 2019
    September 2018
    July 2018
    May 2018
    April 2018
    March 2018
    February 2018
    January 2018
    December 2017
    November 2017
    August 2017
    July 2017
    June 2017
    May 2017
    April 2017
    March 2017
    February 2017
    January 2017
    December 2016
    November 2016
    October 2016
    September 2016
    August 2016
    June 2016
    May 2016
    April 2016
    February 2016
    December 2015
    November 2015
    October 2015
    September 2015
    August 2015
    July 2015
    June 2015
    May 2015
    April 2015
    March 2015
    December 2014
    November 2014
    October 2014
    September 2014
    August 2014
    July 2014
    June 2014
    May 2014
    April 2014
    March 2014
    February 2014
    January 2014
    December 2013
    November 2013
    October 2013
    September 2013
    August 2013
    July 2013
    June 2013
    May 2013
    April 2013
    February 2013
    January 2013
    December 2012
    November 2012
    October 2012
    September 2012
    August 2012
    July 2012
    June 2012
    May 2012
    April 2012
    March 2012
    February 2012
    January 2012
    December 2011
    November 2011
    October 2011
    September 2011

Web Hosting by FatCow