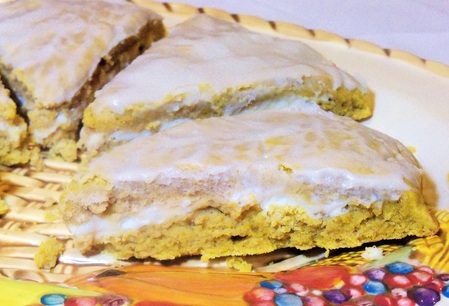
The Bread Monk
  • Home
  • My Bread Blog
  • Breadhead Videos
  • Recipes
  • Fr. Dom's Books
  • Events/Programs
  • Shortcut Stollen
  • New Page

My first ever gluten free recipe!

9/10/2012

4 Comments

 
Picture
Gluten-free pumpkin
scones with a sweet
cream cheese filling!  Not dairy free or vegan, but it's a start.  On my way to a decent gluten free pizza crust!

Gluten-Free Pumpkin Scones with Cream Cheese Filling
2 ½ cups all-purpose gluten-free baking mix (I used King Arthur’s).
1/3 cup light brown sugar
1 teaspoon ground cinnamon
½ tsp. pumpkin pie spice.
¼ tsp. nutmeg
1 ½ teaspoons baking powder
1/4 teaspoon salt
1 stick cold butter, cut into pieces
1 egg
1/2 cup milk
1/2 cup canned pureed pumpkin (NOT pie filling)
1 teaspoon pure vanilla extract
8 oz. cream cheese, softened
¾ cup powdered sugar, divided
2 Tbs. milk

Preheat oven to 400 degrees F.  Line a baking sheet with parchment paper and have one additional sheet of parchment available.  Mix the softened cream cheese with ½ cup of powdered sugar and beat until smooth.

In a large bowl, sift together the flour, sugar, spices, baking powder, and salt.  Cut the butter into small pieces and blend into the flour mixture with a pastry blender or two knives.  The mixture should look like coarse crumbs.  In a separate bowl, mix together the milk, egg, pumpkin puree and vanilla.  Add the milk mixture to the flour mixture and mix just until the dough comes together.  Knead dough gently four or five times while it is still in the bowl.

Remove half of the dough from the bowl and pat the dough into an 8-inch circle in the center of the baking sheet (it helps to butter your hands so the dough will not stick to you).  Spread three quarters of the sweetened cream cheese evenly over the circle of dough.  Spray the second piece of parchment lightly with cooking spray, and pat the second portion of dough into an 8-inch circle.  Carefully flip the second circle of dough on top of the first and peel off the parchment paper. 

Using a large rotary pizza cutter, cut dough into 8 wedges.  Bake at 400 degrees for 20 minutes, or until round is firm on the edges but still slightly soft in the middle.  Cool on a wire rack.  Beat the remaining cream cheese with ¼ cup of powdered sugar and the 2 tbs. of milk to make a glaze ( a couple drops of vanilla extract and a pinch of salt doesn't hurt, either!).  Spread glaze on the scones and cut apart before serving.

Makes 8 large scones.
4 Comments

Victorian Milk Bread

9/7/2012

0 Comments

 
About a case of whole milk expired on the 3rd, which means the lunch room can't sell it, but as many a mom on a  budget will tell you, it's still OK to drink for a few days after the date.  So I decided to make a big batch of Victorian Milk Bread.  I know that sounds like a really fancy title that would have some archaic recipe to go with it.  But in reality, if you take any basic white dough recipe, use milk instead of water and melted butter instead of oil, you've pretty well got it.  Eric Treuille and Ursula Ferrigno in their excellent book Ultimate Bread  show the bread made in a pan, but the dough is shaped into an S before it goes in the pan.  See a picture of someone else's S-shaped bread here.  Not sure what the big deal is---it doesn't seem to enhance the appearance that much.
Picture
Here's my version: just a classic large loaf.  These were baked in 9 x 5 inch pans, using 2 pounds of dough.

Picture
Here's the whole batch (almost--two loaves are already on the abbey breakfast table!)  The milk in the recipe makes for a more tender crumb and softer crust, and also aids in achieving the golden brown appearance.  I  used honey instead of sugar for the sweetener, about one and a half  tablespoons per loaf. The long loaf in front was baked in a stoneware pan.  The double loaves on the right were baked in the ganged pans pictured below.

Picture
These are heavy duty commercial pans ganged four across.  A whole loaf is a bit unwieldy, so that's why I bake two in each section, 20 ounces each.  If you bake larger batches these pans are really handy, but before you go shopping, measure the width of your oven first to make sure they'll fit!

0 Comments

Sourdough Waffle Failure

9/4/2012

0 Comments

 
I had to renew my sourdough starters yesterday (I have three different strains) so I did the usual routine
1) I stirred in the "hooch", the yellowish liquid that collects on top of the starter, then poured off about half of the starter into a stoneware bowl. 
2) I added 1 cup of filtered water and 3/4 cup unbleached all-purpose flour to each mason jar of starter and mixed well.
3) I let the wild yeast develop in the jars for about four hours, then added another 1/4 cup of flour to each.
4) I let the wild yeast develop another two hours, then added another 1/4 cup of flour and put the starter back into the fridge.

Normally I can stop after step 3, but these starters had been neglected for some time, so I really had to rejuvenate the saccharomyces exiguus colonies in the starter.  So, what to do with the starter I poured off?  Normally, I make sourdough waffles, and that's what I intended.  I added more filterd water and flour to the bowl and covered it with plastic wrap to let the yeast develop, then later on added some whole wheat flour.  But evidently the population of yeast cells was REALLY low, because although I got some bubbling, it was fairly lackluster.

For those who don't know, the fluffiness of sourdough waffles and pancakes comes from the acid produced by the yeast combining with the baking soda in the dry ingredients.  Without sufficient yeast production, I didn't get enough "sour" and therefore got a pretty sad waffle---limp, dense, and a bit eggy.  I should have had the patience to let my sponge develop overnight and gotten up early to make waffles in the morning, which sounds really good now but the "up early" part sounded pretty heinous to me yesterday evening.

You don't need sourdough to make really fluffly waffles.  As my Grandma Tootsie showed by her excellent example in my youth, what you really need are egg whites.  If you separate the eggs in the recipe and only beat the yolks in with the other liquid ingredients, then beat the egg whites to stiff peak stage and fold them gently into the batter, you get a batter that will produce light, crisp, slightly moist, irresistable waffles. 

There are few other tips for waffle making which I have found conveniently collected into a single page on Mr. Breakfast's website: click here for 10 Tips to make Perfect Waffles.  The best waffle recipe I've ever made is in the Better Homes and Gardens Cookbook, the one with a plaid cover, but which also appears here on the Serious Eats website.
0 Comments

    Author

    Fr. Dominic Garramone AKA 
    the Bread Monk

    Categories

    All
    Breadhead Bookshelf
    Breakfast Breads
    Buns Rolls And Biscuits
    Craftsy
    Donuts
    Equipment
    Ethnic Breads
    Events
    Gluten Free
    Herbal Breads
    Holidays
    Lake Thunderbird
    Memories Of Mama
    Multigrain Breads
    Pastries
    Pizza
    Places To Visit
    Quick Breads
    Reflections While The Bread Is Rising
    Savory Breads
    Sourdough
    Spirituality
    Stuff Besides Bread
    Sweet Breads
    The Classics
    Tools Of The Trade

    RSS Feed

    Archives

    June 2024
    December 2023
    September 2022
    April 2022
    March 2022
    February 2022
    January 2022
    October 2021
    May 2021
    April 2021
    March 2021
    February 2021
    August 2020
    July 2020
    May 2020
    February 2020
    October 2019
    June 2019
    September 2018
    July 2018
    May 2018
    April 2018
    March 2018
    February 2018
    January 2018
    December 2017
    November 2017
    August 2017
    July 2017
    June 2017
    May 2017
    April 2017
    March 2017
    February 2017
    January 2017
    December 2016
    November 2016
    October 2016
    September 2016
    August 2016
    June 2016
    May 2016
    April 2016
    February 2016
    December 2015
    November 2015
    October 2015
    September 2015
    August 2015
    July 2015
    June 2015
    May 2015
    April 2015
    March 2015
    December 2014
    November 2014
    October 2014
    September 2014
    August 2014
    July 2014
    June 2014
    May 2014
    April 2014
    March 2014
    February 2014
    January 2014
    December 2013
    November 2013
    October 2013
    September 2013
    August 2013
    July 2013
    June 2013
    May 2013
    April 2013
    February 2013
    January 2013
    December 2012
    November 2012
    October 2012
    September 2012
    August 2012
    July 2012
    June 2012
    May 2012
    April 2012
    March 2012
    February 2012
    January 2012
    December 2011
    November 2011
    October 2011
    September 2011

Web Hosting by FatCow