The Bread Monk
  • Home
  • My Bread Blog
  • Breadhead Videos
  • Recipes
  • Fr. Dom's Books
  • Events/Programs
  • Shortcut Stollen
  • New Page

Dinner Rolls and how to roll them

8/31/2013

1 Comment

 
Picture
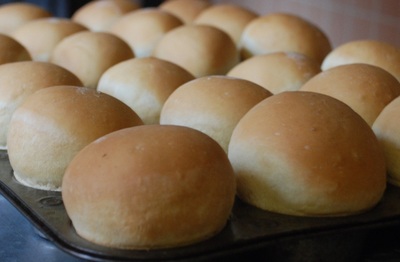
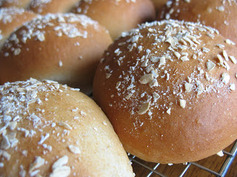
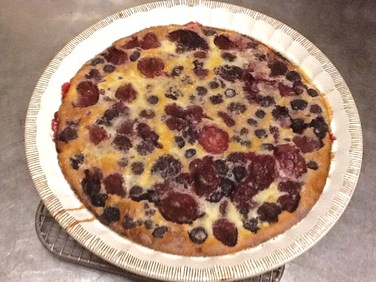
Straight out of the oven. If these were any fresher, they would still be dough.
Do you ever wonder how bakeries get those perfectly round, uniformly sized buns and dinner rolls?  When I was in college at Illinois Wesleyan University I worked in the kitchen and found out that when making rolls many institutional or commercial bakeries use a "rounder."  It's a machine with two horizontal disks--each with twelve round "divots"--that rotate in opposite directions.  The pre-measured dough is placed between the two disks, the machine is switched on, and you get a dozen perfectly round, uniformly sized balls of dough.  There are machines that cut 24 pounds of dough into 1 pound pieces in seconds, no weighing needed, and machines that shape those pieces of dough into round or oval loaves, or baguettes, or flatten them into pizza rounds.

Cheaters.

I shouldn't say that, I suppose.  The profit margin at bakeries is fairly narrow, and given how expensive those machines are, it takes a lot of dough to pay for them, as it were.  There's no way you can do the kind of volume many bakeries must produce without some kind of mechanical assistance.  And there are plenty of smaller bakeries around that still do a great deal of hand shaping.   You have to respect anybody who gets up as early as bakers do, and works in a kitchen with five or six ovens and no AC in the Midwest summers. 

I guess the real problem I have is that we often tend to compare our baking against such mechanized perfection.  I hear a lot of people complain that their rolls taste good but they never come out the same size.  "Good!" I tell them; "Your family will know they were made by a human being---that your hands, your loving heart made those rolls."  Let's not be so hard on ourselves, people; it's not like your baking for the county fair every week.

Picture
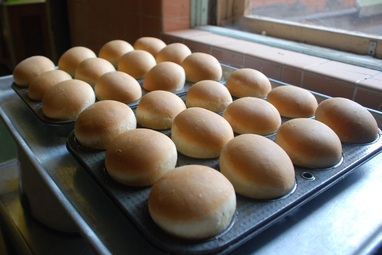
Dinner rolls cooling by the window of the abbey kitchen.
Take a good look at the rolls I just made this afternoon for monk supper.  (We're having beef tips in gravy over buttered noodles, and I like to have something to sop up the gravy!)  A close look will see that they are not all exactly the same size.  Given that 98 pound Fr. Claude will want a smaller roll and our big auto mechanic Fr. Ambrose will want something a bit more substantial, that's going to work out just fine.   They're not going to stay side by side in the basket for comparison very long anyway.  The important thing is that they know I made them to show my love for the community.

I will admit, when I have made rolls for a cookbook or magazine photo shoot, I have actually used a scale and weighed the dough: 2 1/2 ounces for a medium sized roll, 3 ounces for a large bun.  But I think it's more important that rolls have a uniformly smooth surface than be all the same size. There's a bit of a trick to that, but fortunately for you, dear Breadheads, I have a video.

This technique works with any rolls dough recipe, but click HERE for one that's monk-tested.  I'd love to see photos of your successes (or stories of your failures, so I can help you improve!) so e-mail me at [email protected].

God bless and happy baking!
1 Comment

Experimenting with Donuts

8/29/2013

0 Comments

 
Picture
I have a great recipe for batter donuts, but I'm still playing around with a yeasted donut recipe.  The best homemade donuts I've ever made came from brioche dough, but I'm much too lazy to go through all that extra work with the butter just to get a breakfast quick bread.  This picture represents a further attempt, adapting a recipe for  "Spudnuts", a dough recipe using mashed potatoes to help develop a soft texture and tender crumb.  I'm still not satisfied---I think the starch in the potatoes may be making the crust a little chewy.  I can report, however, that when a group of seniors over in the school gym heard about this operation, a dozen or so donuts disappeared rapidly!  More updates as the experimentation continues.

0 Comments

Apple Butter Time!

8/24/2013

2 Comments

 
Picture
Using different varieties of apples makes for a more flavorful apple butter.
We get bushels of apples from the abbey orchard, many of them too small to eat out of hand and a few with bruises or bird marks.  Applesauce is always a possibility, but lately I've been making big batches of apple butter.  I know 8 to 10 pounds of apples seem like a lot, but once it's all cooked down, you end up with about 6 pints.  That leaves you with enough apple butter to get through the winter and maybe a half-pint or two to share.  Of course with my large monastic family, 6 pints won't last past Thanksgiving---we've been through 4 quarts already!  So here's my monk-tested, large-batch recipe.

8 to 10 lbs of apples, washed
1½  to 2 cups apple cider vinegar
3 cups water
4 cups of granulated sugar
4 teaspoons cinnamon
1 teaspoon allspice
¼ tsp. cloves (optional)
½ tsp salt

Picture
This is a 12-quart stockpot but a 10-quart is plenty large.


Cut the apples into quarters--no need to core or peel them, but remove any parts that are bruised or damaged by birds or insects.  If you use a mix of different apples you'll get better flavor, but I've made plenty of apple butter with only one or two varieties of apple and it turned out just fine.  It's homemade---of course it will be good!

Picture
Red peels will give the apple butter a lovely color.


Put apples into a 10 quart stock pot with a thick bottom.  Add 1½ cups of vinegar and all the water; cover, and cook at medium heat until apples are soft, about 30 minutes. Periodically stir the mixture so the apples on the top end up at the bottom.  Remove from heat and allow to cool for about 10 minutes.


Picture
A old-fashioned chinois and pestle will work, too.
Ladle the apple mixture into a food mill and process in small batches.  Throw out seeds and peels as you process each batch.  Return apple purée to pot.  Add 3 cups sugar and stir until it is completely dissolved.  You can use brown sugar but the amounts may have to be adjusted, so don't add too much at a time.  Add salt, cinnamon, and allspice and whisk until smooth.  Taste the purée; adjust vinegar, sugar and/or spices to taste, remembering that as the purée thickens the flavors become more intense.   If the flavor seems blah, try a little more apple cider vinegar before you add more sugar or spices, especially if your apples were overripe.


Return pot to stove top and cook, uncovered, over medium low heat, stirring constantly so the purée doesn't scorch.  It helps to scrape the bottom of the pot while you stir--a flat wooden spatula with a long handle is the best tool for this purpose.  Cook until the purée is thick and smooth.

Picture
To test for thickness, place a small dollop of the apple butter in the middle of a chilled white plate and let it sit for 10 minutes.  If a ring of liquid forms around the dollop of apple butter, it needs to be cooked longer.  If it isn't runny with a clear liquid, it's been cooked long enough.  Cool pot of apple butter quickly in an ice bath to room temperature and spoon into freezer safe containers.  You may also process while hot, using traditional canning methods.

2 Comments

Baking Blogs for you to try

8/23/2013

0 Comments

 
Attending the Food Media Forum earlier this month made me want to explore other baking blogs.  I discovered that there seems to be a lot less yeast baking on the web compared to the number of quick bread and dessert recipes.  But here are some of the blogs I've discovered and have been enjoying.
Picture

The Messy Baker  has great recipes and photos, and includes my latest salty-and-sweet treat, Chocolate Chip Cookie Cups with a Pretzel Crust.  Drove to Walmart after a Knights of Columbus meeting just to get the pretzels for this recipe: click HERE to try it yourself.

Picture
Big Bear's Wife   Food, crafts, and occasional reflections on married life, Her writing style is informal, like reading a neighbor’s kitchen notes rather than a formal blog---and I mean that in a good way.  Click HERE for a non-cooking post I particularly enjoyed.And she has an entire Pinterest Board dedicated to the Minions from Despicable Me!  Click HERE to see it.

Picture
The Brown Eyed Baker  REALLY heavy on the sweets and not many yeast bread recipes at all, but this blog is a dessert paradise  She's been blogging for several years and posts often, so there's a great backlog of recipes to explore, most of them with beautiful photos.  Click HERE to see her bread recipes.

Picture
Roxanne's Home Baking   This blog has plenty of yeast bread recipes in a variety of categories---a little heavy on sweet compared to the savory (I'm sensing a trend here!) but she has more bread variety than the other blogs on this page.  Click HERE to go directly to her yeast breads index.

Picture
Frieda Loves Bread   Frieda makes beautiful small breads like pretzels, bagels, rolls and muffins, in addition to some larger yeast breads.  Scroll through the bread gallery when you want inspiration on what to bake next.  Click HERE and see for yourself.

Stay tuned for more blog suggestions in the future.  Next post: a photo tutorial with recipes for Apple Butter.
0 Comments

The Hero Bowl

8/21/2013

2 Comments

 
I attended a blog writing workshop at the Food Media Forum.  The presenter (a high school English teacher) gave us a homework assignment: write a descriptive essay about a food or a favorite utensil.  Here's mine, and like so many nostalgic reflections, it's accompanied by a grainy photo.)


The Hero Bowl

In some food television production circles,  a "hero" is the best-looking version of a particular dish, the one you would want to put on camera or use in a cookbook.  When we were shooting Breaking Bread With Father Dominic, this term was expanded to include the bowl in which a particular dough would be featured on camera.  I had collected a lot of attractive stoneware bowls, both new and vintage, to use on the set, but only one was exclusively referred to as "The Hero Bowl."

This stoneware marvel was a Christmas gift from my brother Marty years before I had a TV show, and had been made by Jerry McNeil, a talented professional potter who was a family friend.  The rest my family got them, too, in various shades of blue, but mine was the only one that was glazed a deep rust brown--the exact color I would have chosen for myself.  Jerry had made the glaze himself with clay he dug up from Kickapoo Creek near Peoria.  I fell in love with the bowl immediately, or least felt a sudden, deep affection--"love " is a strong word for a monk who is not supposed to become attached to material things.

This was a roomy bowl with both height and heft, essential elements for a bread baker and occasional chef:  I need to keep batter in the bowl no matter how vigorously I mix and be able to toss a pasta salad without rotini going rogue.   This beauty held over six quarts and was heavy enough to remain stable on the counter while whisking egg whites or mixing a sturdy multi-grain dough.

The Hero Bowl had an unusually graceful shape: an wide inverted bell with a slight flare, perfectly proportioned.   The surface appeared smooth at first, but upon closer inspection revealed the tiny ridges left by the clever and loving hands of its maker.  This was a vessel that had not merely been formed but caressed into shape.  It was decorated on the interior with a bone white band of glaze just below the lip of the bowl, which made it a joy to shoot from above with the jig camera.  The exterior sported a series of dark brown stripes ending with the lip itself glazed the same color: a simple accent marked by elegant restraint--anything more elaborate would have appeared gaudy, even vulgar. 


When I got my TV show on public television, I used the Hero Bowl for two seasons, transporting it from abbey to studio in a cocoon of bubble wrap and old t-shirts nestled in a dark green plastic tub.  But layers of cushioning did not protect it from the dangers of a backstage kitchen staffed by teenage interns.  One afternoon I came back to the prep room from a hiatus in Edit Suite B (best napping couch in the building) to a contrite adolescent who manfully admitted, without prevarication, that the bowl had slipped from his soapy hands in the metal dish washing sink and shattered.

I had the presence of mind to ask Josh first if he had hurt himself, even while another part of my mind was cycling through the stages of grief.  He apologized repeatedly, wishing he had been more careful, offering to pay for another bowl, talking in frantic circles.  I knew I had to lay to rest his real fear: that along with the Hero Bowl he had broken my trust and our friendship.  "Josh, it died in the line of duty," I said with a rueful smile, "not knocked off a shelf while you were dusting it.  That's something, isn't it?"

Jerry made me other bowls in various shapes and sizes, but even he admitted they weren't as soulful as the Hero Bowl, and he could never reproduce that exact shade of glaze again.  For a long time I still had the broken pieces stored in a box stored in the abbey basement. Once I came across it when I was searching for some dishes for a photo shoot.  Turning the jagged pieces over in my hands, I realized for the first time that without it breaking I would have never known how beautiful the contrast was between the rich brown of the glaze and the ivory of the stoneware.  I thought about making the pieces into a wind chime or breaking them up even smaller and incorporating them into a mosaic or a garden tile, but eventually I threw the box of pieces away.  It's the memory that matters now anyway.

Picture
2 Comments

What the heck is a "Clafoutis"?

8/5/2013

2 Comments

 
I read a lot of cookbooks, watch a lot of food TV and surf the Internet for recipes all the time.  Every once in awhile I find a reference to a dish that I have never heard of before, let alone prepared it.  This used to happen regularly when I first started watching  Chopped and Top Chef, but after a few dozen episodes you get used to terms like seviche, fattoush and sabayon.  But I was caught off guard when Br. Nathaniel asked me if I'd ever made a clafoutis.  

I thought he was joking---the word sounds like a Dr. Seuss musical instrument, or some kind of STD.  I said I'd never even heard of clafoutis before.  "Really?" he replied, in a tone that made me feel as though I had just admitted I had never seen a radish---or maybe that was just my own sensitivity.  At any rate, since my iPad was close at hand, I did a quick search and soon entered the world of French custard fruit tarts.

The word "clafoutis" (usually spelled without the final "s" in English) comes from a French dialect word clafir, meaning "to fill up."  I suspect that comes from the ridiculously easy method of preparation: you line a baking dish with fresh fruit, fill the dish with a eggy batter, and put it in a hot oven.  As with most ethnic dishes, there are endless variations on the proportion of flour to liquid, the number of eggs involved, and just how much sugar is required.  It's traditionally made with cherries (with the pits left in, no less!) but I have a suspicion I'll be experimenting with all sorts of fruit before this culinary excursion is over.

(I freely admit that a clafoutis is not by any stretch of imagination to be considered "bread" so strict Breadheads should feel free to tune out for awhile.  Maybe you could check out my Pinterest boards.)
Picture
Here's my first attempt, which I made in a 10" cast iron skillet.  The recipe called for a 9" skillet, but the amount of batter the recipe yielded would have never fit in that size pan.  The instructions said to heat the oven to 425 degrees, but the edges seemed to be browning too quickly, so I dialed it back to 375 degrees.  I don't think the custard was sweet enough, and I didn't like having to use a blender as per the instructions (one more thing to wash) so I think I want to do some tweaking.

Picture
Here's a second version, one that had a higher "fruit to batter" ratio and baked nicely in a 12" ceramic pie plate, although one could increased the volume of the batter slightly.  Both of these clafoutis were made with mixed berries which we had leftover from supper.  Blueberries, raspberries and even peaches could also be used.

Picture
Clafoutis can be served warm or cold (there are ardent proponents of both), usually dusted with confectioner's sugar.  If served warm, it is often accompanied by whipped cream, crème fraîche, ice cream or even plain yogurt.

So why no recipe?  I'm still not entirely satisfied with the results, and with only two attempts I can hardly be considered a trustworthy instructor.   Based on the fact that after monk breakfast the lone piece pictured above remained, I suspect my confreres will be happy to serve as test tasters.
2 Comments

    Author

    Fr. Dominic Garramone AKA 
    the Bread Monk

    Categories

    All
    Breadhead Bookshelf
    Breakfast Breads
    Buns Rolls And Biscuits
    Craftsy
    Donuts
    Equipment
    Ethnic Breads
    Events
    Gluten Free
    Herbal Breads
    Holidays
    Lake Thunderbird
    Memories Of Mama
    Multigrain Breads
    Pastries
    Pizza
    Places To Visit
    Quick Breads
    Reflections While The Bread Is Rising
    Savory Breads
    Sourdough
    Spirituality
    Stuff Besides Bread
    Sweet Breads
    The Classics
    Tools Of The Trade

    RSS Feed

    Archives

    June 2024
    December 2023
    September 2022
    April 2022
    March 2022
    February 2022
    January 2022
    October 2021
    May 2021
    April 2021
    March 2021
    February 2021
    August 2020
    July 2020
    May 2020
    February 2020
    October 2019
    June 2019
    September 2018
    July 2018
    May 2018
    April 2018
    March 2018
    February 2018
    January 2018
    December 2017
    November 2017
    August 2017
    July 2017
    June 2017
    May 2017
    April 2017
    March 2017
    February 2017
    January 2017
    December 2016
    November 2016
    October 2016
    September 2016
    August 2016
    June 2016
    May 2016
    April 2016
    February 2016
    December 2015
    November 2015
    October 2015
    September 2015
    August 2015
    July 2015
    June 2015
    May 2015
    April 2015
    March 2015
    December 2014
    November 2014
    October 2014
    September 2014
    August 2014
    July 2014
    June 2014
    May 2014
    April 2014
    March 2014
    February 2014
    January 2014
    December 2013
    November 2013
    October 2013
    September 2013
    August 2013
    July 2013
    June 2013
    May 2013
    April 2013
    February 2013
    January 2013
    December 2012
    November 2012
    October 2012
    September 2012
    August 2012
    July 2012
    June 2012
    May 2012
    April 2012
    March 2012
    February 2012
    January 2012
    December 2011
    November 2011
    October 2011
    September 2011

Web Hosting by FatCow