The Bread Monk
  • Home
  • My Bread Blog
  • Breadhead Videos
  • Recipes
  • Fr. Dom's Books
  • Events/Programs
  • Shortcut Stollen
  • New Page

Grandma Gome's Shortcut Kringle

4/30/2013

0 Comments

 
Picture
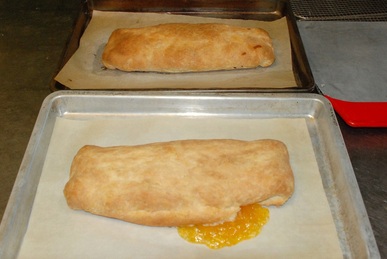
A little too much filling in the one up front---read the end of the recipe for advice.
When my sister Angela was little, she was unable to  pronounce our family name “Garramone,” so my father’s mother became "Grandma Gome" (pronounced GO-me).   Grandma was an excellent baker, and this Danish Kringle was one of her favorite recipes.  It’s quite different from the kringle made with yeasted pastry dough.  It’s both simpler and more difficult: only a few ingredients, but a lot of technique.  Rolling out and shaping such a rich dough can be a bit intimidating, but it’s well worth the effort. 

I hadn't made this recipe in years, so I pulled it out this week and made a couple of breakfast pastries.  I always keep a variety of Solo cake and pastry fillings in the pantry, so I decided on apricot and cherry.  The dough was easier to roll out than I remembered, but I have had more experience with pastry dough since the last time I made this recipe, which seems to have paid off. 

I enjoyed thinking of my grandma rolling out this dough to make a sweet treat for her three sons.  That is one of the distinct pleasures of baking from family recipes: the sense of heritage, of being connected to someone you love over time and space, that even death hasn't separated you entirely from your kitchen mentors.  Grandma Gome was also famous for her cinnamon rolls, but the recipe she handed down (and I have the one written by her own hand) has vague expressions like "enough" flour or "bake until done" so I'm going to have to do a little retro-engineering.  I'll be sure to report on that soon, but for now, make a couple of pastries, on for your family and one to share. 

Grandma Gome’s Shortcut Kringle
2 cups flour
2 sticks butter
1 cup sour cream
1 15-oz. can apple pie filling (or any flavor you like).

In a medium size bowl, cut butter into flour using a pastry blender or two knives.  Butter should be in pieces about the size of peas (slightly larger pieces than for a pie crust).  Mix in sour cream until well blended, and knead once or twice, just long enough to collect stray pieces into a ball.  Wrap dough in plastic or waxed paper, and chill for at least two hours.  Divide dough into two pieces.  On a well-floured board or pastry cloth, roll a piece into a 12” x 14” rectangle.  Spread half of the apple pie filling down the center third of the dough, leaving a 2” border at top and bottom.  Fold over sides to center and pinch to seal.  Fold top and bottom borders in and pinch to seal.  Carefully lift kringle and place it, seam side down, onto an ungreased 9” x 13” jelly roll pan.  Repeat with second portion of dough, using a second pan.  Bake in a preheated 400° F. oven for 10 minutes, then reduce heat to 350° and bake for another 35 minutes or until brown.  Remove from oven and let the pastry settle for about 10 minutes before transferring to a wire rack to cool slightly.  Best when served warm, drizzled lightly with powdered sugar icing, but these also will keep for a day or two and bear re-heating.

NOTE:  I used the 12 oz. cans of Solo Cake and Pastry Filling, but I really needed only 8 0z. worth.  I didn't know what to do with just 4 oz. of filling, so I used it all.  In hindsight, I should have just spread it on toast the next morning!  The apricot pastry in the foreground of the photo split during baking and spilled some of its filling.  For the raspberry pastry in the back, I rolled the dough as directed, spread half the can of filling just slightly to the left of the center of the dough, flipped the left hand section of dough on top of that filling, spread the rest on top and flipped the right side of the dough.  This "double decker" pastry worked out much better and tasted wonderful. 

0 Comments

Soup and Farinata

4/13/2013

1 Comment

 
I have a pizza party on Sunday, and I want to make something different for the appetizer course.  In previous years I've done marinated olives, antipasti trays, Italian wedding soup and minstrone.  This time I wanted a lighter soup more suitable for spring:  chicken broth  with a little vegeatble stock, ribbons of egg with Parmesan cheese, orechiette pasta and chopped green onion  for garnish---egg drop soup, southern Italian style!

But what to serve on the side?  Grissini?  Too bland.  Bruschetta?  Old hat!  Plain or garlic crostini?  Ho-hum!  Then as I was browsing on the Splendid Table website, I came across a reference to a flatbread made in Genoa called "farinata," made with chickpea flour.  I liked the idea of something similar in shape to pizza, but with a different flavor and texture, so I started researching.  As with many ethnic breads, there are hundreds of variations on farinata.  It can be plain or flavored with onions, herbs, olives, and the like.  It can be thin as a crepe or thick as a slice of bread, soft as a pancake or crisp as a cracker, cut into strips, squares or wedges, baked on a pizza pan or in a cast iron skillet.    

There was no chickpea flour at my local supermarkets, so I bought a one pound bag of dried chickpeas and sent them through a tabletop mill and then sifted out the larger pieces to get a fine flour, about 2 1/2 cups.  I mixed a cup of flour with 1 - 3/4 cups of water and left it overnight to thicken.  Thius morning  I put the pizza stone in the oven and turned the heat up to 500 degrees.  After about 30 minutes, I put a 10-inch cast iron frying pan on the stone.  In the meantime, I added a teaspoon each of salt and rubbed sage to my batter.  Once the pan was thoroughly heated, and pulled it out of the oven and poured in about 2 tablespoons of olive oil and swirled it around then pan, then tossed in about a quarter cup of minced red onion.  After it sizzled for about a minute, I gently added a cup of batter to the pan and put it back in the oven for 10  minutes.  The directions in most recipes for farinata tell you to put it under the broiler for 2 minutes, but I don't have a broiler.  So I browned the top by flipping the flatbread over in the pan and putting it back in the oven for another 2 minutes. 
Picture
The result, as you can see, was a golden brown flatbread, tender in the middle and crisp on the edges, fragrant with sage and onion and begging to be dunked in chicken broth.  I also made another one with the oven's convection blower on.  It got burnt on the edges, but the crispy texture of the middle more than made up for that.  You can bet I'll be experimenting with this new bread a LOT in the weeks to come, especially as the garlic chives, sage and oregano start sprouting. 

1 Comment

Mmmmm . . . biscotti!

4/11/2013

0 Comments

 
Picture
Some friends of mine recently gave me a few pounds of dutch process cocoa powder.  In case you don't know, this type of chocolate has been treated with an alkali to neutralize its natural acidity. Because it is neutral and does not react with baking soda, it must be used in recipes calling for baking powder.  So I decided to make some biscotti.

The word "biscotti" comes from the Italian for "twice baked," and they were originally developed as a bread or cookie that would keep for a long time, as one might need for a journey or a time of war.  They are very hard and crunchy and are traditionally dunked in vin santo (an Italian sweet wine) or coffee.  The earliest recipes for them had no fat/oil or sugar in them, and many of these early biscotti were savory rather than sweet.  At first pistachios or pine nuts were used, and later almonds, with anise being one of the most popular flavorings for sweet biscotti.  I've made them with all sorts of ingredients, from white chocolate chips to dried cranberries to fresh mint.  Once you get the simple technique, you'll be drawn to experiment! 

The method for making biscotti is not difficult, but it does take some time because of the two baking periods.  You can make them without nuts if you prefer.  Here's what I did for the ones pictured above.

Double Chocolate Walnut Biscotti
1/3 cup butter, softened
2/3 cup granulated sugar
2 eggs
1 tsp. vanilla extract
1 3/4 cups all-purpose flour
1/3 cup unsweetened cocoa powder
2 teaspoons baking powder
¼ tsp. salt
1/2 cup miniature semisweet chocolate chips
2/3 cup chopped walnuts

Preheat oven to 375 degrees F.  Line a 9” x 13” baking sheet with parchment paper.  In a medium size bowl, cream together the butter and sugar until light and fluffy (a stand mixer is even better!). Beat in the eggs one at a time, then add the vanilla and mix. In a separate bowl, whisk together the flour, cocoa, baking powder and salt; stir into the sugar mixture until well blended. Mix in the chocolate chips and walnuts---I find it easiest to do this last step by hand with a sturdy spoon.

Divide dough into two equal parts. Shape each part into a 9 x 2 x 1” inch loaf.  Place them onto baking sheet, evenly spaced.   Bake for 20 minutes in the preheated oven, or until slightly firm to the touch. Cool on the baking sheet for 30 minutes.  Discard used parchment and line pan with fresh.

Using a wavy knife, slice the loaves diagonally into 1” slices. Place the slices on their sides on the baking sheet. Bake for 10 to 12 minutes on each side, or until dry ands crisp.  Cool completely before storing in an airtight container.

Optional:  Melt a couple of squares of almond bark and drizzle on biscotti in a wavy pattern, as pictured. 


0 Comments

Not baking

4/8/2013

1 Comment

 
I'm not sure if my readers have noticed, but I've been keenly aware of how long it's been since I posted anything on the Bread Blog.  I could claim that there were all sorts of other things that got in my way---the spring musical, my teaching schedule, Lent, community meetings, Holy Week, weekend missions, our Fr. Joseph's funeral, yadda, yadda, yadda.  And I certainly didn't do as much baking during the past two months as usual.  But in point of fact, it has been a conscious choice to scale back. 

Yes, dear Breadheads, I have been trying to be sensible.

I'm sure that those of you who know me well are shocked, shocked at this unexpected revelation.  After all, I am notorious in the monastic community for staying up unreasonably late after a meeting to produce two dozen loaves of multigrain bread for a bake sale, or testing three new recipes simultaneously, or making homemade cream puffs for the stage crew during production week.  But when I baked hot cross buns for Ash Wednesday, I made an extra batch to put in the freezer until Good Friday---entirely too sensible.  I'd have a day off from rehearsals or set building and use the time to grade papers, do laundry and nap---clear signs of the coming Apocalypse.  Easter came and went and I baked absolutely nothing---no pastries, no Austrian povitica, not a single dinner roll.  And I don't feel the least bit guilty.

The fact, the spring musical took a pretty big physical toll on my body, with far too many late night tech sessions going up and down ladders, followed by mornings hobbling like a 90 years old arthritic to the shower.  I soon came to the realization that something had to give, and since I can't quit teaching and don't want to skip prayer, much of my kitchen time had to go.  I made a big batch of white bread for the freezer sometime in early March, and played around with caramel recipes, but otherwise most of my connection with baking came from casually reading bread recipes without any intention of actually making them.

I know this hiatus is just about over.  I've got a pizza party this weekend, and a talk to give next Friday, and it won't be long before there are fresh chives and sage to inspire me.  But it's been a good exercise in restraint, and a reminder that we all need to give ourselves permission to take a break now and then.

As I mentioned, however, I have been experiementing with homemade caramels, much to the delight of my students/test-tasters.   The best recipe I've found is HERE, but be sure you have a large sauce pan with a heavy bottom so you don't scorch anything.  Wonderful as they are, but also a fine recipe with which to make turtles or chocolate covered caramel-peanut clusters!
1 Comment

    Author

    Fr. Dominic Garramone AKA 
    the Bread Monk

    Categories

    All
    Breadhead Bookshelf
    Breakfast Breads
    Buns Rolls And Biscuits
    Craftsy
    Donuts
    Equipment
    Ethnic Breads
    Events
    Gluten Free
    Herbal Breads
    Holidays
    Lake Thunderbird
    Memories Of Mama
    Multigrain Breads
    Pastries
    Pizza
    Places To Visit
    Quick Breads
    Reflections While The Bread Is Rising
    Savory Breads
    Sourdough
    Spirituality
    Stuff Besides Bread
    Sweet Breads
    The Classics
    Tools Of The Trade

    RSS Feed

    Archives

    June 2024
    December 2023
    September 2022
    April 2022
    March 2022
    February 2022
    January 2022
    October 2021
    May 2021
    April 2021
    March 2021
    February 2021
    August 2020
    July 2020
    May 2020
    February 2020
    October 2019
    June 2019
    September 2018
    July 2018
    May 2018
    April 2018
    March 2018
    February 2018
    January 2018
    December 2017
    November 2017
    August 2017
    July 2017
    June 2017
    May 2017
    April 2017
    March 2017
    February 2017
    January 2017
    December 2016
    November 2016
    October 2016
    September 2016
    August 2016
    June 2016
    May 2016
    April 2016
    February 2016
    December 2015
    November 2015
    October 2015
    September 2015
    August 2015
    July 2015
    June 2015
    May 2015
    April 2015
    March 2015
    December 2014
    November 2014
    October 2014
    September 2014
    August 2014
    July 2014
    June 2014
    May 2014
    April 2014
    March 2014
    February 2014
    January 2014
    December 2013
    November 2013
    October 2013
    September 2013
    August 2013
    July 2013
    June 2013
    May 2013
    April 2013
    February 2013
    January 2013
    December 2012
    November 2012
    October 2012
    September 2012
    August 2012
    July 2012
    June 2012
    May 2012
    April 2012
    March 2012
    February 2012
    January 2012
    December 2011
    November 2011
    October 2011
    September 2011

Web Hosting by FatCow