The Bread Monk
  • Home
  • My Bread Blog
  • Breadhead Videos
  • Recipes
  • Fr. Dom's Books
  • Events/Programs
  • Shortcut Stollen
  • New Page

Upcycling

7/27/2017

17 Comments

 
Picture
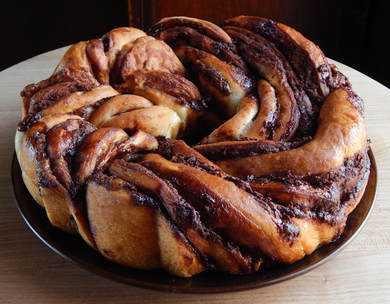
Babka with a caramel and chocolate ganache filling.
Recently I posted a picture on my Facebook page of a chocolate babka I made using leftovers. We had mashed potatoes for supper, and about 3 cups remained, which is enough for a triple batch of Best Ever Crescent Roll Dough, which I find makes outstanding dinner rolls and coffeecakes. As I mixed the dough up I remembered that we also had some candy that was beginning to go a bit stale and was best used for baking. So I chopped up some walnut penuche and small pieces of dark chocolate and put them in a sauce pan. In another saucepan I heated up some half and half, then poured it over the candy and stirred it over very low heat until it was smooth. The result was a rich chocolate caramel ganache that made the perfect filling for babka. I had enough for two babka, one of which was devoured by the brethren at breakfast. The other I took as a treat for the staff at the doctor's office where I go for my diabetes---the irony was not lost on me or the secretaries!

     When I shared the picture on Facebook, one Breadhead posted the comment "Another creation from 'Father Waste Not Want Not'! accompanied by a smiley emoticon. Seems that my love for using up what's in the pantry has been noticed by my fans! The abbot has commented on this tendency once or twice as well, with paternal approval for my monastic frugality, which I actually inherited from my Depression era grandmother. I hate to see anything go to waste, especially food, and I'm more likely to be inspired by what's in the fridge than what I see on Pinterest. Leftover corn goes into cornbread, an abundance of spinach from the garden means spinach pesto for pizza, stale bread is transformed into croutons or crostini.
Picture
     The same compulsion fuels my love for thrift stores and flea markets. You may have already seen Bread Blogs about the bread quilts I make out of vintage dresser scarves and embroidered linens, or how I accessorized my monastery room with reclaimed oak and old rolling pins. I even made my trash receptacle out of an oak desk that had been water damaged. I'm grateful that in addition to learning how to bake from my mother, I was taught woodworking by my father, who was an amateur (but talented) carpenter. In my shop there is a lot of lumber rescued from pews, kneelers, desktops and bleachers, waiting to be transformed into a treasured piece of furniture or funky accessory.

Picture
     That's why there is a large plastic tub in my shop filled with vintage rolling pins in need of restoration. I'm pretty particular about which ones I buy. They have to be less than $10, without plastic or ball bearings (preferably made entirely of wood) and in need of TLC. I or one of stage crew will strip off the old grime and stains with coarse sand paper, refinish the barrel with a finer grit, and repaint the handles as necessary. Then they get treated with Boos Block Mystery Oil to restore the wood. I've done a few this week, now that the weather isn't so beastly. My shop is attached on the stage in the (un-airconditioned) gymnasium, and it gets plenty hot and humid back there---last summer it got so hot in the stage right stairwell that the heat sensor went off and summoned the fire department! 

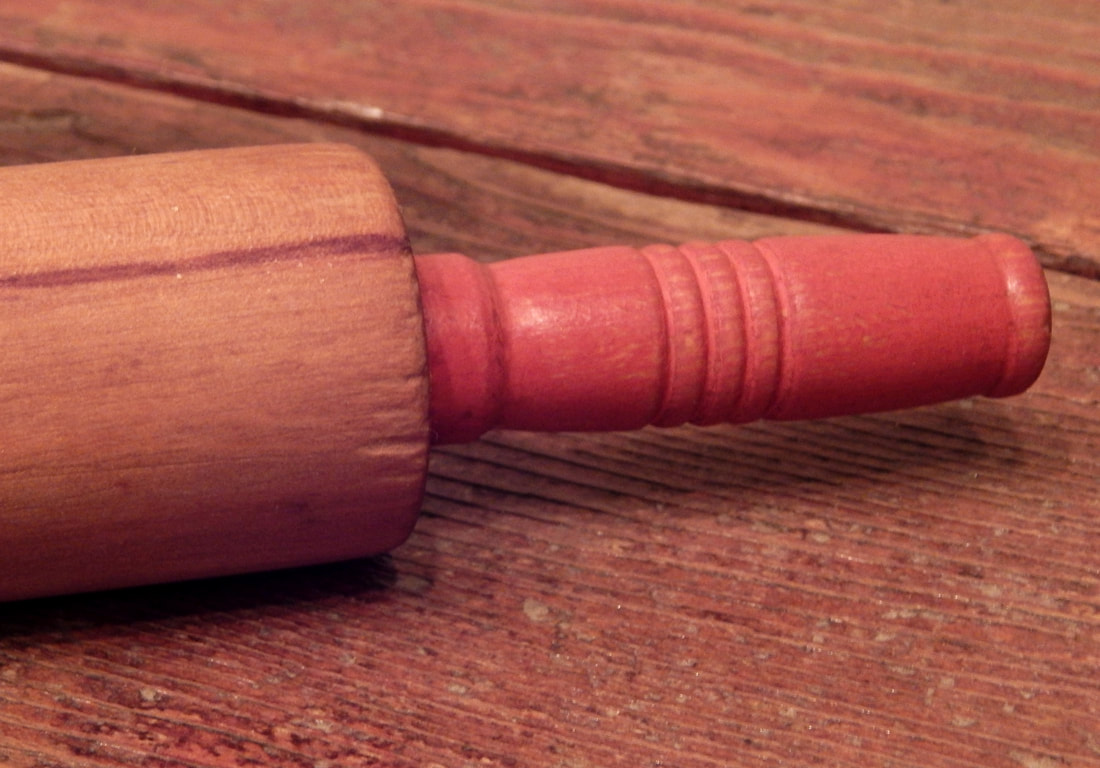
     My most recent restoration was a small rolling pin, only 9" across with a narrow barrel and red handles---because it's in the foreground of the photo, it looks larger than it is. It has a long stain down the length of it and some chips along the edges of the barrel, all of which are too deep to sand out. If you look carefully, you can see that it has a metal rod and one of the handles is slightly bent. But it still works just fine, and in spite of its faults I can't bring myself to throw it out. I keep thinking of a line in the poem "To Be of Use" by Marge Piercy: "The pitcher cries for water to carry." In the same way, the rolling pin, bent handle and all, longs for the grip of the baker and a slab of dough to work over.  But, I already own a number of rolling pins of various sizes and purposes. What to do?
Picture
     The obvious answer is to give it away, but I am reluctant to use it as a door prize, in case the winner is not so enamored with the charm of its imperfections. So here's the deal, Breadheads. If you think you would be willing to give this wounded warrior a good home, click on the button below ("Enter Here") or in the comments (which will display your email address ONLY to me) to send me an email with a short explanation of why your kitchen is the place where it belongs. (This reminds me of those Facebook posts with the pictures of unwanted shelter dogs!) On August 8th, the feast of St. Dominic, I will choose a winner and send it to you free of any charge (not even shipping and handling, unless you live outside of the continental United States, in which case we'll negotiate!)

Please note: By entering, you are giving me the right to quote from your entry in my Bread Blog without using your name, and if you win I have your permission to post your entry and your name in a post on this blog page. I promise, I won't use your email address for ANYTHING other than to contact you if you win. Enter now---the little rolling pin is waiting for your hands.

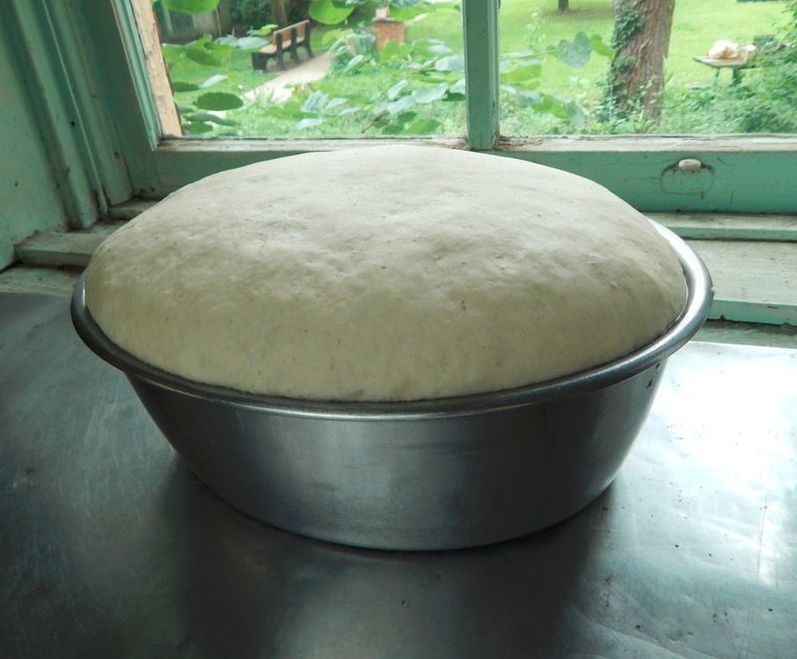
Now if you will excuse me, I have dough rising. We had deli sandwiches for lunch and there are a lot of leftover onions which are now minced and 
mixed into dough with herbs from the garden for dinner rolls.
​
Enter Here!
17 Comments

Honey Oatmeal: the Bread of Gratitude

7/20/2017

1 Comment

 
Picture
One of my most popular talks (at least in church circles) is titled "What Kind of Bread Shall We Be?" It's based on a chapter in my book Bake and Be Blessed  in which I compare various kinds of bread to different forms of Christian ministry. Some people are multigrain, with wisdom gathered from all over, others are tortilla Christians who wrap themselves around what is best in other people, others are Italian bread like my grandfather---crusty on the outside, tender on the inside! Today we had oatmeal for breakfast, and leftover oatmeal usually means honey oatmeal bread will be rising on the kitchen counter before too long. (Recipe HERE.)

Picture
Because I often make it with leftovers, I think of oatmeal bread as the "Bread of Gratitude." People who are grateful for the food on the table, who are mindful of how rare it is in this world to eat your fill and have some left over, who would never dare let food go to waste and can be thankful even for cold oatmeal---these are people who understand the nature of gratitude. 

Honey oatmeal bread is also the bread of gratitude because I know that the only reason there is a gallon jar of honey in the pantry is that Br. Luke and Br. David dressed up in full-body bee suits on a warm spring day and went out to the hives to harvest it. I watched them clean the honey room and repair the extraction equipment over the course of several days before they even got around to spinning out the comb, filtering, pasteurizing, etc. I genuinely appreciate their hard work and make an effort to tell them so every now and then. They'll be doing the same thing again in the heat of August and September.
Picture
Thankfulness has been on my heart a lot lately because I'm making a sincere effort to ramp up my gratitude's metabolism. One of the deacons of the Peoria diocese comes to me for spiritual direction, and we determined that it would be fruitful for him to keep a gratitude journal in which he daily records at least three things for which he is thankful. I decided to do the same thing myself. So every morning over coffee I sit at my desk and write down at least three gratitudes from the day before. Some samples:
  • I'm grateful that I was home and available when a friend unexpectedly stopped by needing some spiritual encouragement.
  • I'm thankful for the sacrifices made by our military personnel around the world.
  • I'm grateful that our prior Fr. Michael is so well organized in keeping the day-to-day operations of the abbey running smoothly.
  • I'm thankful for the health and strength to be able to knead a double batch of dough.​
  • ​I'm grateful that my scented geranium is in bloom, and that I have the leisure time to enjoy it.
Picture
Psychologists and other scientists confirm that developing an attitude of gratitude can have significant benefits for your mental, emotional and even physical health. I've certainly noticed an increase in positive attitudes and reduced stress since I started this practice. (We'll see what happens when the school year starts again!) If writing isn't your thing, it doesn't even have to be a journal---check out some suggestions HERE.

So what are your three gratitudes today? I hope one of them is that you had a chance to bake or at least enjoy some homemade bread. God bless and happy baking!
Picture
1 Comment

7 Things You'll Need to Learn to Bake

7/19/2017

1 Comment

 
If you’ve never baked before, you might wonder what equipment you’ll need to get started. Obviously, you'll need an oven that can maintain a consistent temperature, whether it's gas, electric, or wood-fired. You may have almost everything you need in your kitchen right now, but here’s a helpful guide for choosing other equipment and utensils to make your first baking experience a success.
 
Five-quart mixing bowl
You’ll need bowls in other sizes in which to beat eggs or mix wet ingredients, but your mixing bowl should be large enough to hold two loaves worth of dough. I prefer one with high sides to keep the ingredients from escaping during mixing. Glass, glazed stoneware, Pyrex or plastic will all do the job, but a heavier bowl is a little easier to work with because it remains more stable during mixing.


Picture
I love this vintage set from Pyrex. The pattern is called "Autumn Harvest" and it was produced from 1979 to 1986. I use my set whenever I have to shoot a video.

​Accurate measuring cups and spoons
You’ll need measuring cups for both dry and liquid ingredients, and yes, there is a difference----about 5% between the two.  For liquid measure your best choice is the classic Pyrex glass pitcher, both a one cup and a two cup.  For dry measure, consider spending a little more for the heavy duty metal measuring cups and spoons---they’re often on sale at Marshall’s and TJ Maxx. I also like the measuring spoons with a long handle and a narrow bowl that can easily fit into spice jars. If you have recipes written in the European style, a scale will also be essential.
Picture
These are Cuispro measuring cups and spoons, which were rated as the best by America's Test Kitchen. The most important thing in my view is that the labels are stamped--the painted ones on cheap sets wear off in a short time.

​A large wooden spoon

This is the hand tool of choice for most Breadheads, and this is another utensil you might want to spend a little more on---I’ve snapped 8 or 9 cheap wooden spoons in half over the years. There is also an unusual mixing tool that is specific to baking called a dough whisk that mixes and aerates batters and doughs better than any spoon in the drawer. 
Did you know I have a whole series of these videos? Check out my YouTube Channel! And you can buy dough whisks on our abbey website: www.monksmarket.com. 

​An
instant read thermometer
Get the electronic kind rather than one with a conventional dial, since they produce a precise temperature reading more quickly. You’ll use it to test the temperature of liquids before adding yeast (100
° to 110° F.), and to check the interior temperature of a loaf of bread to ensure that it is fully baked (190° to 195° F.). 
I'm using a dial thermometer here, but a digital one will give you more accurate results quickly. They costs less than $20 at stores like Target and Walmart.

​Baking Pans

To start out, you’ll need a baking sheet (like for cookies), loaf pans (I recommend the medium size, 8½” x 4½” x 2½”) and a 12 cup muffin tin. If you intend to make cinnamon rolls, a rolling pin and an 9” x 13” pan would be in order as well. As you explore the world of baking, you may start thinking about brioche pans, cast iron skillets for scones, and stoneware casserole dishes for deep dish pizza. But the aforementioned three or four pans will be adequate for most recipes.
If you are just starting to equip your kitchen and you're on a tight budget, I recommend shopping for pans at thrift stores. You'll be amazed at what you can find!

Wire Racks

You can cool your loaves on a clean dishtowel, but a wire rack allows for air circulation on the bottom of the loaf, resulting in a superior crust. You can easily drop $20 or more on a heavy-duty stainless steel rack, but the less expensive ones do the job just as well, and once again thrift shops and flea markets are a great source for them. If they are slightly rusty, you can easily clean them up with steel wool, but don't try to rescue something that's clearly been put away wet and allowed to rust all over. You can also buy a multi-tier rack that can be used to save space both in the oven and on the counter top.
Picture
In a pinch, an extra oven rack can serve as a cooling rack as well.

​A reason to bake
I briefly considered making this last item "one of my cookbooks" but then I realized that I have maintained for many years now that people don't need recipes as much as they need reasons to bake. You can get literally millions of recipes from the Internet. I typed in "white bread recipe" in Google Chrome and got over SIX MILLION web pages in .47 seconds. But what will make you try one? A sense of adventure? The desire to recapture happy memories of a beloved grandmother, or to make new memories with your own grandchildren? Interest in your family's ethnic culinary heritage? Frugality, simplicity, the desire to slow down? Or just a longing for the taste of real bread? Whatever your reason, bake with courage and conviction, be willing to fail and to learn from your mistakes, and remember what I've said since my public television days: "It's bread---it's gonna forgive you!"
Picture
1 Comment

"Creamed Corn" Cornbread

7/17/2017

0 Comments

 
Picture
Yesterday (July 16) was National Corn Fritter Day, and I posted a link on Facebook to a previous post on The Cornbread Book by Jeremy Jackson. I didn't make corn fritters yesterday, mainly because my blood sugar was trending a bit high. But we had corn (off the cob, frozen) for supper last night, and I thought someone out to do something about the leftovers, so I decided to make cornbread, adapting a recipe in the aforementioned book (which you really should buy---it's a gem!) His original recipe uses creamed corn, something we rarely serve here at the abbey, so I adapted it by simply sending the whole kernels through the food processor and then adding them to the liquids. The resulting bread has a more intense corn flavor and doesn't suffer from the "Dry Crumblies" as some cornbread does. Here's my version:

1 cup all-purpose flour
1 cup stone-ground cornmeal
2 teaspoons baking powder
1 teaspoon salt
1 cup whole corn kernels, finely chopped in food processor
1 large egg, lightly beaten
1 cup milk
1/4 cup granulated sugar
2 tablespoons of vegetable oil

Preheat the oven to 425 degrees F., and grease an 8" x 8" baking pan with cooking spray. Sift the flour, cornmeal, baking powder, sugar and salt into a large bowl and stir until well-combined. In a separate bowl, whisk together corn, milk, egg, and oil.

Add the wet ingredients to the dry and stir until just combined. Don't overbeat, but be sure to use a rubber spatula to make sure there are no pockets of dry ingredients along the sides or bottom of the bowl. Pour batter into pan and spread it evenly. Bake for 20 to 25 minutes, until the top begins turn golden brown and the bread pulls away from the sides of the pan slightly. The top of the loaf should spring back when pressed with a fingertip.

0 Comments

National Corn Fritter Day July 16

7/15/2017

1 Comment

 
Picture
Yesterday I attended the Marshall Putnam County Fair (Henry, Illinois) with my sister Angela, who, like me, enjoys eating from the "fatal food group." Enjoying lemonade shake-ups and cheesy fries with her reminded me of my family's love of summer fairs and festivals while we were growing up. Between that and National Corn Fritter Day July 16, I decided to share the following excerpt from my new book Baking Secrets from the Bread Monk" Tips, Techniques, and Bread Lore (Reedy Press) which is available on the abbey's Monks' Market website.
 
From the chapter titled "Food Holiday Mash-ups"

July is designated National Culinary Arts Month, with a grateful nod to culinary professionals, from TV celebrity chefs to the under-appreciated line cook who makes the best hash browns at the local diner. Culinary training runs the gamut from small classes at cooking stores to junior college degree programs to the Cordon Bleu. But the term “Culinary Arts” always reminds me of the sign above the doorway to a barn-like structure at the Peoria Heart of Illinois Fair where my mother entered her bread every year (her raisin bread took first place nearly every time she entered it).

 
I love fair food in general and fried foods in particular: corndogs, haystack onion rings and funnel cakes are my personal faves. But there was one year at the Heart of Illinois Fair when a local church set up a tiny trailer out of which they sold fresh corn fritters. These fried delights were dredged in powdered sugar, and served piping hot in a brown lunch paper bag. I devoured several bags’ worth over the course of the week of the fair, and eagerly anticipated their return the following year. But alas, I was disappointed in my expectation---the little trailer with the hand printed cardboard sign never returned. You’ll have to settle for the homemade version yourself, and hope they are as good as my memories.

Picture


Corn

Fritters


Oil for frying

1 cup all-purpose flour
2 teaspoons of sugar
1 teaspoon baking powder
¼ teaspoon of salt
2 large eggs
½ cup milk
2 tsp. vegetable oil
1 12 oz. can of corn, drained  (3/4 cup, fresh)
Powdered sugar for coating
 
Heat at least 2” of oil to 375 degrees F., either in an electric fryer or in a heavy pan over medium heat. You may use an electric deep fryer as well.  Measure flour, sugar, baking powder and salt into a bowl and whisk to combine ingredients thoroughly.  In a separate bowl, beat eggs, milk and oil together, then stir in the corn kernels. Pour wet mixture into the bowl with the dry ingredients and stir until thoroughly combined. Drop tablespoons of the batter into the hot oil and fry until golden brown on both sides---they may need some help turning over. It takes only two or three minutes for them to cook, so don’t crowd the pan or the oil will cool and the fritters will be soggy with grease. Remove the fritters to drain on paper towel, then roll them while warm in the powdered sugar to coat (some people prefer granulated sugar). Serve immediately.
 ​

1 Comment

Do you want to bake a snowman?

7/9/2017

1 Comment

 
Picture
Regular readers of this blog know that I am an incurable shopper at thrift stores, garage sales, and flea markets. I have found a number of genuine treasures for myself (my most recent being a Wusthoff chef's knife for 50 cents!) but mostly I'm shopping for vintage or unusual kitchen items to give away as door prizes at my bread demos. At a recent pizza demo I gave away three pizza stones and a brand new pasta machine imported from Italy, and I spent less than a total of $20 for them. When I know I'm going to demonstrate particular breads or techniques, I keep an eye out for items that will go with that theme.

Twice last month I gave a presentation on homemade multigrain baking mix and I'll be doing the same demo later in the year, so I've been on the lookout for vintage biscuit cutters, rolling pins and gently used-waffle irons. You might be surprised how many of the latter show up at Goodwill and Salvation Army (almost as often as those canape molds from Pampered Chef) and last week I came across a Frozen-themed waffle iron that makes waffles in the shape of Olaf the Snowman. It was a whopping $4.99, so I bought it eagerly, well aware that often times these sort of trendy kitchen implements and appliances are heavy on licensing and light on actual usefulness.

Picture
However, I was delighted to discover that this waffle iron worked pretty well. Even before I got it back to my kitchen I realized that it would be difficult to clean, so I picked up a color-coordinated scrub brush at the Dollar Store on the way home. I also knew that it would be easier to dispense the waffle batter using a squeeze bottle, so I got one out from the storage room. I made a quick batch of waffle batter and put it in the squeeze bottle, heated up the iron, and then got to work. As you can see, the waffle iron makes all the parts of Olaf individually, so you can assemble him on the plate. A batch of batter with two cups of Bisquick makes EIGHT of these waffles, so you might consider dividing the recipe in half unless you have a large family or run a daycare. The surface of the iron is completely non-stick, but the waffles are hard to remove if you don't let them cook long enough. I wait until the steam stops coming out of the sides---the blue snowflake indicator light just tells you that the iron is on, not when it's hot enough. It's best to fill the sections from largest to smallest (lower body, head, middle body, stick arms) so the arms don't over cook.

There are surprising number of novelty waffle designs out there: Mickey Mouse, Captain America's shield, Hello Kitty, the Star Wars death star, even one that makes a wide waffle shaped like a computer keyboard. If any of them show up at a local flea market or yard sale, I'll probably bring it home and give it a try. But I'm especially looking forward to a future bread demo when I can give this treasure to a mom with Frozen-obsessed daughters---I'll throw in the squeeze bottle and the scrub brush, too. Sometimes people express surprise that I can give away such wonderful kitchen items at my appearances, but when you're a monk who is supposed to remain unattached to material possessions, it's best just to "Let It Go."
1 Comment

    Author

    Fr. Dominic Garramone AKA 
    the Bread Monk

    Categories

    All
    Breadhead Bookshelf
    Breakfast Breads
    Buns Rolls And Biscuits
    Craftsy
    Donuts
    Equipment
    Ethnic Breads
    Events
    Gluten Free
    Herbal Breads
    Holidays
    Lake Thunderbird
    Memories Of Mama
    Multigrain Breads
    Pastries
    Pizza
    Places To Visit
    Quick Breads
    Reflections While The Bread Is Rising
    Savory Breads
    Sourdough
    Spirituality
    Stuff Besides Bread
    Sweet Breads
    The Classics
    Tools Of The Trade

    RSS Feed

    Archives

    June 2024
    December 2023
    September 2022
    April 2022
    March 2022
    February 2022
    January 2022
    October 2021
    May 2021
    April 2021
    March 2021
    February 2021
    August 2020
    July 2020
    May 2020
    February 2020
    October 2019
    June 2019
    September 2018
    July 2018
    May 2018
    April 2018
    March 2018
    February 2018
    January 2018
    December 2017
    November 2017
    August 2017
    July 2017
    June 2017
    May 2017
    April 2017
    March 2017
    February 2017
    January 2017
    December 2016
    November 2016
    October 2016
    September 2016
    August 2016
    June 2016
    May 2016
    April 2016
    February 2016
    December 2015
    November 2015
    October 2015
    September 2015
    August 2015
    July 2015
    June 2015
    May 2015
    April 2015
    March 2015
    December 2014
    November 2014
    October 2014
    September 2014
    August 2014
    July 2014
    June 2014
    May 2014
    April 2014
    March 2014
    February 2014
    January 2014
    December 2013
    November 2013
    October 2013
    September 2013
    August 2013
    July 2013
    June 2013
    May 2013
    April 2013
    February 2013
    January 2013
    December 2012
    November 2012
    October 2012
    September 2012
    August 2012
    July 2012
    June 2012
    May 2012
    April 2012
    March 2012
    February 2012
    January 2012
    December 2011
    November 2011
    October 2011
    September 2011

Web Hosting by FatCow