The Bread Monk
  • Home
  • My Bread Blog
  • Breadhead Videos
  • Recipes
  • Fr. Dom's Books
  • Events/Programs
  • Shortcut Stollen
  • New Page

Welsh Cakes

6/11/2019

1 Comment

 
Please forgive my long hiatus from the Bread blog! I can honestly say I have no idea how or why I got so neglectful, but I'm resolved to make it up to my loyal Breadheads.

One of my most popular bread demos in recent years has been one using a multigrain baking mix I developed. It's used in the same way as
BisquickTM but has more whole grains and fiber, plus it uses unsalted butter instead of shortening. My first blog about it is HERE along with the recipe. It will also be featured in an upcoming book, along with several quick and tasty recipes. I use it most often for waffles, but I also keep it on hand for pancakes, muffins, biscuits and more unconventional recipes, like Welsh Cakes. 
Picture
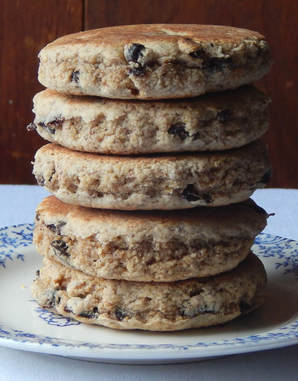
Welsh Cakes are like a cross between pancakes and English muffins, all of these being small breads cooked in a skillet. Welsh cakes are thicker and heartier than pancakes, but not as dense and chewy as English muffins. With a baking mix, they take little time to prepare, and with the addition of spices and dried fruit of various kinds, you can produce a variety of flavor profiles, one of which is sure to become a favorite. Traditionally one uses cinnamon and nutmeg along with raisins or currants, but I like using Chinese five spice for the light licorice flavor of the anise and the light kick from the pepper in the blend. This spice blend is now available in most grocery stores, usually in the baking aisle, but sometimes with the Asian foods. In case you don't have it in your area, you can find a recipe for it HERE

​Welsh Cakes

2 cups baking mix
1/3 cup granulated sugar
½ teaspoon cinnamon
¼ teaspoon ground nutmeg
½ cup currants or raisins
1 large egg
1/4 cup cold milk
Butter for the pan

Combine baking mix, sugar and spices in a medium-size bowl and whisk to blend.  Stir in the currants. In a separate small bowl, beat the egg with the milk; stir into mixture to make a soft dough. Turn the dough out onto a lightly floured board and knead briefly, 8 to 10 strokes. Lightly flour the board, then roll the dough to a 1/4-inch thickness. Cut into rounds with a fluted cookie cutter (2½” or 3”size). If you don't have a fluted cutter, use an ordinary biscuit cutter, but one that has sharp enough edges to cut through the raisins/currents. 

Heat a cast iron skillet over medium-low heat (or use an electric skillet set to 350° F).  Brush the surface of the pan lightly with butter and cook the cakes for about 3 minutes per side, or until they are golden brown. (I usually test one first to make sure I have the temperature correct--they should come out soft in the middle but not at all doughy).  Remove to a wire rack and sprinkle with granulated sugar.  Serve warm. 
1 Comment

Craftsy Class #2: Baking with Herbs and Spices

4/9/2018

2 Comments

 
For those who don't follow me on Facebook, you may not have heard the news that I was asked to tape another bread class for Craftsy.com. I just back from Denver where the company is based, after four days in their "Studio F", which is a defunct cooking school converted into a TV studio for their cooking classes. It's located in the Ice House building, just up the street from Coors Field where the Rockies play.
Picture
Shooting my second Craftsy Class "Baking with Herbs and Spices"
The class is "Baking with Herb and Spices" and is made up of six different lessons of about 20 minutes each, with two recipes thoroughly demonstrated in each lesson.

Lesson 1: Multigrain Baking Mix 
Multigrain Baking Mix
Waffles with chicken and sherry cream sauce
Welsh Cakes

Lesson 2: Skillet Breads
Apricot Skillet Bread
Farinata

Lesson 3: Savory side breads
Savory Biscotti
Cheddar Chive Breadsticks

Lesson 4: Spirals and Swirls
Sausage Roll-Ups
Italian Herbal Swirl

Lesson 5: Summer and Fall
Tomato Bacon Galette with Gorgonzola
Whole Wheat Stuffing Bread

Lesson 6: Herb Breads with a meaning
Housewarming Rolls
Herbal Encouragement Bread


Some of these recipes you'll recognize from previous posts, and dedicated Breadheads will remember the others from the Breaking Bread with Father Dominic cookbooks, or from my live demos. I'll be posting some photos from each lesson over the next few weeks, along with descriptions of my experiences"behind the scenes". As usual, the Craftsy crew was wonderful to work with. Here's my kitchen crew and I on Friday after an 11 hour workday, and as you can see, we're still friends and we're still smiling! The irony in this photos is that the breads we're holding are rock-hard prop breads from the set that we didn't bake!
Picture
The class will "launch" some time in April, and when it does I'll post some special links for an introductory discount, plus hold a drawing for a free subscription to the class. Keep checking in for details!
2 Comments

Savory Biscotti

3/27/2018

0 Comments

 
PictureMy tulips are just a few weeks away from blooming!
Spring has almost sprung here in north central Illinois---we had three inches on snow on Saturday, but it almost completely disappeared by Tuesday afternoon. The tulips and daffodils I planted last fall are sprouting all over the yard and the chives are up. But the days remain a bit chilly, so we're still serving hot soup in the student dining room. In the monastery we get soup at lunch every day, all year long, which has probably been the case since we first showed up on the property in 1890. No better way use leftovers!

My herb guild has a Soup Night every year and a couple of years ago at that meeting I gave a talk on herbal breads to accompany soups, among them a savory biscotti recipe I found on the Land O'Lakes Butter website. It proved quite popular, in part because the idea of a savory biscotti rather than a sweet one is so different. In recent months I've been developing recipes for my next Craftsy class, which has an herbal theme, so I decided to create a savory biscotti recipe for the class. My favorite cheese is smoked Gouda, so I made that the central flavor, along with a little thyme and rosemary. We served them at lunch on a day when we had out of town guests visiting the abbey and got enthusiastic reviews, so I'm posting the recipe here. 
Picture
Savory Biscotti
1¼ cups all-purpose flour
2 tablespoon fresh rosemary
1 Tbs. fresh thyme
1 1/2 teaspoons baking powder
½ teaspoon salt
½ cup unsalted butter, softened
2 eggs at room temperature
6 oz. smoked gouda, shredded
Directions
Preheat the oven to 350 degrees and line a 9” x 13” baking sheet with parchment paper. In a medium mixing bowl, whisk together the flour, rosemary, thyme baking powder and salt. In separate bowl, beat the butter and eggs together until smooth, then stir in the cheese. Slowly add the flour mixture and beat until combined. Divide dough in half. Form each half into an 8” x 3” slightly flattened log. Bake 30 minutes or until golden brown. Remove pan from oven and cool for 20 minutes. Transfer the logs to a cutting board. Using a sharp serrated knife, cut into 3/4-inch thick pieces on a slight diagonal. Return them to the pan and bake an additional 20 minutes, turning them over after 10 minutes. Remove from pan to a wire rack and cool completely before serving.  Makes about 20 biscotti, plus some smaller pieces for nibbling.


Notes
--I first made savory biscotti for a presentation to our local herb guild. I made several kinds of crackers and side breads, but these savory biscotti were the biggest hit. Excellent with any soup.
-- You can use other cheeses (a sharp white cheddar, pepper jack, and provolone all come to mind)or herbs. Remember, use one half to one third as much dried herb as fresh.

0 Comments

Why take a Craftsy class online?

9/6/2016

0 Comments

 
Picture
I've been talking a lot on this blog and on social media about my Craftsy baking class, and it's about to launch soon---yay! So I thought I'd offer some thoughts on why I got involved with this company and why you should consider joining the over five million crafters and hobbyists in over 200 countries who take classes online with Craftsy.

     Craftsy is like Facebook for quilters, knitters, foodies and artists, combined with quality, detailed video instruction. Craftsy only works with top instructors---I had to submit a detailed class description which was reviewed by a green light committee before I was accepted as a Craftsy teacher. In the baking world, people like Peter Reinhart, Nick Malgieri, and Gale Gand have also produced classes for the site. 
      With a Craftsy online class you can take it as many times as you want, whenever you want and access never expires. They play on any device with internet access: computer, smart phone, iPad, tablet, etc. I usually watch my classes (yes, I am a Craftsy student as well as an instructor!) on my iPad, so I can take it around the kitchen or the wood shop as I'm working. Craftsy’s platform enables you to take virtual notes while watching a class, so you can pause the video and type in your own notes (that only you can see) which appear at that point in the video from then on.
     In my opinion the best features are the interaction with the teacher and the 30 second replay. If you have a question about a particular technique or want more information, you can enter a question on your Craftsy class page. Craftsy instructors are required to go online to answer questions for their students at least twice a week, so you'll get individualized instruction and feedback. Other students in class can also offer suggestions, so we're all learning together.
     If you are having trouble understanding a particular technique, the 30 second replay button allows you to watch the same 30 seconds of the video over and over again until you get it right. The HD quality video and audio make it easy to see exactly how the instructor is creating the craft, with close-ups of the different steps. One of the reasons I signed on with Craftsy is because of the high production values in the studio and in the editing process. They are endlessly creative and highly competent, and it shows in their videos.
     You can also use the Craftsy platform to show off your projects to the Craftsy community and be inspired by other students’ work. It's not just online learning, it's a social media site as well, so you can interact with like-minded foodies and crafters from around the world. If you take their classes in quilting or other fiber arts, Craftsy offers an excellent selection of craft supplies and class kits, and supports independent designers by providing them with a pattern shop to list their pattern without charging them fees.
     Consider joining this delightful group of bakers, fiber artists and crafters. You can find out more on the Craftsy website HERE.
Picture
0 Comments

Challah Babka

8/19/2016

2 Comments

 
Picture
Chocolate Babka. Photo by Craftsy.com
Most people only know about babka because of the episode on Seinfeld in which Jerry and Elaine miss out on the last chocolate babka and have to settle for cinnamon version, which Elaine thinks of as “the lesser babka.” Both are excellent, and I'm partial to the cinnamon variety, but the chocolate kind is what I made for my Craftsy class, so here's a description and recipe.

The word babka means “grandmother” in Polish, and may have been applied to the pastry because it was often made in a tall, fluted cylindrical pan that produced a cake shaped like a pleated skirt.  Some people make it in a loaf pan or as a wreath on a sheet tray. 
When I make babka, I like to use a Bundt pan so the resulting loaf has a decorative shape and some height.

Challah featured prominently in my Craftsy Class---the last three lessons, actually---with "Half-Pipe Chocolate Babka" being the crown of my instruction. 
For my class I used a Holiday Challah dough recipe that makes a HUGE batch and has to be kneaded by hand unless you have a larger stand mixture that can manage the equivalent of three loaves of bread. Here's the recipe for a simpler dough you can make in an ordinary KitchenAid.

3¼ to 3½ cups of all-purpose flour, divided
¼ cup of granulated sugar
1½ teaspoons of salt
1 pkg. instant yeast
¾ cup warm water
2 eggs, room temp
1 egg yolk (save egg white for the glaze)
¼ cup neutrally flavored oil (canola or a very light olive oil), 

Place 3 cups of flour, sugar, salt and yeast into a medium size bowl and whisk them together. Place water, eggs and egg yolk into the bowl of a stand mixer. Blend with a paddle attachment, then add flour mixture a small scoop at a time, with the mixer on medium speed. Once all the dry ingredients are incorporated thoroughly, beat in oil at a slightly higher speed into smooth.

Switch to a dough hook attachment. The remaining flour is added gradually until you have a mass of dough that pulls away from the side of the bowl. Knead with hook for 5 minutes. The dough should be smooth, elastic and a little bit sticky. Remove dough hook and cover bowl with a clean dry towel. Allow to rise for 60 to 90 minutes---a richer dough usually means a slower rise.

Lightly grease a Bundt cake pan. Roll dough out to 20” x 24”. Spread filling (recipe below) evenly over the surface, leaving the top wide edge 1” uncovered. Brush top edge lightly with water. Roll up from bottom wide edge and pinch to seal. Place the roll on a cutting board seam side up and cut down the middle with a large sharp knife or large pizza cutter. (Photo below.) Turn halves with the filling side facing upwards. Starting from the middle, twist the two side together towards one end. Repeat with other side. Carefully lift the twist into the prepared pan and arrange so it’s even. Cover and let rise for 30 to 45 minutes or until nearly doubled. Bake in a preheated 350 F. oven for 40 to 45 minutes. Interior temp of the bread should 190 F. on an instant read thermometer.   

Filling
¾ cup semisweet chocolate chips
⅓ cup unsalted butter
¼ cup powdered sugar
⅓ cup cocoa powder

In a small saucepan, melt butter over low heat and whisk in chocolate chips. Sift powdered sugar and cocoa powder together into the pan and whisk until smooth. Remove from heat.
Picture
Chocolate babka slice. Photo: Fr. Dominic
This has to be served on the nicest china cake plate you have, preferably one from your grandma. Seasonally decorated plates are nice, too. Some people add a little chocolate drizzle to dress it up or a light dusting of powdered sugar. But once you cut the first wedge, the interior is so beautiful you won’t care about the loaf’s surface, and the tender crumb and sweet filling don't need any additional sugar.
Picture
The filing in this oicture is almond, and you're supposed to cut all the way through at the top, but you get this idea.
I make two other versions of babka, one with a sugar and spice filling, and the other as the pinnacle of sweet bread decadence: Nutella salted caramel babka. For the spice variety, I spread melted butter over the surface of the dough, and then sprinkle on a half-cup mixture of equal parts white and brown sugar with a teaspoon of Chinese five spice (you could use just cinnamon, or pumpkin pie spice, too). In my opinion, no need for streusel, just butter and hot coffee.
Picture
For the richer version, I heat a 13 oz. jar of Nutella in the microwave for about 10 seconds, and then spread it over the rolled out dough using an offset spatula or plastic bench knife. Then I sprinkle on 5 or 6 oz. of Kraft Premium Caramel Bits (about half an 11-oz. package) and then 1/4 tsp. of kosher salt. Roll it up and continue as directed--the result is below.
Picture
Forgive me, dieters, if I have led you into temptation.
Picture
2 Comments

Craftsy Shoot, Day 4

8/13/2016

2 Comments

 
Picture

​
The final installment of my adventures at Craftsy in Denver CO,
taping a six part online class in baking:
"Bake Your Best: Sweet Yeast Breads, Challah and More."

The final lesson of my Craftsy class is for Holiday Challah, which includes a variation on the Challah recipe featured in my most recent book The Breadhead Bible. The only change was that I used honey instead of sugar, and light olive oil instead of canola. These ingredients are more traditional and seemed appropriate for breads that are often served for Jewish holidays like Purim and Rosh Hashanah. Read a blog I wrote about it in 2012 and find a recipe HERE.
Picture
Traditional Challah. Photo: Craftsy.com
A crown braid makes an impressive addition to the holiday table, and when I teach comparative religions I make it when we study the feast of Purim, which commemorates the courage of Queen Esther. It's also traditional for Rosh Hashanah. I don't have a photo tutorial yet, but you can see from the finished product that it's a culinary tour de force.
Picture
Crown braid, using a pattern of shaping I adapted from more traditional methods. Photo: Craftsy.com
My last recipe for the class is for Halfpipe Twist Babka. Again, I don't have a series of photos to show you, and I haven't found anything online with enough details to be helpful. I promise you, I'm not just being coy so you'll subscribe to my class! Once I get a decent set of photos, I'll share them. Here's what the finished product looks like.
Picture
Chocolate Babka Photo: Craftsy.com
PictureMaggie, Brian, Me and Samantha in the kitchen with the fruits of our labor.
After we wrapped taping the lessons, we had to make some LTV's ("Little Tiny Videos") to be used for the title cards for each lesson, and then shoot all the still photography. The kitchen crew had been saving product all week, and had made some of their own based on my instruction, and we had a sizable collection of goodies. 
​


​There was a Saint Bede Academy alumni gathering that evening at the Craftsy headquarters, so I went straight there from the studio. After shooting pictures of the stained glass in the Denver cathedral and then lunch at Biker Jim's Gourmet Dogs on Saturday with my cousin (there's a non-sequiter if ever I saw one), I flew back to Illinois.

Best. Week. Ever.
​
You'll be seeing more about my class and the Craftsy platform in future blogs, but for right now . . .

2 Comments

Craftsy Shoot Day 3

8/13/2016

0 Comments

 
Picture
The ongoing account of my days of shooting a six part online class for Craftsy.com August 2- 5 . . .

The class is titled "Bake You Best: Sweet Yeast Breads, Challah and More" and will launch by early September. Stay tuned to this blog for a chance to be enrolled in the class for FREE and for other special discounts.
​

Thursday's shoot began with a blossom and ended with a braid. Apricot Blossom Coffeecake is a monastery favorite which has not yet made it into a cookbook but has been featured in this blog before (clock HERE for the photo tutorial). There was one error that could have been disastrous if we had been baking for something other than a taped class and the accompanying photos. Brian, one of my kitchen angels, had never used nor seen coriander before, and it was one of the ingredients in the apricot filling. Evidently the jar lids had been switched, and he used garam masala instead, which has coriander in it but a LOT of other spices as well, including a healthy amount of black pepper! The bread was unexpectedly spicy, but if he had used about half the amount, it would have been one of those sweet/hot flavor profiles that would pair well with a creamy cheese. A happy accident might yield a new recipe . . .
Picture
Apricot Blossom, black pepper and all! Photo: craftsy.com
Next we started on the challah portion of the class. My orginal class proposal had been just for breakfast breads, but the green light committee had decided they wanted challah added, first as a single lesson and then they expanded it to three lessons. I must admit, the class is much more interesting and educational thanks to their input.

Challah is a part of Jewish baking tradition and is often served for the Sabbath and for holidays. It's a bread rich with eggs, slightly sweet and utterly delicious. I made my first loaf for a cast party for Fiddler on the Roof  when I was a senior in high school and have been baking it regularly ever since. A braided loaf is the traditional shape, but until I started researching for this class, I had no idea just how many kinds of braids are out there. Challah is often served as pull-apart rolls as well, which is the first shape we featured in the class.
Picture
Pull-apart challah rolls with poppyseed. photo: Craftsy.com
The recipe I used was one a developed specifically for the class (I promise I'll share it eventually) to be made in a KitchenAid or other stand mixer. Challah dough often comes in huge proportions, since people are baking for larger groups for the holidays---recipes using 5 lbs. of flour are not uncommon. This one can be made in the very smallest model of KitchenAid, the one you buy first and use until you realize you want to make biggest batches of challah! I showed how to make braided sandwich rolls, another common shape for challah.   
Picture
Braided sandwich rolls made with challah dough. photo: craftsy.com
Lastly for this lesson I showed a slab braid, which I've featured on this blog several times. HERE is the YouTube video that I made a few years ago. A slab braid is a lot easier to shape than one that requires you to roll out ropes or strands to exactly the right size and shape. But that is exactly what we did in the next lesson, showing a three and a six strand braid using the traditional method.
Picture
Clockwise from left: slab braid, six strand braid (both with an egg white wash) and three strand braid with a whole egg wash and sesame seed topping. Photo: Craftsy.com
Shooting on Thursday went a little overtime, and when I got back to the hotel my cousin was already waiting for me with two large pizzas from Amici's in Wheat Ridge (a family favorite) and we went to my uncle and aunt's house for a little family reunion. Lots of love and laughs and red wine, and way more food than we needed---which is to say, just as it always is in our Italian family!

Next up: Crown braid and chocolate babka!

0 Comments

Craftsy Shoot, Day Two

8/13/2016

0 Comments

 
The ongoing account of taping my Craftsy class August 2 - 5. . .
Picture
Makeup call for the shoot was always at 8 a.m.--the stylist Lillian was a pleasure to work with and a good conversationalist. The biggest struggle of course was keeping the shine off my bald pate, and frequent blotting and powdering was required throughout the day. It wasn't as bad as when I shot Breaking Bread in St. Louis, which is the humidity sinkhole of the Midwest---all of the humidity of the Great Plains drains into center field of Busch Stadium. The air is so dry in Denver that I walked the 16th Street Mall in 90 degree heat and it felt like 75 degrees in Illinois. 

Day One included the Basic Sweet Dough recipe (an adaptation of Best Ever Crescent Roll Dough) and rose rolls, but not made for dinner, but as cinnamon rolls with bright red frosting (see previous post). I've made the rose rolls for nearly every monastery holiday meal, but only as cinnamon rolls a couple of times, once on the feast of our Lady of Guadalupe, and another time for my mom's birthday.  

Picture
Rose rolls with cinnamon filling and red frosting. Photo: Craftsy.com
We continued shooting the lessons in order, Lesson 2 being for jellyroll variations. The class is meant for advanced beginner or intermediate bakers, so I figured expanding on the jellyroll technique used for cinnamon rolls would be the next step. The first recipe was for Breakfast Butterflies, an old fashioned roll you don't see much these days. I like them with brown sugar cinnamon or almond filling, but we decided to use blueberry. You can find the recipe for the blueberry filling HERE, but I find that Solo Blueberry pastry filling also works well.  The recipe for the rolls came from my book The Breadhead Bible. 
Picture
Luscious blueberry filling--lemon zest gives it a fresh test, even with frozen berries. Photo: Craftsy.com
The segment for Sweetheart Coffeecake followed, which I featured in an earlier blog--find the photo tutorial HERE. Craftsy is the perfect platform for this kind of teaching, because a well-shot video is always better than my amateur photographs! The other feature on the Craftsy platform that Breadheads will appreciate is that at the bottom of the window where the lesson plays, there is a "30 second replay" button--click it and the last 30 seconds of the video plays on a loop for as long as you want. People learning to knit, crochet and quilt on Craftsy really like this feature!
Picture
Sweetheart Coffee Cake, with cherry filling and sliced almonds. Photo: Craftsy.com
Producer Jon Clark had scheduled one more segment for the day, so we went on to Lemon Fantans, another old-fashioned roll but usually made with butter between the layers and served at dinner. To make it into a sweet treat, I added granulated sugar mixed with lemon zest to the layers, and drizzled on a thin icing made with lemon juice. The cameraman Marshall declared this roll his favorite and would have consumed more of them if we hadn't had to keep some idea for product shots! My photo tutorial from last summer is HERE, and the results from the shoot are below.
Picture
The shoot ended about 6 p.m., after which I took off my apron and my habit, threw on a Rockies jersey and walked the four blocks to Coors Field---yep, that's how close the studio is to the ballpark! The Rockies pounded the Dodgers 12 - 2, a typical Mile High home run fest. DJ LaMahieu hit one that just barely cleared the wall, and Dodger center fielder Joc Pederson jump for it, missed, and lost his glove over the wall in the shrubbery around the fountains! As he stood there waiting for an usher to throw his glove back over, you could tell from his stance that he was NOT happy with himself. I celebrated by going back to the concession stands. Bread in the studio, bratwurst in the ballpark---not sure it gets much better.
Picture
Photo credit: www.denver.com
0 Comments

Craftsy shoot, Day 1

8/10/2016

1 Comment

 
PictureConsulting with the producer about a close-up shot. Photo: Craftsy.com
Day one of my Craftsy class taping was spent consulting with the Jon Clark, the producer. Given the number of their teachers who have little or no television experience, Jon is the ideal Craftsy producer: utterly unflappable, endlessly patient and unfailingly kind. I was also to discover that logistical skills rival those of the Allied invasion, and as a person who has produced and directed videos myself, I know how valuable that skill is. 

Samantha Sherman, the kitchen production manager, was just as well-organized, and only once did she and her crew produce a dough that was a little stiff—their first time making challah in the mixer. Otherwise, everything that came on set was the perfect consistency and timed to be sufficiently risen for use. Some dough we had to slow down in the fridge and once we had to wait while something proofed. But every time we got off schedule, we adjusted, did something else in the meanwhile, and still ended pretty much on time.
Picture
Rose rolls were the first treat we worked on together. Photo: Craftsy.com
​
After our prep and practice day, I went back to the hotel, changed into more casual clothes, and headed off to the ballpark with my cousin Chris. My parents were from Denver originally before moving to Peoria when my dad got a job with Caterpillar, so I still have family out there. The Rockies played the Dodgers. We sat above the scoreboard in right field, and the right fielder for the Dodgers, Riddick, had just been traded from the A’s, a National League team, and so he hadn’t played against much against the American Leaguers. Periodically he would take off his hat, and from our vantage point we could see that he had a cheat sheet hidden in his cap! He’d steal a glance as a hitter came up to bat and then adjust his position. As with many cheat sheets, it didn’t help much: Rockies won 7 to 3.

On our way to our seats I saw a touching sight. There was a large bearded man escorting his family to their seats. His eldest daughter appeared to be about 12 years old and seemed to be especially unnerved by the crowds. He held her hand, the rest of the family trailing behind, without a sign of annoyance or impatience on his face, matching his pace to hers. 

There was a bit of a rain delay early in the game, which mean that I got back to the hotel a little later than I would have liked. But after a successful prep session, I went to sleep without anxiety about the first day of shooting. I woke up the next morning with a kind of pleasurable nervous anticipation, like actors have before opening night of a revival of a successful show: familiar but new, confident but not complacent. 

Next blog: First day of shooting!
1 Comment

    Author

    Fr. Dominic Garramone AKA 
    the Bread Monk

    Categories

    All
    Breadhead Bookshelf
    Breakfast Breads
    Buns Rolls And Biscuits
    Craftsy
    Donuts
    Equipment
    Ethnic Breads
    Events
    Gluten Free
    Herbal Breads
    Holidays
    Lake Thunderbird
    Memories Of Mama
    Multigrain Breads
    Pastries
    Pizza
    Places To Visit
    Quick Breads
    Reflections While The Bread Is Rising
    Savory Breads
    Sourdough
    Spirituality
    Stuff Besides Bread
    Sweet Breads
    The Classics
    Tools Of The Trade

    RSS Feed

    Archives

    June 2024
    December 2023
    September 2022
    April 2022
    March 2022
    February 2022
    January 2022
    October 2021
    May 2021
    April 2021
    March 2021
    February 2021
    August 2020
    July 2020
    May 2020
    February 2020
    October 2019
    June 2019
    September 2018
    July 2018
    May 2018
    April 2018
    March 2018
    February 2018
    January 2018
    December 2017
    November 2017
    August 2017
    July 2017
    June 2017
    May 2017
    April 2017
    March 2017
    February 2017
    January 2017
    December 2016
    November 2016
    October 2016
    September 2016
    August 2016
    June 2016
    May 2016
    April 2016
    February 2016
    December 2015
    November 2015
    October 2015
    September 2015
    August 2015
    July 2015
    June 2015
    May 2015
    April 2015
    March 2015
    December 2014
    November 2014
    October 2014
    September 2014
    August 2014
    July 2014
    June 2014
    May 2014
    April 2014
    March 2014
    February 2014
    January 2014
    December 2013
    November 2013
    October 2013
    September 2013
    August 2013
    July 2013
    June 2013
    May 2013
    April 2013
    February 2013
    January 2013
    December 2012
    November 2012
    October 2012
    September 2012
    August 2012
    July 2012
    June 2012
    May 2012
    April 2012
    March 2012
    February 2012
    January 2012
    December 2011
    November 2011
    October 2011
    September 2011

Web Hosting by FatCow