The Bread Monk
  • Home
  • My Bread Blog
  • Breadhead Videos
  • Recipes
  • Fr. Dom's Books
  • Events/Programs
  • Shortcut Stollen
  • New Page

Pastry Blenders and Classic Strawberry Cream Scones

9/26/2015

0 Comments

 
Picture
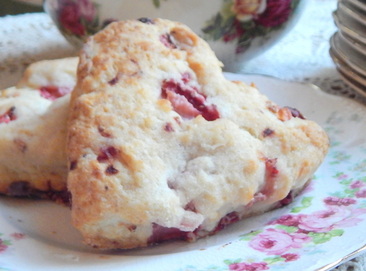
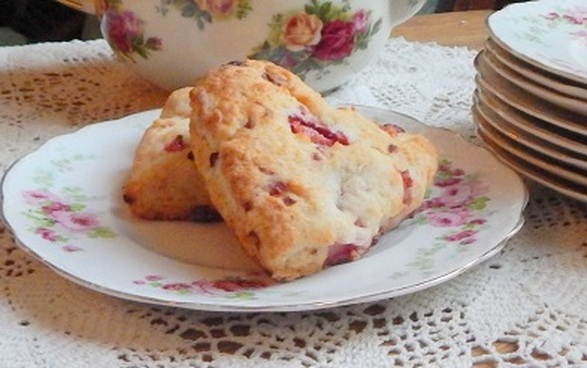
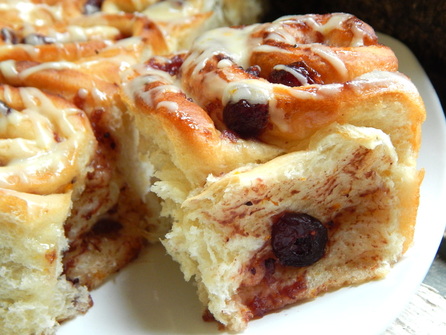
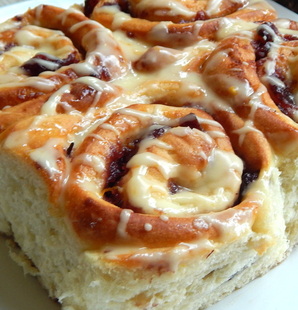
Strawberry Cream Scones--use the good china!
If I were going to choose a recipe to teach to a newbie baker an I had less than an hour, I would definitely choose scones as my ideal recipe: easy to make, infinitely versatile, using simple ingredients and prepared with ordinary equipment. AND you get to eat them, warm with butter, within forty-five minutes or less. What's not to love? 

Picture
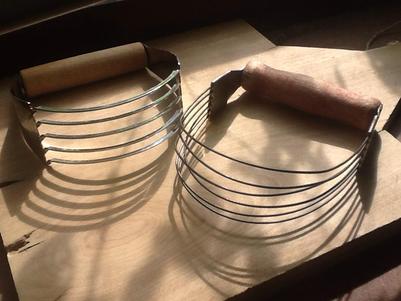
Vintage pastry blenders
Some people might take exception to the "ordinary equipment" part, since not everyone has a pastry blender in the drawer. I was surprised to discover this week that there are kitchens without a rolling pin! However, you can achieve the same goal (cold butter cut into small pieces blended with flour) with a pair of ordinary knives or (gasp!) a food processor. However, if you do have a Cuisinart and not a pastry blender or granny fork, I'm not sure we can be friends. I have several varieties of pastry blenders, and the one on the left with the metals "blades" seems to me to be the most useful. When you are using cold butter (necessary for really flaky pastry) the harder blades are more effective than the wires on the right, which tend to get bent. 

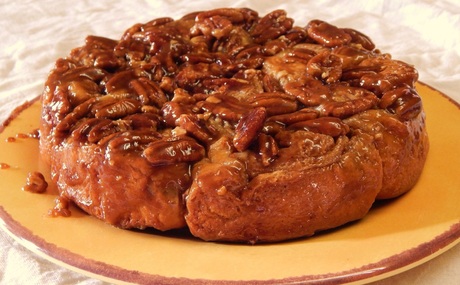
Besides appreciating the time factor, I like scones because they aren't as sweet at other breakfast breads coated with glaze or slathered with frosting. Granted, I love caramel pecan cinnamon rolls more than most sugar addicts, but it's hard not to feel guilt afterwards. With scones, you feel like you've had "a treat without a cheat". Some commercial scones are about as healthy as a Krispy Kreme donut, but the ones you make yourselves are no worse than a biscuit. Just go easy on the clotted cream and you'll be fine.
Picture
This recipe will appear in my upcoming cookbook Breadhead Breakfast Treats, which I hope to have available by May 2016

Strawberry Cream Scones


2 cups all-purpose flour
2 teaspoons sugar
2 teaspoons baking powder
½ teaspoon salt
6 tablespoons cold butter
1 cup chopped strawberries (1/4” dice)
¾ cup heavy cream

Preheat the oven to 425° F. Lightly grease a 9 x 13-inch baking sheet and set aside. Place flour, sugar, baking powder, baking soda and salt in a medium size bowl whisk together until blended. Work the butter into the flour with a pastry cutter until the mixture resembles coarse bread crumbs. Add strawberries and stir till evenly distributed. Add cream and mix until a cohesive ball of dough is formed; do not over-mix

Transfer the dough to a well-floured work surface. Pat or roll the dough into an 8-inch disk about ¾" thick. Use a chef’s knife, bench knife or large pizza cutter to cut the disk into 8 wedges. (You may also use a round or heart-shaped cookie cutter.) Transfer scones to the prepared pan, evenly spaced. Bake the scones for 20 to 25 minutes, until golden brown. Cool on the pan and serve warm.

Breadhead Backstory
I'm in “the scone phase” of recipe testing, and last week I discovered that we had several pints of fresh strawberries that needed to used up pretty quickly. As a practical baker, that was reason enough to make these! Strawberries and cream go together, and the richness of the cream means you can use a little less butter on this recipe. In a convection oven (with the blower on), there’s real risk of the strawberries on the surface of the dough getting scorched black, so if you are using one be sure to cover the pan lightly with aluminum foil until the last few minutes of baking. The strawberry flavor of these scones is rather delicate, so don’t serve them with an overwhelmingly strong coffee or heavily flavored tea—for the latter, I recommend Formosa Oolng.

This is fairly classic scone recipe, and you could substitute raisins, dried cranberries, or blueberries with equally delightful results. I like to use dried apricots or snipped dates with chopped pecans and serve them with clotted cream and a little spoonful of orange marmalade.  When I tested the recipe, this strawberry version was enjoyed both by the monks at breakfast and some of the faculty at lunch, and the only criticism I received was that I hadn’t made enough for the whole staff!  

0 Comments

Orange Cranberry Rolls

9/18/2015

0 Comments

 
PictureThe pinnacle of breakfast breads!
The Breadhead Breakfast project has been inspiring me to think of new variations on some of my old favorites. Although my monastic brethren love cinnamon rolls (a moment of silence as we all contemplate the glory of Fab's Nutty Goodness) I've been experimenting with different fillings in the last year or so. I've made Strawberry Rolls and little spirals of pastry and pineapple filling using Shortcut Croissant dough, and even added Chinese Five Spice instead of cinnamon. None of this is particularly adventuresome compared to, let's say, chefs of Chopped, but it is making me explore some new flavor profiles. 

PictureDON'T USE THIS STUFF!
For several weeks I've been planning to experiment with cranberry sauce, because I found a small can of it in the pantry. I DON'T mean the stuff that looks like cranberry jello and can be serve in slices. This was whole berry cranberry sauce---not as good as fresh cranberries, but it's what I had in the kitchen without having to to the store. I once enjoyed a delectable cranberry salad with mandarin orange slices, so I decided to add that flavor as well. 

I made a batch of Basic Roll Dough but I used only 4.5 cups of flour, leaving the dough very soft. As it rose, I took the cranberry sauce (14-oz. can.) and stirred in a teaspoon of freshly grated orange zest (about half an orange--the rest goes in the icing), and 1/4 cup of orange juice. I thought the filling lacked tartness, so I added 1/2 cup of dried cranberries--much better. I rolled the dough out as usual (about 15" x 12"), spread the filling and rolled it up for slicing. I made 15 rolls, but you could do 12 and make more generous servings. They went into a 9" x 13" greased pan and rose for about half an hour. In my commercial convection oven they baked in 18 minutes at 350, but in a regular oven it would take about 30 minutes. 

Picture
The icing was made with a cup of powdered sugar whisked with 1 teaspoon of fresh orange zest and two tablespoons of orange juice. I heated it in the microwave on high for ten seconds and then drizzled it over the rolls. Go easy on the icing--the filling is plenty sweet. They were much enjoyed by the monks and several lucky members of the faculty of our high school.

Picture
A little Internet research revealed that there are a wide variety of orange-and-cranberry-flavored breads out there, from rolls to scones to muffins. Some roll recipes use fresh cranberries in a food processor with orange marmalade, which made for a beautifully rich, red filling; some added walnuts for a little crunch. Plenty of recipes still to be explored. If there is leftover cranberry salad after this year's Thanksgiving feast, I have a pretty good idea what I'll be serving for breakfast the next morning!

God bless and happy baking!

0 Comments

Italian Onion Herb Bread

9/18/2015

1 Comment

 
PictureItalian Onion Herb Bread can be made in round loaves or in a loaf pan.
A friend invited me to supper at his house last weekend and "suggested" I might bring along some bread. This is the time of year when I try to use up whatever fresh herbs are left in the garden, and when I saw that we had some green onions in the fridge that needed to be used pretty quickly, I knew Italian Onion Herb Bread was the best possible choice. It goes well with just about any meat (we were having pork loin on the grill) plus my host's last name is DiVincenzo. I used fresh garlic chives, basil, rosemary, oregano, and a pinch of red pepper in my mix, but any dried Italian seasoning will work. I would have to rate this among the breads with the best aroma, not only while baking, but on the counter, in the bread basket, and even when wrapped in plastic. Try it and let me know what you think. 

Picture
Italian Onion Herb Bread

2 pkg. active dry yeast
1 Tbs. brown sugar
2 tsp. salt
1 cup warm water (100 to 110 degrees)
1 cup milk
2 Tbs. vegetable oil (divided)
1/3 cup finely chopped onion
1 or 2 Tbs. dried Italian herb blend, or 1/4 cup fresh
5½ to 6 cups of all-purpose flour

Sauté onions in 1 tablespoon of the oil until translucent but not browned.  Remove pan from heat and add remaining oil, herbs and milk---set aside to cool to lukewarm.  Dissolve yeast in warm water with a pinch of the sugar. Let stand 10 minutes until foamy.  In a large mixing bowl, combine milk, salt, and onion/herb mixture.  Stir in yeast and remainder of sugar.  Add 2 cups of flour and mix thoroughly. Add three more cups of flour, one cup at a time.  About ¼ cup at a time, add enough of the remaining flour to make a moderately stiff dough.  Turn out onto a lightly floured board and knead for 6 to 8 minutes, until dough is smooth, shiny and slightly sticky.  Lightly oil the surface of the dough, and place in the rinsed bowl covered with a dish towel, in a warm place free from drafts.  Let rise until doubled, about one hour.  Punch dough down and knead again for about one minute.  Form into loaves and place in greased pans.  Let rise again for 30 to 45 minutes, until nearly.  Bake at 375 degrees for 45 minutes or until golden brown and loaves sound hollow when tapped.  Cool on racks.

Notes
---The first time you make Italian Onion Herb bread, use only 1 tablespoon of dried herb mix, and see if that’s enough for your palate.  If not, increase it to two. Go easy on the rosemary. 
---You can try other of herbs in this recipe as well.  I made it once with a combination of lovage, savory and parsley, and the community devoured six loaves at a single meal! 
---If you are short on time, omit the onions and just warm the milk to 110 degrees before adding it to other ingredients along with the oil.

1 Comment

Chili for Breakfast?!

9/15/2015

0 Comments

 
PictureNothing I like better than cornbread with butter and honey.
Earlier this week I made a batch of cornbread using a new recipe I found on Pinterest. The pinner claimed it was "The Best Cornbread"--moist and sweet, with a tender crumb. I'm usually a bit wary of such claims, because often what the baker has developed is a recipe for a cornmeal-flavored cake, with way too much butter and sugar. But this recipe made use of unsweetened applesauce, so I decided to give it a try. I'm glad I did. Although it had a texture that reminded me of yogurt cake and was a bit too sweet for my taste, it was definitely moist and flavorful. The recipe is HERE.

PictureSan Pasquale, patron saint of cooking, looks on from the background.
I don't know what inspired me to put my fried eggs on cornbread the next morning, because normally I'm a butter-and- honey kind of monk. But it was so good that I decided to take it even further and create the masterpiece picture here. I cut a large square of cornbread in half lengthwise and topped it with a slice of sharp cheddar. That went into the microwave for about 20 seconds, just enough to melt the cheese. Once it was on the plate, I added chili, jalapenos, and a fried egg. No salt, no pepper, no hot sauce--it had all the flavor it needed. I'm glad I didn't use the whole piece of cornbread, because that would have been far too bread-y. This was perfectly balanced, IMHO.  The idea of chili first thing in the morning might seem odd at first, until you think about breakfast staples like biscuits and gravy, or eggs over grits and corned beef hash. You could do something similar with salsa, guacamole, or white chili, or make a variation on Eggs Benedict if you're awake enough to attempt hollandaise sauce at that hour. 

Picture
Cornbread with chili, jalapenos, cheddar, and an egg sunny side up.
I should note that in taking this picture I had the assistance of Courtney and Destiny, two of my students who usually get to school early and graciously volunteered to advise me on food styling. They were rewarded with the plate pictured above and a pair of forks.

God bless and happy baking!
0 Comments

    Author

    Fr. Dominic Garramone AKA 
    the Bread Monk

    Categories

    All
    Breadhead Bookshelf
    Breakfast Breads
    Buns Rolls And Biscuits
    Craftsy
    Donuts
    Equipment
    Ethnic Breads
    Events
    Gluten Free
    Herbal Breads
    Holidays
    Lake Thunderbird
    Memories Of Mama
    Multigrain Breads
    Pastries
    Pizza
    Places To Visit
    Quick Breads
    Reflections While The Bread Is Rising
    Savory Breads
    Sourdough
    Spirituality
    Stuff Besides Bread
    Sweet Breads
    The Classics
    Tools Of The Trade

    RSS Feed

    Archives

    June 2024
    December 2023
    September 2022
    April 2022
    March 2022
    February 2022
    January 2022
    October 2021
    May 2021
    April 2021
    March 2021
    February 2021
    August 2020
    July 2020
    May 2020
    February 2020
    October 2019
    June 2019
    September 2018
    July 2018
    May 2018
    April 2018
    March 2018
    February 2018
    January 2018
    December 2017
    November 2017
    August 2017
    July 2017
    June 2017
    May 2017
    April 2017
    March 2017
    February 2017
    January 2017
    December 2016
    November 2016
    October 2016
    September 2016
    August 2016
    June 2016
    May 2016
    April 2016
    February 2016
    December 2015
    November 2015
    October 2015
    September 2015
    August 2015
    July 2015
    June 2015
    May 2015
    April 2015
    March 2015
    December 2014
    November 2014
    October 2014
    September 2014
    August 2014
    July 2014
    June 2014
    May 2014
    April 2014
    March 2014
    February 2014
    January 2014
    December 2013
    November 2013
    October 2013
    September 2013
    August 2013
    July 2013
    June 2013
    May 2013
    April 2013
    February 2013
    January 2013
    December 2012
    November 2012
    October 2012
    September 2012
    August 2012
    July 2012
    June 2012
    May 2012
    April 2012
    March 2012
    February 2012
    January 2012
    December 2011
    November 2011
    October 2011
    September 2011

Web Hosting by FatCow