The Bread Monk
  • Home
  • My Bread Blog
  • Breadhead Videos
  • Recipes
  • Fr. Dom's Books
  • Events/Programs
  • Shortcut Stollen
  • New Page

An antique bread tool

7/30/2012

1 Comment

 
On a recent vacation day I went to the local antique mall to see if I could score some vintage bread knives to use as door prizes at my next demo.  I didn't find any, but what I did find was a Kaiser roll stamp, made of cast iron with a rosewood handle, incorrectly labeled as a "vintage nut chopper".
Picture
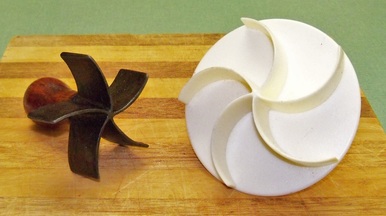
Here's what I find really interesting:  on the left is the antique stamp, and on the right is one I bought about ten years ago.  Look at the difference in size!  Kaiser rolls were meant to be dinner rolls, sometimes used for small sandwiches for breakfast.  But in typical American style, we make them HUGE, large enough for a 3/4 pound burger with all the works.  It's the same way with pastries.  Traditional Danish pastries are tiny treats, meant to be nibbled on delicately or perhaps eaten in a couple of bites.  But order a "Danish" at an American bakery and you'll get something the size of a catcher's mitt. 
          Don't get me wrong.  I am not against the occasional extravagant meal or decadent dessert:  "Moderation in all things, including moderation."  But our food culture in the United States seems to be fueled by the desire for complete satiety at the every meal, supersized portions for every entree, and the substitution of platters for dinner plates at restaurants.  Even worse, we're often getting quantity but not quality.   I will confess you having baked some very large caramel pecan rolls in my day, but they were, after all, homemade, and make them only once or twice a year!  I'm more likely to serve the brethren a healthy multigrain bread for breakfast.
     Okay, enough ranting.  Let's just try to stem the tide of culinary mediocrity and caloric excess, one roll at a time.
         

1 Comment

Self correcting cinnamon rolls

7/28/2012

0 Comments

 
I was in a hurry tonight to get some cinnamon rolls made, but I took pictures in case we need them for the new book.  I just want you to notice that the rolls went into the pan less than perfectly arranged, but a well-greased pan and 30 minutes of rising fixed everything.  No need to get all Martha Stewart in the kitchen---bread is very forgiving! 
Picture
Picture
Picture
0 Comments

Breakfast butterflies, crescent rolls and Fr. Joe

7/26/2012

0 Comments

 
Picture
Last night I mixed up a batch of basic sweet dough so I could make two recipes from the new book.  I didn't really need to test the recipes, but I needed some photos for illustrations of Breakfast Butterflies and Crescent Rolls.  Butterfly rolls used to be found in most bread cookbooks (I think I saw them first in the 1962 edition of The Joy of Cooking).  You roll the dough out as you do for cinnamon rolls and then cut the roll into 9 wedges instead of 12 slices (see above).  You can use any filling you want--I used a can of Solo Almond Cake and Pastry Filling, but you could use apricot filling or chopped dates and walnuts.  The advantage of almond filling is that the rolls are sweet enough without frosting.
          (I should note here in passing that the temperature in the kitchen last night was 99.3 degrees F.  My sister Eileen says I'm crazy for even considering baking in this weather, but I don't even notice the heat anymore).

Picture
     To shape the rolls, you turn each wedge short side up, and press the handle of wooden spoon across each—this pushes the dough outward to form the “wings”.   There are other "butterfly roll" recipes out there for which you actually form an insect body complete with antennae, but I think they're a bit too fussy. 

Picture
They rise and bake pretty much like any other roll (30 minutes or until doubled, 15 to 20 minutes at 350 degrees).   They were a hit with the brethren this morning, and so much so that next time I think I'll make a double batch, maybe with two different fillings.  Apricot filling would be good with an orange flavored frosting, for example. 

Picture
I made the second half of the dough into crescent rolls, which are a snap once you get the hang of rolling dough out into a circle.  Sincxe my last book was on pizza, that's one skill I have pretty well mastered!  A pizza cutter is useful for cutting the wedges, too--far easier than even the sharpest kitchen knife.

Picture
After seeing these pictures, I'm surprised that I've never noticed how much crescent rolls look like crabs!  Here they are before the second rise.  You'll notice that I don't have brand new shiny pans to bake them on, so don't worry if yours are little stained or battered.

Picture
I have to say these are some of the most photogenic rolls I've ever made!  I think thse are best serve warm with butter and grape jelly, which is how I ate then when my mom made them for us.  These came out of the oven about 10:30 p.m. and I had to stay up until all the rolls had cooled completely before wrapping them, so I was up late.  But thereby hangs a rather sad tale.

          This whole process took a somewhat longer time than usual, because I kept having to tend to our Fr. Joseph, who is suffering from Alzheimer's.  Recently he has been insisting that he is going home to live with his parents in Peoria again (they've been dead for years, and the house he is remembering has been torn down).  At least once a day he packs a suitcase or two, or drags boxes to the loading dock, convinced that someone will be coming to pick him up soon.  We've had to hide his luggage, because the visual cue of seeing it in his room triggers the obessesion, and we can no longer keep car keys in plain sight for fear he may try to drive himself to Peoria.  
          Sometimes it's difficult to divert him from this train of thought, and last night he was particularly determined.  It was obvious that he was exhausted, which made him more irritable, like a cranky toddler who needs a nap.  Three times he was out of his room and looking for someone to help him find a car, all within the same half hour, and he lost his temper the third time.  "Why do I have to put up with this shit?" he shouted at me in the hallway.  "Why can't you just take me someplace where there are old things that I understand?!" 
          But sadly, no such place exists anymore, except in his memory.  Because of his condition, very little makes sense to him anymore, and so he's surrounded by confusion and frustration---no wonder he loses his temper.   I finally commented sympathetically on how tired he looked, and he responded to the cue, saying that maybe he should just go to bed and not leave until tomorrow.  I helped him to his room and he thanked me for my kindness, all rancor forgotten: "Good night, dear Father," he said, as I closed the door.
          By the time I got to the dough, it was a bit over-risen in the first proof, but bread is forgiving, and caring for my confrere is far more inportant than picture perfect rolls.  Like any family coping with an elderly parent or a special needs child, the monastic community is learning once again to do as St. Benedict urges us in his chapter on good zeal: "Bear with the greatest patience one another's weaknesses of body and behavior." 
0 Comments

A bread lesson for the Loretto Sisters

7/18/2012

2 Comments

 
During my recent visit to St. Louis I stayed with the Loretto Sisters in Webster Groves.  Their Sr. Maragaret was the blood sister of our Fr. John, and I used to stay with them during taping sessions for Breaking Bread.  The kitchen manager of their food service asked for a bread lesson, so we assembled to make a basic roll dough and to shape it in various ways.  As you can see, her slab braids turned out especially nice.  Surprisingly, none of the sisters were interested in getting their hands in the dough--I'll have to work on that!
2 Comments

Cheesy Twist Bread--yum!

7/16/2012

0 Comments

 
Picture
One of the best aspects of traveling around doing bread demos is that you meet lots of happy bakers who want to share recipes--and occasional samples!  This couple attended a special class I taught for KETC/Channel 9 in St. Louis a couple years ago, and they showed up in Smithton as well, bearing a scrumptious cheese twist bread.  Rachel was kind enough to share the recipe with me, and I pass it on to you with the highest recommendation.  You can change the kind of cheese you use for the filling or use a blend. 
CHEESY TWIST BREAD
Dough -
2 packages active dry yeast
1 cup warm water
3 to 3 ½ cups unbleached all-purpose flour
1 teaspoon salt
2 tablespoons sugar
1 teaspoon onion powder
3 tablespoons oil
1 teaspoon dried basil
1 teaspoon chopped sun-dried tomatoes in olive oil
Filling-
4 ounces soft cream cheese
2 tablespoons dry ranch salad dressing powder
¼ cup chopped onions
3 tablespoons chopped sun-dried tomatoes in olive oil
¾ cup shredded parmesan cheese

Stir yeast into warm water and let set a few minutes to dissolve.  Attach flat beater to mixer.  In bowl of stand mixer add 2 cups of flour, sugar, salt, onion powder, basil, and sun-dried tomatoes.  Turn on stir speed to combine.  Add the water and yeast mixture.  Turn on speed # 4 for about 1 minute and beat.  Turn mixer speed down to 2 and add oil.  Continue to add the remainder of the flour a little at a time until the dough starts to clean the sides of the bowl and cling to the paddle.  Switch to dough hook and turn mixer on speed # 2 only and kneed for 4 to 6 minutes until dough is soft and elastic and tacky to the touch.  Take the dough out of bowl and knead into a ball.  Cover and let rest for about 5 minutes.  Roll dough out on a lightly floured surface into a 14x10 rectangle, spread with filling, sprinkle with ¾ cup of cheese over filling.  Starting from the long side, roll dough up tightly, with scissors cut roll in half, lengthwise.  Place halves, filling side up, side by side on parchment lined baking sheet.  Twist together gently and loosely.  Cover and let rise for 20 minutes.  Uncover and bake in a preheated 375 degree oven for about 25 minutes.  Take out of oven and brush with butter.  Put on a cooling rack to cool for about 15 to 20 minutes.  


0 Comments

Three herbal bread recipes

7/14/2012

2 Comments

 
I had meant to get back to the blog a lot sooner after my return from St. Louis, but shortly thereafter I developed some serious adominal pains and spent three days in the hospital.  Still no diagnosis, symptoms have subsided considerably but still pesist.  They have ruled out appendicitis, colon cancer, gall bladder, kidney stones, ulcers, and pregnancy.  Please keep me in your prayers.
          But enough about that.  While I was in St. Louis I was privileged to teach an afternoon class to the advanced pastry students at L'Ecole Culinaire (website here) on Monday.  We took a basic roll dough and made slab braids, bambino bread, and rose rolls.  The students were enthusiastic and made some lovely breads, although some of them need to work on their rolling pin technique--a perennial struggle!
Picture
          Tuesday night I was in Smithton, Illinois for an herb bread demo sponsored by the Metro East Herb Guild in Belleville.  For that presentation I made bacon dill bread, herbal rose rolls, and tomato basil focaccia.  I had hoped to give you links to those recipes, but I'm having trouble logging on to Google Docs, so I'll just post them here. 
Bacon Dill Bread
½ cup warm water (100 to 110 degrees)
2 tsp. brown sugar
2 pkg. active dry yeast
1 c. milk
1 c. cottage cheese
2 Tbs. fresh chopped dill (1 Tbs. dried)
1½ tsp. salt
2/3 cup cooked, crumbled bacon, drained (about 14 to 16 strips)
5 to 6 cups of all-purpose flour
Proof yeast with water and sugar in a small bowl.  Blend milk and cottage cheese in a blender until smooth and warm mixture to 100 to 110 degrees.   Pour milk mixture into a large bowl and add yeast, dill and salt.  Stir in 2 cups of flour until thoroughly incorporated.  Add bacon and mix thoroughly.  Add 3 more cups of flour, one cup at a time, mixing thoroughly each time.  Turn dough out onto a lightly floured board and knead for 6 to 8 minutes, adding small amounts of flour as needed to keep dough manageable.  At the end of the kneading period, dough should be rather soft rather than stiff, but only slightly sticky.  Oil the surface of the dough and place back in the rinsed bowl.  Cover with a towel and allow to rise in a warm place free of drafts for 45 to 60 minutes, or until doubled.  Punch dough down and knead briefly to work out the larger air bubbles.  Dough may be formed into one large or two medium free form loaves and placed on a lightly greased baking sheet, or divided into two and placed in standard loaf pans. (if you make free form loaves, they may not rise as high as in a pan.)  Cover and let rise for 20 to 30 minutes or until nearly doubled.  Bake in a preheated 350 degree oven for 40 to 50 minutes, until lightly brown and loaf sounds hollow when tapped.  Cool on racks.
(Don't have a picure of this yet.)

Tomato Basil Focaccia
Dough
2 cups tomato juice                           
1 pkg. active dry yeast
2 tsp. salt                                 
1/4 cup chopped sun dried tomatoes          
1 cup whole-wheat flour                    
2 Tbs. olive oil                                   
4 to 4 ½ cups white bread flour
2 Tbs. finely chopped fresh basil 
    OR 1 Tbs. dried whole basil leaves 
    OR  2 tsp. ground dried basil     

Topping
olive oil
kosher salt

Scald tomato juice in a saucepan over low heat, but do not allow to boil.  Add the sun dried tomatoes and cool to lukewarm.  Pour into a mixing bowl.  Stir in yeast and 1 cup of whole wheat flour and allow to rest for ten minutes.  Add olive oil and salt and mix well, about 100 strokes by hand.  Add flour, one cup at a time, until you get a soft dough that is rather sticky.  Knead on a lightly floured board for about 5 minutes, until the dough is smooth and elastic but still a bit sticky (be careful not to add too much flour in the course of kneading).  Give the mixing bowl a quick wash, oil the surface of the dough lightly and place it in the bowl.  Let rise, covered with a towel, in a warm place free from drafts, until doubled---about 1 to 1 ½ hours.  Punch down, and divide into two portions.  Flatten each portion into a round, flat loaf, about ½  inch thick.  Place loaves on a baking sheet that has been sprinkled with cornmeal (you may need 2 sheets).  Brush on about 1 Tbs. of olive oil on each loaf.  Allow to rise, uncovered, for 30 minutes.  Dimple dough with your forefinger, each dimple being about ½ inch apart.  Brush top with olive oil and sprinkle lightly with kosher salt.  Bake at 400 degrees until lightly browned, about 20 minutes.  Remove from oven and cool loaves for 10 minutes before serving.
Picture

I often make tomato basil kaiser rolls topped with parmesan for sandwiches or to accompany pasta with cream sauces, but you can also bake this bread into a regular loaf pan and use it to make the best grilled cheese sandwich ever!

Rose Rolls
Use any recipe for one dozen dinner rolls, preferably one that uses milk as the liquid.

On a lightly floured board, roll dough out into a rectangle 12” high by 15” wide.  Brush the dough with the melted butter, leaving 1 inch of the top edge dry.  Sprinkle on about 1/2 cup of fresh chopped herbs.  Roll the dough up jellyroll style.  Lightly brush the top edge with a little water, so it will stick to the roll; pinch to seal.  Using a sharp knife cut the roll into 12 even pieces.  Cut side down, place them one by one into the cups of a lightly greased muffin tin.  Using a pair of scissors cut an “X” in the top of each roll---you should cut about 2/3 of the way through the roll.  Cover and let rise in a warm place until doubled, 30 to 45 minutes.  Bake in the preheated 375 degree oven for 10 to 12 minutes, or until lightly browned.  Remove from pans and place on wire racks to cool slightly.  If desired, brush tops of rolls with more melted butter before serving warm.
Picture
Picture
2 Comments

    Author

    Fr. Dominic Garramone AKA 
    the Bread Monk

    Categories

    All
    Breadhead Bookshelf
    Breakfast Breads
    Buns Rolls And Biscuits
    Craftsy
    Donuts
    Equipment
    Ethnic Breads
    Events
    Gluten Free
    Herbal Breads
    Holidays
    Lake Thunderbird
    Memories Of Mama
    Multigrain Breads
    Pastries
    Pizza
    Places To Visit
    Quick Breads
    Reflections While The Bread Is Rising
    Savory Breads
    Sourdough
    Spirituality
    Stuff Besides Bread
    Sweet Breads
    The Classics
    Tools Of The Trade

    RSS Feed

    Archives

    June 2024
    December 2023
    September 2022
    April 2022
    March 2022
    February 2022
    January 2022
    October 2021
    May 2021
    April 2021
    March 2021
    February 2021
    August 2020
    July 2020
    May 2020
    February 2020
    October 2019
    June 2019
    September 2018
    July 2018
    May 2018
    April 2018
    March 2018
    February 2018
    January 2018
    December 2017
    November 2017
    August 2017
    July 2017
    June 2017
    May 2017
    April 2017
    March 2017
    February 2017
    January 2017
    December 2016
    November 2016
    October 2016
    September 2016
    August 2016
    June 2016
    May 2016
    April 2016
    February 2016
    December 2015
    November 2015
    October 2015
    September 2015
    August 2015
    July 2015
    June 2015
    May 2015
    April 2015
    March 2015
    December 2014
    November 2014
    October 2014
    September 2014
    August 2014
    July 2014
    June 2014
    May 2014
    April 2014
    March 2014
    February 2014
    January 2014
    December 2013
    November 2013
    October 2013
    September 2013
    August 2013
    July 2013
    June 2013
    May 2013
    April 2013
    February 2013
    January 2013
    December 2012
    November 2012
    October 2012
    September 2012
    August 2012
    July 2012
    June 2012
    May 2012
    April 2012
    March 2012
    February 2012
    January 2012
    December 2011
    November 2011
    October 2011
    September 2011

Web Hosting by FatCow