The Bread Monk
  • Home
  • My Bread Blog
  • Breadhead Videos
  • Recipes
  • Fr. Dom's Books
  • Events/Programs
  • Shortcut Stollen
  • New Page

7 Things You'll Need to Learn to Bake

7/19/2017

1 Comment

 
If you’ve never baked before, you might wonder what equipment you’ll need to get started. Obviously, you'll need an oven that can maintain a consistent temperature, whether it's gas, electric, or wood-fired. You may have almost everything you need in your kitchen right now, but here’s a helpful guide for choosing other equipment and utensils to make your first baking experience a success.
 
Five-quart mixing bowl
You’ll need bowls in other sizes in which to beat eggs or mix wet ingredients, but your mixing bowl should be large enough to hold two loaves worth of dough. I prefer one with high sides to keep the ingredients from escaping during mixing. Glass, glazed stoneware, Pyrex or plastic will all do the job, but a heavier bowl is a little easier to work with because it remains more stable during mixing.


Picture
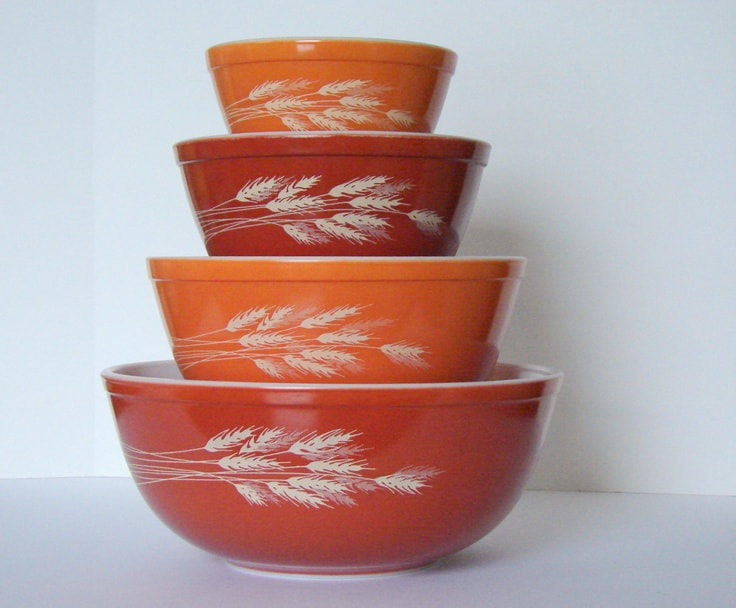
I love this vintage set from Pyrex. The pattern is called "Autumn Harvest" and it was produced from 1979 to 1986. I use my set whenever I have to shoot a video.

​Accurate measuring cups and spoons
You’ll need measuring cups for both dry and liquid ingredients, and yes, there is a difference----about 5% between the two.  For liquid measure your best choice is the classic Pyrex glass pitcher, both a one cup and a two cup.  For dry measure, consider spending a little more for the heavy duty metal measuring cups and spoons---they’re often on sale at Marshall’s and TJ Maxx. I also like the measuring spoons with a long handle and a narrow bowl that can easily fit into spice jars. If you have recipes written in the European style, a scale will also be essential.
Picture
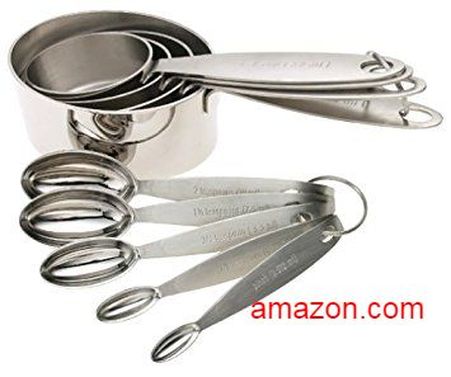
These are Cuispro measuring cups and spoons, which were rated as the best by America's Test Kitchen. The most important thing in my view is that the labels are stamped--the painted ones on cheap sets wear off in a short time.

​A large wooden spoon

This is the hand tool of choice for most Breadheads, and this is another utensil you might want to spend a little more on---I’ve snapped 8 or 9 cheap wooden spoons in half over the years. There is also an unusual mixing tool that is specific to baking called a dough whisk that mixes and aerates batters and doughs better than any spoon in the drawer. 
Did you know I have a whole series of these videos? Check out my YouTube Channel! And you can buy dough whisks on our abbey website: www.monksmarket.com. 

​An
instant read thermometer
Get the electronic kind rather than one with a conventional dial, since they produce a precise temperature reading more quickly. You’ll use it to test the temperature of liquids before adding yeast (100
° to 110° F.), and to check the interior temperature of a loaf of bread to ensure that it is fully baked (190° to 195° F.). 
I'm using a dial thermometer here, but a digital one will give you more accurate results quickly. They costs less than $20 at stores like Target and Walmart.

​Baking Pans

To start out, you’ll need a baking sheet (like for cookies), loaf pans (I recommend the medium size, 8½” x 4½” x 2½”) and a 12 cup muffin tin. If you intend to make cinnamon rolls, a rolling pin and an 9” x 13” pan would be in order as well. As you explore the world of baking, you may start thinking about brioche pans, cast iron skillets for scones, and stoneware casserole dishes for deep dish pizza. But the aforementioned three or four pans will be adequate for most recipes.
If you are just starting to equip your kitchen and you're on a tight budget, I recommend shopping for pans at thrift stores. You'll be amazed at what you can find!

Wire Racks

You can cool your loaves on a clean dishtowel, but a wire rack allows for air circulation on the bottom of the loaf, resulting in a superior crust. You can easily drop $20 or more on a heavy-duty stainless steel rack, but the less expensive ones do the job just as well, and once again thrift shops and flea markets are a great source for them. If they are slightly rusty, you can easily clean them up with steel wool, but don't try to rescue something that's clearly been put away wet and allowed to rust all over. You can also buy a multi-tier rack that can be used to save space both in the oven and on the counter top.
Picture
In a pinch, an extra oven rack can serve as a cooling rack as well.

​A reason to bake
I briefly considered making this last item "one of my cookbooks" but then I realized that I have maintained for many years now that people don't need recipes as much as they need reasons to bake. You can get literally millions of recipes from the Internet. I typed in "white bread recipe" in Google Chrome and got over SIX MILLION web pages in .47 seconds. But what will make you try one? A sense of adventure? The desire to recapture happy memories of a beloved grandmother, or to make new memories with your own grandchildren? Interest in your family's ethnic culinary heritage? Frugality, simplicity, the desire to slow down? Or just a longing for the taste of real bread? Whatever your reason, bake with courage and conviction, be willing to fail and to learn from your mistakes, and remember what I've said since my public television days: "It's bread---it's gonna forgive you!"
Picture
1 Comment

"Creamed Corn" Cornbread

7/17/2017

0 Comments

 
Picture
Yesterday (July 16) was National Corn Fritter Day, and I posted a link on Facebook to a previous post on The Cornbread Book by Jeremy Jackson. I didn't make corn fritters yesterday, mainly because my blood sugar was trending a bit high. But we had corn (off the cob, frozen) for supper last night, and I thought someone out to do something about the leftovers, so I decided to make cornbread, adapting a recipe in the aforementioned book (which you really should buy---it's a gem!) His original recipe uses creamed corn, something we rarely serve here at the abbey, so I adapted it by simply sending the whole kernels through the food processor and then adding them to the liquids. The resulting bread has a more intense corn flavor and doesn't suffer from the "Dry Crumblies" as some cornbread does. Here's my version:

1 cup all-purpose flour
1 cup stone-ground cornmeal
2 teaspoons baking powder
1 teaspoon salt
1 cup whole corn kernels, finely chopped in food processor
1 large egg, lightly beaten
1 cup milk
1/4 cup granulated sugar
2 tablespoons of vegetable oil

Preheat the oven to 425 degrees F., and grease an 8" x 8" baking pan with cooking spray. Sift the flour, cornmeal, baking powder, sugar and salt into a large bowl and stir until well-combined. In a separate bowl, whisk together corn, milk, egg, and oil.

Add the wet ingredients to the dry and stir until just combined. Don't overbeat, but be sure to use a rubber spatula to make sure there are no pockets of dry ingredients along the sides or bottom of the bowl. Pour batter into pan and spread it evenly. Bake for 20 to 25 minutes, until the top begins turn golden brown and the bread pulls away from the sides of the pan slightly. The top of the loaf should spring back when pressed with a fingertip.

0 Comments

National Corn Fritter Day July 16

7/15/2017

1 Comment

 
Picture
Yesterday I attended the Marshall Putnam County Fair (Henry, Illinois) with my sister Angela, who, like me, enjoys eating from the "fatal food group." Enjoying lemonade shake-ups and cheesy fries with her reminded me of my family's love of summer fairs and festivals while we were growing up. Between that and National Corn Fritter Day July 16, I decided to share the following excerpt from my new book Baking Secrets from the Bread Monk" Tips, Techniques, and Bread Lore (Reedy Press) which is available on the abbey's Monks' Market website.
 
From the chapter titled "Food Holiday Mash-ups"

July is designated National Culinary Arts Month, with a grateful nod to culinary professionals, from TV celebrity chefs to the under-appreciated line cook who makes the best hash browns at the local diner. Culinary training runs the gamut from small classes at cooking stores to junior college degree programs to the Cordon Bleu. But the term “Culinary Arts” always reminds me of the sign above the doorway to a barn-like structure at the Peoria Heart of Illinois Fair where my mother entered her bread every year (her raisin bread took first place nearly every time she entered it).

 
I love fair food in general and fried foods in particular: corndogs, haystack onion rings and funnel cakes are my personal faves. But there was one year at the Heart of Illinois Fair when a local church set up a tiny trailer out of which they sold fresh corn fritters. These fried delights were dredged in powdered sugar, and served piping hot in a brown lunch paper bag. I devoured several bags’ worth over the course of the week of the fair, and eagerly anticipated their return the following year. But alas, I was disappointed in my expectation---the little trailer with the hand printed cardboard sign never returned. You’ll have to settle for the homemade version yourself, and hope they are as good as my memories.

Picture


Corn

Fritters


Oil for frying

1 cup all-purpose flour
2 teaspoons of sugar
1 teaspoon baking powder
¼ teaspoon of salt
2 large eggs
½ cup milk
2 tsp. vegetable oil
1 12 oz. can of corn, drained  (3/4 cup, fresh)
Powdered sugar for coating
 
Heat at least 2” of oil to 375 degrees F., either in an electric fryer or in a heavy pan over medium heat. You may use an electric deep fryer as well.  Measure flour, sugar, baking powder and salt into a bowl and whisk to combine ingredients thoroughly.  In a separate bowl, beat eggs, milk and oil together, then stir in the corn kernels. Pour wet mixture into the bowl with the dry ingredients and stir until thoroughly combined. Drop tablespoons of the batter into the hot oil and fry until golden brown on both sides---they may need some help turning over. It takes only two or three minutes for them to cook, so don’t crowd the pan or the oil will cool and the fritters will be soggy with grease. Remove the fritters to drain on paper towel, then roll them while warm in the powdered sugar to coat (some people prefer granulated sugar). Serve immediately.
 ​

1 Comment

Do you want to bake a snowman?

7/9/2017

1 Comment

 
Picture
Regular readers of this blog know that I am an incurable shopper at thrift stores, garage sales, and flea markets. I have found a number of genuine treasures for myself (my most recent being a Wusthoff chef's knife for 50 cents!) but mostly I'm shopping for vintage or unusual kitchen items to give away as door prizes at my bread demos. At a recent pizza demo I gave away three pizza stones and a brand new pasta machine imported from Italy, and I spent less than a total of $20 for them. When I know I'm going to demonstrate particular breads or techniques, I keep an eye out for items that will go with that theme.

Twice last month I gave a presentation on homemade multigrain baking mix and I'll be doing the same demo later in the year, so I've been on the lookout for vintage biscuit cutters, rolling pins and gently used-waffle irons. You might be surprised how many of the latter show up at Goodwill and Salvation Army (almost as often as those canape molds from Pampered Chef) and last week I came across a Frozen-themed waffle iron that makes waffles in the shape of Olaf the Snowman. It was a whopping $4.99, so I bought it eagerly, well aware that often times these sort of trendy kitchen implements and appliances are heavy on licensing and light on actual usefulness.

Picture
However, I was delighted to discover that this waffle iron worked pretty well. Even before I got it back to my kitchen I realized that it would be difficult to clean, so I picked up a color-coordinated scrub brush at the Dollar Store on the way home. I also knew that it would be easier to dispense the waffle batter using a squeeze bottle, so I got one out from the storage room. I made a quick batch of waffle batter and put it in the squeeze bottle, heated up the iron, and then got to work. As you can see, the waffle iron makes all the parts of Olaf individually, so you can assemble him on the plate. A batch of batter with two cups of Bisquick makes EIGHT of these waffles, so you might consider dividing the recipe in half unless you have a large family or run a daycare. The surface of the iron is completely non-stick, but the waffles are hard to remove if you don't let them cook long enough. I wait until the steam stops coming out of the sides---the blue snowflake indicator light just tells you that the iron is on, not when it's hot enough. It's best to fill the sections from largest to smallest (lower body, head, middle body, stick arms) so the arms don't over cook.

There are surprising number of novelty waffle designs out there: Mickey Mouse, Captain America's shield, Hello Kitty, the Star Wars death star, even one that makes a wide waffle shaped like a computer keyboard. If any of them show up at a local flea market or yard sale, I'll probably bring it home and give it a try. But I'm especially looking forward to a future bread demo when I can give this treasure to a mom with Frozen-obsessed daughters---I'll throw in the squeeze bottle and the scrub brush, too. Sometimes people express surprise that I can give away such wonderful kitchen items at my appearances, but when you're a monk who is supposed to remain unattached to material possessions, it's best just to "Let It Go."
1 Comment

Sausage for breakfast, sausage for snack

6/29/2017

0 Comments

 
Picture
If it weren't for bacon, burgers, meatballs and sausage, I might be able to live as a vegetarian. For the most part, I can live without steak, I'm not fond of pork chops, not even fried chicken holds much appeal for me. But sausage . . . . . mmmmmm. However, I am rather particular about the exact flavor of sausage depending upon whether it is served at breakfast, as an accompaniment to pasta in  link or in sliced form, or crumbled on a pizza.  

Picture
My first cookbook,  Breaking Bread with Father Dominic (1999), included a recipe for Italian sausage for pizza, one that uses half lean pork and half ground turkey. I include it below, in spite of the fact that I rarely make it any more, because I discovered a Hot Sausage spice blend that is just as good. It's not a national brand---you can only get it at DiGregorio's on the Hill in St. Louis, but fortunately they will ship it to you, along with any number of other authentic Italian foods you might not be able to obtain in your locality. I like their Pizza Sprinkle, too, and their spice blend for olive oil for dipping your bread into, and the sun dried tomatoes, and the nice selection of Chianti and other Sangiovese-style wines. (I hasten to note that I haven't received any compensation from DiGregorio's---I just like their shop a lot!) As for the sausage seasoning, 3 to 4 teaspoons of seasoning mixed with a pound of ground pork butt yields a robust sausage with plenty of flavor and just enough heat.  But until you can get your own jar, here's my recipe. Note: for link sausages, I recommend using all ground pork, but this version works great for pizza sausage.    

Fr. Dom’s Italian Pizza Sausage
Mix together until well blended:
     1 lb. ground pork
     1 lb. ground turkey       
     1 Tbs. Italian herb blend
     1 Tbs. garlic powder
     1 Tbs. fennel seed
     2 tsp. ground black pepper                
     2 tsp. salt
     1 tsp. paprika              
     1 tsp crushed red pepper
And as long as we're at it, here's another reduced fat sausage recipe, one for breakfast sausage that I make regularly. I usually mix it up, form it into patties on a cookie sheet lined with parchment and bake them at 350° F. in a convection oven for 7 or 8 minutes. Many websites say 450° F. for 10 minutes, then turn them over, rotate the pan and bake for another 10. I can't imagine they would take that long at that temp---maybe if they were frozen. The main issue is, the interior temperature of the patties should be 165° F., but don't let them get too much above that or they get dry and tough (reduced fat, remember?) After they cool, I wrap them in cling wrap, two at a time, and then freeze them in a larger zipper bag. Handy single servings for breakfasts or mid-afternoon snacks. 
Reduced Fat Breakfast Sausage
Mix together until well blended:
     1 lb. ground pork
     1 lb. ground turkey
     2 tsp. dried rubbed sage
     2 tsp. salt (perhaps more to taste)
     1 to 1-1/2  tsp. ground black pepper
     1 to 2 tsp. garlic powder 
     1/2 tsp. dried marjoram
     1/4 tsp. crushed red pepper
​ 
0 Comments

Melo's: Pizza in a renovated St. Louis garage

6/16/2017

0 Comments

 
Picture
Whenever I'm in STL with my publisher Josh Stevens of Reedy Press, I can always count on him to find a new pizza joint for us to try, This time it was Melo's Pizzeria (2438 McNair, 314.833.4489) behind Blues City Deli. It's a tiny joint housed in a former garage with a small patio out back. But holds a 55oo pound wood-fired oven that was custom built in Naples, Italy. 

Melo's specializes in Italian style pizza with a New York twist. In other words, hand-stretched dough (no rolling) cooked on high heat with simple ingredients *(no Supreme Meat Lover's pizzas here). The New York twist is that the  crust is chewy but soft enough to fold the slice in half for eating. (If you want a cracker crust go to Pi). You can find a more complete review by Ian Froeb of the Post-Dispatch HERE. I had "the Dom" (how could I not?) with tomatoes, sausage and basil. I enjoyed the flavors but I must admit I prefer a traditional St. Louis crispy crust. But the outer crust was chewy with just the right amount of char.  My only serious criticism is that their hours are listed as "changes daily---see Facebook for details". As far as I can tell, that usually means only Thursday and Saturday. ???? 
0 Comments

A Donut Day

6/15/2017

0 Comments

 
Picture
Tuesday night I had the pleasure of presenting a bread demo at Operation Food Search in St. Louis. They have a brand new demonstration/teaching kitchen which was a pleasure to work in. The money raised by the event is going to fund a cooking class for food insecure people, and the participants will get both groceries and cooking equipment to take home. The presentation I gave was similar to the one I gave at Missouri Botanical Gardens this past weekend, featuring a homemade multi-grain baking mix.

Since I gave away a large portion of my supply of door prizes (for example, you can see a restored vintage rolling pin in the photo above) I decided to find an antique mall to explore. Google directed me to South County Antique Mall (13208 Tesson Ferry Rd) and further assisted me in discovering The Ex Cop Donut Shop (4584 Telegraph Road)
in Oakville. Frank Loforte and his wife Linda are both ex-cops who decided to open the shop about seven years ago---among other reasons, because "donuts don't shoot at you." Since then they have become a popular neighborhood destination as well as the donut supplier for Dierberg's and dozens of local gas stations (and they have a unique delivery van!). You can read their full story in the articles from Riverfront Times and St. Louis Magazine. After trying their apple fritter and seeing the cookie-topped varieties, I'm sure I'll be back.  
Later at the Cardinals game I discovered that they now have a mini donut stand on the upper concourse behind section 450. They use an automatic machine like the one I ran at Illinois Wesleyan back on college---we called it the Dono-Robo. Fresh out of the oil and sprinkled with powdered sugar, these little gems are a genuine treat. If you smile and talk nice to the ladies behind the counter, they will leave yours in a little longer in the hot oil so they come out crispy on the edges). At least that worked for me with Kim and Kimberly last night (and a shout out to Amber, who had the night off!).
Picture
Unfortunately there was a rain delay around the 7th and the Cards lost to the Brewers  7-6. I'm going to tonight's game as well, so I'm hoping for a better result. I suspect that no matter where my seats are, I'll take a stroll along the upper concourse behind section 450. I you ever decide to go there, too, tell them Fr. Dom sent you.

0 Comments

A Blessing for Mother's Day

5/14/2017

2 Comments

 
Picture


This is my first Mother's Day without my dear mama, and it has made me realize that Mother's Day can have a lot of different meanings depending on your circumstances. So I wrote this and offered it in place of the traditional blessing of mothers customarily used at the end of Mass on Mother's Day. I was asked by some people to make it available to them so I post it here. Please share it as you wish.


Blessings to all mothers


Blessings to all who mourn the loss of a mother or the loss of a child

Blessings to those mothers with special needs children, whose motherhood perhaps turned out to be differently from what they dreamed of, at the same time better and worse than they imagined.

Blessings to all who long to be mothers but cannot because of circumstance or biology or some mystery still to be revealed

Blessings to adoptive mothers and their children, and to the biological mothers who gave them life.

Blessings to all who never knew their mothers, or lost them too soon

Blessings to all who are estranged from their mothers, or from their children

Blessings to those separated from their children by illness, distance, or military service. 

Blessings to all who struggle with what it means to be a mother, who are fearful of failure, who second guess themselves and wonder what they did wrong or how they can get it right.

Blessings to stepmothers and second mothers and grandmothers raising their children’s children and to all the women in your life who have been like a mother to you.

Blessings to those for whom Mother’s Day is not a blessing, and to those for whom it is a mixed blessing and to those who find it a blessing in every way and a great singing joy.

Fr. Dominic Garramone


2 Comments

Chicken Pizza

4/28/2017

0 Comments

 
PictureCoach Eustice, his son Bryant and I with the Meat Lovers' and the Chicken Pizzas before we put them in the oven.
A couple of times a year, I make homemade pizza and take it to a student's table in the Academy cafeteria (or to use the monastic term, "refectory"). Today I was joined in the kitchen by my colleague Coach Jim Eustice, and we made three pizzas for his son's table, which is populated primarily by members of Jim's football and baseball teams. I've had most of them in class, so they have a pretty good idea of what I'm capable of in the kitchen.

Jim's son Bryant asked for a seafood pizza, some kind of chicken pizza with a white sauce, and a meat lovers' pizza. After a few questions and a little prompting, we settled on a bechamel sauce flavored with some vegetable stock concentrate, crabmeat, celery, onion and goat cheese. The meat lovers' was straightforward: my homemade sauce and sausage, pepperoni, ham, genoa salami and bacon, topped with the customary mozz (although snuck in a little pecorino Romano under the meats). 

The chicken pizza was a bit more challenging. Usually I make a broccoli chicken pizza with black olives and fresh mozz, but the "chicken" part was the only ingredient Bryant was interested in. Besides, the last few times I made it, the chicken breast seemed a little dry, although the veloute sauce continues to be the best part of the whole business. Veloute
 sauce is one of the "mother sauces" of French cuisine, and can be made with veal, chicken or fish stock. The roux is cooked darker than for bechamel, and I like it with a little half and half added to the stock, along with seasoned sea salt and fresh thyme. You make it thicker for pizza sauce than for pasta or vegetables.  You can find all about the different sauces I make for pizzas in my book Thursday Night Pizza, available on our abbey's retail website www.monksmarket.com. 

To counteract the potential dryness of the chicken, I used thighs instead of breast meat, and sauteed it just barely to a safe temperature, knowing that it would cook again in the oven on the pizza. Brightly colored red, green and yellow peppers added to the flavor and the appearance of the pizza, and inspired by what I found in the fridge, I topped the whole business with smoked mozzarella. Smoked gouda would have been a good choice, too, but the results were as delicious as they were photogenic.

Picture
Chicken Pizza with veloute sauce and smoked mozz---and I didn't get any because it was meatless Friday for the monks!
0 Comments

Banana Coconut Cream Puffs

3/24/2017

1 Comment

 
PictureBanana Coconut Cream Puffs
Today is the birthday of Mady, one of my Stage Rats, and she has a special appreciation for my cream puffs, so I thought I'd make some for the kids are her lunch table, most of whom are Stage Rats as well. Saint Bede alum Collin and I made the pâte à chou and baked the puffs last night, and Mady even helped whip the cream that I folded into banana pudding to make the filling. But she had to leave before everything was finished, so she missed out on the initial taste test. But she'll get a couple dozen for the table today.

The pudding I used was Jello's Simply Good Banana Pudding (I didn't get any compensation from them---I genuinely love this product!) because it's made with real bananas and not artificial flavorings. The instructions call for 2 cups of milk, but I reduced that by a quarter cup to get a more intense banana flavor. Then I whipped a little over a cup of heavy cream (whatever was left in the carton, essentially) and folded that into the firmed-up pudding. Filling: done!

For the drizzle on top, I whisked together a heaping tablespoon of banana pudding mix, a quarter teaspoon of coconut extract, a third of a cup of powdered sugar, and three tablespoons of half and half. After each puffs got filled and drizzled, I sprinkled on toasted sweetened coconut. 
Collin said of the flavors, "It's like a banana exploded in your mouth."


 I know that some Breadheads will want more details on the recipe, but I pretty much made it up as I went along (remember my last "improv" blog post?) and for the pâte à choux I used the recipe in The Joy of Cooking. However, there is a very nice video tutorial for making choux puff  pastry HERE. Equal parts of any flavor of pudding folded together with whipped cream make a delicious filling, and the most traditional garnish is a light dusting of powdered sugar.

As I have said many times, most people don't need any more recipes, they need reasons to bake. For example, one of my religion students saw me walking to Mady table with the banana coconut cream puffs and asked if she could earn a batch for the class with a perfect score on the day's quiz. I agreed, but if she didn't get a perfect score each classmate had to bring me a five pound bag of flour. All interested parties agreed to the wager. 

I've never been so happy to lose a bet.


Picture
What would you be willing to wager for a banana coconut cream puff?
1 Comment
<<Previous
Forward>>

    Author

    Fr. Dominic Garramone AKA 
    the Bread Monk

    Categories

    All
    Breadhead Bookshelf
    Breakfast Breads
    Buns Rolls And Biscuits
    Craftsy
    Donuts
    Equipment
    Ethnic Breads
    Events
    Gluten Free
    Herbal Breads
    Holidays
    Lake Thunderbird
    Memories Of Mama
    Multigrain Breads
    Pastries
    Pizza
    Places To Visit
    Quick Breads
    Reflections While The Bread Is Rising
    Savory Breads
    Sourdough
    Spirituality
    Stuff Besides Bread
    Sweet Breads
    The Classics
    Tools Of The Trade

    RSS Feed

    Archives

    June 2024
    December 2023
    September 2022
    April 2022
    March 2022
    February 2022
    January 2022
    October 2021
    May 2021
    April 2021
    March 2021
    February 2021
    August 2020
    July 2020
    May 2020
    February 2020
    October 2019
    June 2019
    September 2018
    July 2018
    May 2018
    April 2018
    March 2018
    February 2018
    January 2018
    December 2017
    November 2017
    August 2017
    July 2017
    June 2017
    May 2017
    April 2017
    March 2017
    February 2017
    January 2017
    December 2016
    November 2016
    October 2016
    September 2016
    August 2016
    June 2016
    May 2016
    April 2016
    February 2016
    December 2015
    November 2015
    October 2015
    September 2015
    August 2015
    July 2015
    June 2015
    May 2015
    April 2015
    March 2015
    December 2014
    November 2014
    October 2014
    September 2014
    August 2014
    July 2014
    June 2014
    May 2014
    April 2014
    March 2014
    February 2014
    January 2014
    December 2013
    November 2013
    October 2013
    September 2013
    August 2013
    July 2013
    June 2013
    May 2013
    April 2013
    February 2013
    January 2013
    December 2012
    November 2012
    October 2012
    September 2012
    August 2012
    July 2012
    June 2012
    May 2012
    April 2012
    March 2012
    February 2012
    January 2012
    December 2011
    November 2011
    October 2011
    September 2011

Web Hosting by FatCow