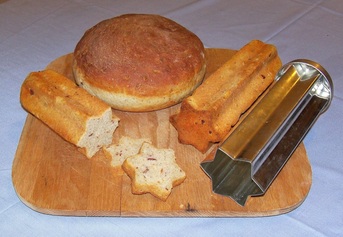
You can see that I baked one loaf in a casserole dish and the other in canape bread molds. These molds used to be available from Pampered Chef and I believe Norpro still makes them. But evidently lots of people have bought them and never used them, because they turn up at garage sales for 50 cents, or $1.99 at Goodwill, brand spankin' new and still in the box. That's unfortunate, because they do make beautiful little sandwiches for a tea party or light buffet, and it isn't at all difficult to use them.
Just in case you have some and have lost the instructions: You remove the ends and spray the inside with cooking spray, put on cap one and drop in a small portion of dough (9 or 10 ounces is perfect), put the top cap on and let the dough rise with the mold standing upright. They bake upright in the oven as well, usually in about two-thirds the time of a full loaf. Take them out of the oven and let cool with both caps off for 2 or 3 minutes, then tap one end of the mold lightly on the countertop. The bread loosens up and slides right out, or at least it always has for me.
The molds come in three shapes---six pointed star, flower and heart--and thanks to garage sales and Goodwill, I own two or three of each shape. They are a bit awkward to clean (I use a brush or sponge on a long handle) and the best way to dry them is to put them back in the oven as it cools, rather than trying to get into all those corners with a dish towel.
I put my star loaves in the freezer (see previous post) since I intend to use them later in the month for a "breads and spreads" buffet. A little star-slice of bacon dill spread with cream cheese and topped with a little deli ham or ham salad---yum!
Bacon Dill Bread
½ cup warm water (100 to 110 degrees)
2 tsp. brown sugar
2 pkg. active dry yeast
1 c. milk
1 c. cottage cheese
2 Tbs. fresh chopped dill (1 Tbs. dried)
1½ tsp. salt
2/3 cup cooked, crumbled bacon, drained (about 14 to 16 strips)
5 to 6 cups of all-purpose flour
Proof yeast with water and sugar in a small bowl. Blend milk and cottage cheese in a blender until smooth and warm mixture to 100 to 110 degrees. Pour milk mixture into a large bowl and add yeast, dill and salt. Stir in 2 cups of flour until thoroughly incorporated. Add bacon and mix thoroughly. Add 3 more cups of flour, one cup at a time, mixing thoroughly each time. Turn dough out onto a lightly floured board and knead for 6 to 8 minutes, adding small amounts of flour as needed to keep dough manageable. At the end of the kneading period, dough should be rather soft rather than stiff, but only slightly sticky. Oil the surface of the dough and place back in the rinsed bowl. Cover with a towel and allow to rise in a warm place free of drafts for 45 to 60 minutes, or until doubled. Punch dough down and knead briefly to work out the larger air bubbles. Dough may be formed into one large or two medium free form loaves and placed on a lightly greased baking sheet, or divided into two and placed in standard loaf pans. (if you make free form loaves, they may not rise as high as in a pan.) Cover and let rise for 20 to 30 minutes or until nearly doubled. Bake in a preheated 350 degree oven for 40 to 50 minutes, until lightly brown and loaf sounds hollow when tapped. Cool on racks.
Notes ---Dill is not a flavoring I much care for (except in pickles) but our Br. Nathaniel finds it irresistible. Monasteries are like other families---the cook can’t always make what he likes best!---so I developed this bread flavored with dill and bacon. You’ll often see recipes for “dilly bread” which use cottage cheese for moistness and sautéed onions for flavor, but I find that the bacon in my version is less overwhelming of the dill---I avoid adding caraway seed for the same reason. You’ll notice that there’s no oil in this recipe---between the bacon and the cheese, there’s plenty of fat to enrich the dough. If you use lo-fat or fat-free products, the dough will not be as soft and smooth, but the bread will still be delicious.
---You can fry the bacon, drain and then crumble it, or you can cut the bacon into small pieces and then fry and drain it. Either way works fine for the recipe, although with the latter technique I find myself more inclined to nibble!
---I often bake this bread in a 2 quart casserole dish, but there’s just a little too much dough to fit. So I divide out enough dough to fill a mini-loaf pan. That way I can have a sample loaf for my helpers when the bread comes out of the oven, and the large loaf to serve the community. A pair of 1 1/2 quart casserole dishes works fine, too.
 RSS Feed