

1 1/2 cups of melted ice cream
PLUS
1 cup of self rising flour
EQUALS
batter for 6 muffins!

 Saturday June 22 I was in St. Louis to teach two sessions of beginning baking at the Missouri Botanical Gardens Kemper Center. If you've never taken a class there or visited the home gardens there, it's well worth a road trip. We had two sessions with a dozen bakers in each. Most of the participants had never baked bread before, (although we had one or two ringers!) so it was challenging and exciting for all. I was genuinely pleased to see a great variety of people: adults of all ages, both men and women, and all of them eager to learn.  Many of the students said that the best part of the class was to get individual instruction in kneading, which in my experience is one of the aspects of yeast bread making that people find the most difficult. After the dough was ready for its first proof, we made ice cream muffins while it rose: 1 1/2 cups of melted ice cream PLUS 1 cup of self rising flour EQUALS batter for 6 muffins!  For the shaping methods I demonstrated both the smooth top and the braid-top loaves and they could choose which form they wanted to try. The results coming out of the oven were satisfactory all around, and everyone went home with a fresh, hot loaf of bread and a goodie bag from Hodgson Mill, who also provided all the flour, yeast and vital wheat gluten for the event. The general consensus seemed to be that my next class there should be pizza!
0 Comments
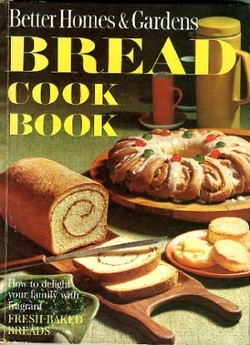 This is the 1963 edition of the Better Homes and Gardens Bread Cook Book and if you ever see it at a flea market or rummage sale, BUY IT! It's one of my favorite old-time recipe books, and it has clear instructions and photos for shaping a number of old-fashioned breads and coffee cakes that you don't see much anymore. Among them is an Apricot Daisy Coffee Cake that isn't terribly complex to make, but looks outstanding on the breakfast table. You can use any basic sweet dough, including my Best Ever Crescent Roll Dough (click HERE for the recipe). For the one I made recently, I used a dinner roll dough recipe but substituted half and half for the liquid (mainly because we had a couple of quarts that were going to expire in four days, so I wanted to use it up!) 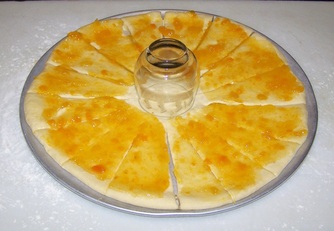 You roll the dough out into a 14" circle and place it on a metal pizza pan lightly coated with cooking spray. Place a glass in the center, and spread with apricot pastry filling or preserves (you can use any filling, really). Then take a pizza cutter and divide the dough into 16 even "spokes"---the glass keeps you from cutting all the way through, so that an open section is left in the middle. 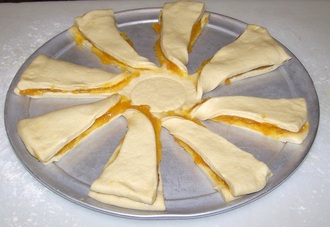 Remove the glass, then fold one spoke on top of the one next to it, until you have 8 double decker spokes. Make sure you fold them all in the same direction. Try not to let too much filling drip onto the pan. 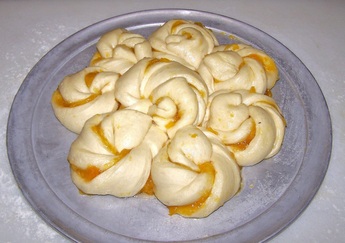 Twist each double decker spoke three or four times, and then curl it into spiral or snail shape. The first one goes in the open center space where the glass had been---do this first so you have a little more room to work with the others. The remaining seven are arranged evenly around the center. Cover and let rise for 30 minutes. 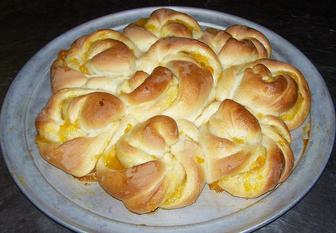 Here it is, fresh out of the oven. I baked it for 30 minutes at 350 degrees. Because the dough I used had a lot of sugar and eggs, about 15 minutes into the baking process I covered it loosely with aluminum foil so the top wouldn't brown too much. You should let it cool slightly before trying to transfer it to a wire rack to cool completely. Or just let it cool to lukewarm on the pan, put on the frosting and serve it on the same pan. 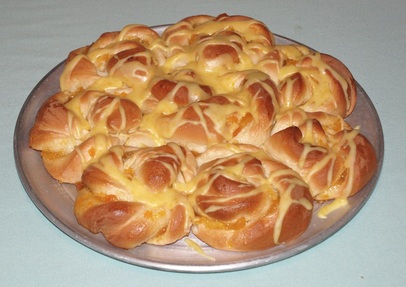 You can use plain glaze or frosting, but I like to add another layer of flavor by using the zest and juice of a medium orange with a dash of almond extract, whisked into about 1 1/2 cups of powdered sugar. I mixed it in a Pyrex measuring cup so I could microwave it for 30 seconds. Heating the glaze until it just boils helps to cut the "raw sugar" taste. If you want a brush-on glaze, use it immediately; otherwise, let it cool about 5 minutes before pouring it in swirls over the coffee cake. I've made this with other fillings and toppings: cinnamon sugar with hazelnut caramel glaze; almond pastry filling with a light glaze and toasted sliced almonds; mixed berry filling with a cream cheese frosting. Don't be afraid to experiment with the filling, the frosting, and the dough---which is a good enough rule for any recipe!  This is Rachel and Alex, two Breadheads who show up at my events whenever I'm anywhere near southern Illinois or St. Louis. They are true Breadheads, in that they bake a lot, or at least Rachel does. I haven't seen evidence of Alex's culinary skills, but his wife can sure rock a recipe. Earlier this year gave me two big zip lock bags of Dutch process cocoa powder. You may remember an earlier blog post about how their gift inspired some biscotti I made.  In search of other ways to use up this chocolate bounty, I turned to brownies. As a rule I don't like them because they are either too cakey or seem to be made entirely of fudge---too dry or too wet. In search of the perfect balance between chewy and fudgy, I came across this recipe on the King Arthur Flour website which promised such a state of textural equilibrium. They were absolutely correct, except for two things: their recipe included semi-sweet chocolate chip (entirely unnecessary) and it did not include walnuts (?). Click on the link, download the recipe, and sub walnuts for the choco chips.  And serve them warm, with ice cream. This is a moral imperative. I'm not kidding. If you don't, your guardian angel will hide her head under her wing in shame at the Supper of the Lamb. Plus, you will never again have to pay $8 at some hipster cafe for this kind of treat.  Wednesday June 19 I'll be at St. Joseph Parish in Freeburg Illinois for a bread demo (check out the events page for more info). I'm not sure what I'll be demonstrating yet, but I know that they are serving hors d'oeuvres, including "breads and spreads." When I have friends over for summer iced tea, I often serve one or two kinds of breads accompanied by herbal butters, one sweet and one savory. My default bread is cornbread, usually mini corn muffins. As you can see from the photo, I mix the batter and then pour it into a large squeeze bottle with a wider spout, and use that to dispense the batter evenly and cleanly into the little compartments.  The resulting muffins are all the same size and perfectly shaped, and there's less mess on the muffin tin or the counter to clean up. Cornmeal muffins tend to dry out quickly, so make them the day you're going to serve them.  For serving I make use of those vintage "hostess sets": small glass trays with a matching punch cup. The breads go on the tray and the spreads in the punch cup, and I get out some pretty silver butter knives. Any cornmeal muffin recipe will do, and you could use white or wheat yeast breads, too. There are thousands of herb butter recipes out there, as well (they're also called "compound butters"), but here are four of my favorites:
1 stick of softened butter + 2 Tbs. minced fresh chives + 1 tsp. minced fresh sage (this one can be bruahed on chicken as it comes off the grill, too). 1 stick of softened butter + one garlic clove, mashed and minced + 2 or 3 Tbs. Parmesan 1 stick of softened butter + 1 tsp. ground coriander + 1/4 cup of honey 1 stick of softened butter + 1 tsp. ground cinnamon + 1/4 cup maple syrup Don't forget to try cream cheese as a base for herbs as well: 8 oz. softened cream cheese + 2 T. minced onion + 1 Tbs. dried parsley + 1/2 tsp. dried basil 8 0z. softened cream cheese + 2 Tbs. mayonnaise + 1/2 tsp. dried thyme + 1 finely minced shallot + 1/4 tsp. white pepper Try combinations of whatever herbs are in your garden---you may discover a family favorite! |
AuthorFr. Dominic Garramone AKA Categories
All
Archives
June 2024
|