The Bread Monk
  • Home
  • My Bread Blog
  • Breadhead Videos
  • Recipes
  • Fr. Dom's Books
  • Events/Programs
  • Shortcut Stollen
  • New Page

About bread knives

8/7/2012

3 Comments

 
Picture
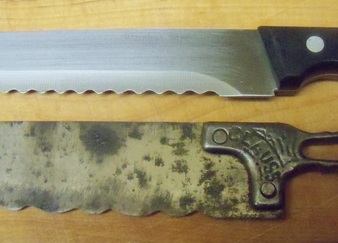
Okay, you've been baking bread more often and now you're in the market for a really good bread knife.  Before you drop too much money on a Wusthoff, here's a piece of advice: look for a knife with a wavy blade, not a serrated one with points.  The points on a serrated blade can tear some breads to pieces before it slices them, especially if it becomes dull.  A wavy blade will cut the crustiest artisan loaf with a minimum of crumbs, and nothing slices angel food cake better.  The top knife I bought at Marshalls for about $7 and it's been cutting bread in the abbey dining room for about 10 years now.   The bottom knife was made by the Clauss knife company of Fremont Ohio around 1920.  It's worth looking for a knife like this at antique malls or on eBay, but don't spend  more than $20 and have it professionally cleaned and sharpened.

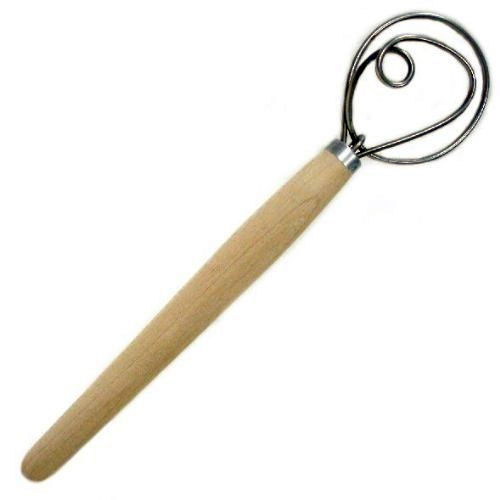
          If you live in or near St. Louis, the place to have your knives sharpened is Berterelli's Cutlery on Marconi, down the street from St. Ambrose parish, right there on the Hill.  I have mine done there and as far as I can tell, every chef and commercial kitchen in St. Louis does, too.   They just expanded their retail section AND they now carry dough whisks, in both sizes.  (Full disclosure: they sent me a couple of samples--but I would have written about them anyway, because it's a great store!)
Picture
3 Comments

Spoiled with Sweets

8/4/2012

0 Comments

 
Picture
The monks of St. Bede are definitely getting spoiled lately.  Last Friday I baked an enriched soda bread flavored with coriander and cut rounds out to make strawberry shortcake (actually has a lot less fat than shortcake.  the remaining pieces and  crumbly parts will probably go into a peach trifle with spearmint and fennel, if I can keep Fr. Ronald from feeding the leftovers to the birds in the west garden.  

Picture
Saturday afternoon I made a monkey bread coffecake with refrigerator biscuits for Sunday breakfast.  I know that seems like cheating to use pre-made dough, but it's so simple and so good that I'm not convinced that it's better to make the dough from scratch.  There are lots of recipes out there, but the best IMHO is from www.cooks.com:
MONKEY BREAD  
Content Copyright © 2012 Cooks.com - All rights reserved.
3 packages of buttermilk biscuit tubes
1 cup sugar (divided)
2 teaspoons cinnamon
1 cup butter
1/2 cup brown sugar
Take 3 packages of buttermilk biscuit tubes (10 per roll) and cut each roll into 4 pieces. Drop roll pieces into 1 cup sugar and 2 teaspoons cinnamon. Drop sugar-coated pieces into a well buttered Bundt pan (don't squish roll pieces when placing them in the Bundt pan). Put 1/2 cup of the left-over sugar/cinnamon mix and 1/2 cup packed brown sugar and 1 cup of butter (2 sticks) into a small saucepan. Bring this mixture just to a boil; remove from heat immediately. Carefully drizzle over the roll pieces. Bake at 350°F for 30 minutes. Cool slightly in an upright position, then tip pan over onto a plate to remove monkey pull-apart bread.

0 Comments

Pretzels and dip

8/4/2012

0 Comments

 
We're a bit bored with the same old ham-and-turkey-and-processed-cheese platters we've been getting for haustus, so recently I made sloppy joes (we haven't had them in ages) and last Thursday I made homemade pretzels and four different dips.  I had to make pretzels to get a photo for the new book anyway, and in my casual cookbook reading I had been looking at sauces in The Joy of Cooking, so I put the two together.
Picture
          Pretzels can be made from just about any bread dough.  What gives them their characteristic color and flavor is a two minute bath in boiling water with baking soda added.  You do the same thing to bagels but without the baking soda.  They drain for a few minutes on a cloth towel (paper towels adamantly stick to the pretzels) and then bake on sheet trays.  I find that a non-stick surface is absolutely necessary, and a silicone baking mat is even better.
          For the dips, I made a cheese sauce with sharp cheddar, a mustard sauce with a little horseradish added, blue cheese dip, and a ricotta cheese dip: 
        Drain 1 cup of ricotta for about 12 hours (place the cheese in a sieve lined
         with a coffee filter and suspend it over a bowl in the fridge).   Place the cheese in
         a medium bowl and mash it with a fork.  Add 3 Tbs. olive oil, 2 Tbs. of white wine
         vinegar and 2 Tbs. dry sherry and whisk.  Whip a cup of heavy cream until soft
         peaks form and fold it into the cheese mixture.  Fold in  2 green onions, finely
         minced and 1/4 cup of chopped herbs (I used parsley, basil, garlic chives and
         oregano).  Cover and chill for two hours before serving.  Can be made the day
         before.
(This recipe is adapted from one I found in the Illinois Valley Herb Guild cookbook.)

0 Comments

Cinnamon rolls and missing my dad

8/3/2012

2 Comments

 
I've been baking a lot of cinnamon rolls lately, mainly because I've been trying to get the recipe just right for the new book.  I usually make two or three dozen cinnamon rolls at a time, with at least one for the breakfast table and one for the freezer, plus extra for my kitchen helpers or to take to a friend.  So it took some experimentation to get the ingredient amount right for a single batch of twelve rolls.
          Baking cinnamon rolls makes me think of my Grandma Helen, whom we always called "Gramma Gome" since one of my silblings as a toddler couldn't pronounce "Garramone".  She made cinnamon rolls that put mine to shame, and as is so often the case, even though I have her recipe I can't get them to turn out nearly as well.  My father must have had them often while growing up, because he couldn't get my mother to make cinnamon rolls often enough.  Once she had baked a batch for a bake sale, and he actually bought them from her because he couldn't bear having them in the house without sampling!
          My father passed away a couple of years ago, after a long, slow progression of congestive heart failure and emphysema.  Because of this latter condition, he didn't like to talk on the phone--he'd get embarassed when he got out of breath.   So I started mailing him homemade greeting cards instead, photo cards I made with inexpensive prints from Walgreens attached to card stock with double sided tape.  I'd mail them every week or two, maybe more if I felt inspired.  On his birthday he'd get two or three, as for Father's Day.  I'd send pictures I'd taken of what was blooming in the garden or a unique stained glass window I'd seen, sometimes photos from the ball park, odd shots from my travels.  I though that he'd enjoy the images as a retired professional photographer.
          In every card I'd write a little news of the day, but I'd always included some memory I had of him, or something he taught me for which I was espcially thankful, or why I was blessed to have him as a dad.  And of course I always told him I loved him.  
           But then again, using "of course" is perhaps not realisitic here---lots of people never get around to telling their parents they love them, at least after adulthood.  But that's never been much of an issue in my family, and besides, I'd heard too many stories of regret in the confessional---I knew better.
          My father died in his easy chair, at home, (so may we all) with his wife Joyce in the next room.  Joyce said that he got one of my cards on the day he died, and I mailed one that morning.  Ironically, the card I mailed featured a photo of our abbey cemetery.  Of course I grieved, but it was not as hard as I thought it would be.  I came to realize that I wasn't quite so devastated because there wasn't anything important that I had left unsaid.  No reason to anguish over "what I would have said if I only I had been there"---I had been telling him for months.  And Joyce said he had saved every card.
          My dad's birthday is later this month, and I got a little tearful in Target this week when I saw the perfect card and had no-one to send it to.  So I'm telling you all this to get you to do two things.  First, write and send that card, make that phone call, or go into the next room and put your arms around that person you love and tell them how much they mean to you.  Second, bake some cinnamon rolls.  You'll be glad you did both.
Picture
2 Comments

An antique bread tool

7/30/2012

1 Comment

 
On a recent vacation day I went to the local antique mall to see if I could score some vintage bread knives to use as door prizes at my next demo.  I didn't find any, but what I did find was a Kaiser roll stamp, made of cast iron with a rosewood handle, incorrectly labeled as a "vintage nut chopper".
Picture
Here's what I find really interesting:  on the left is the antique stamp, and on the right is one I bought about ten years ago.  Look at the difference in size!  Kaiser rolls were meant to be dinner rolls, sometimes used for small sandwiches for breakfast.  But in typical American style, we make them HUGE, large enough for a 3/4 pound burger with all the works.  It's the same way with pastries.  Traditional Danish pastries are tiny treats, meant to be nibbled on delicately or perhaps eaten in a couple of bites.  But order a "Danish" at an American bakery and you'll get something the size of a catcher's mitt. 
          Don't get me wrong.  I am not against the occasional extravagant meal or decadent dessert:  "Moderation in all things, including moderation."  But our food culture in the United States seems to be fueled by the desire for complete satiety at the every meal, supersized portions for every entree, and the substitution of platters for dinner plates at restaurants.  Even worse, we're often getting quantity but not quality.   I will confess you having baked some very large caramel pecan rolls in my day, but they were, after all, homemade, and make them only once or twice a year!  I'm more likely to serve the brethren a healthy multigrain bread for breakfast.
     Okay, enough ranting.  Let's just try to stem the tide of culinary mediocrity and caloric excess, one roll at a time.
         

1 Comment

Self correcting cinnamon rolls

7/28/2012

0 Comments

 
I was in a hurry tonight to get some cinnamon rolls made, but I took pictures in case we need them for the new book.  I just want you to notice that the rolls went into the pan less than perfectly arranged, but a well-greased pan and 30 minutes of rising fixed everything.  No need to get all Martha Stewart in the kitchen---bread is very forgiving! 
Picture
Picture
Picture
0 Comments

Breakfast butterflies, crescent rolls and Fr. Joe

7/26/2012

0 Comments

 
Picture
Last night I mixed up a batch of basic sweet dough so I could make two recipes from the new book.  I didn't really need to test the recipes, but I needed some photos for illustrations of Breakfast Butterflies and Crescent Rolls.  Butterfly rolls used to be found in most bread cookbooks (I think I saw them first in the 1962 edition of The Joy of Cooking).  You roll the dough out as you do for cinnamon rolls and then cut the roll into 9 wedges instead of 12 slices (see above).  You can use any filling you want--I used a can of Solo Almond Cake and Pastry Filling, but you could use apricot filling or chopped dates and walnuts.  The advantage of almond filling is that the rolls are sweet enough without frosting.
          (I should note here in passing that the temperature in the kitchen last night was 99.3 degrees F.  My sister Eileen says I'm crazy for even considering baking in this weather, but I don't even notice the heat anymore).

Picture
     To shape the rolls, you turn each wedge short side up, and press the handle of wooden spoon across each—this pushes the dough outward to form the “wings”.   There are other "butterfly roll" recipes out there for which you actually form an insect body complete with antennae, but I think they're a bit too fussy. 

Picture
They rise and bake pretty much like any other roll (30 minutes or until doubled, 15 to 20 minutes at 350 degrees).   They were a hit with the brethren this morning, and so much so that next time I think I'll make a double batch, maybe with two different fillings.  Apricot filling would be good with an orange flavored frosting, for example. 

Picture
I made the second half of the dough into crescent rolls, which are a snap once you get the hang of rolling dough out into a circle.  Sincxe my last book was on pizza, that's one skill I have pretty well mastered!  A pizza cutter is useful for cutting the wedges, too--far easier than even the sharpest kitchen knife.

Picture
After seeing these pictures, I'm surprised that I've never noticed how much crescent rolls look like crabs!  Here they are before the second rise.  You'll notice that I don't have brand new shiny pans to bake them on, so don't worry if yours are little stained or battered.

Picture
I have to say these are some of the most photogenic rolls I've ever made!  I think thse are best serve warm with butter and grape jelly, which is how I ate then when my mom made them for us.  These came out of the oven about 10:30 p.m. and I had to stay up until all the rolls had cooled completely before wrapping them, so I was up late.  But thereby hangs a rather sad tale.

          This whole process took a somewhat longer time than usual, because I kept having to tend to our Fr. Joseph, who is suffering from Alzheimer's.  Recently he has been insisting that he is going home to live with his parents in Peoria again (they've been dead for years, and the house he is remembering has been torn down).  At least once a day he packs a suitcase or two, or drags boxes to the loading dock, convinced that someone will be coming to pick him up soon.  We've had to hide his luggage, because the visual cue of seeing it in his room triggers the obessesion, and we can no longer keep car keys in plain sight for fear he may try to drive himself to Peoria.  
          Sometimes it's difficult to divert him from this train of thought, and last night he was particularly determined.  It was obvious that he was exhausted, which made him more irritable, like a cranky toddler who needs a nap.  Three times he was out of his room and looking for someone to help him find a car, all within the same half hour, and he lost his temper the third time.  "Why do I have to put up with this shit?" he shouted at me in the hallway.  "Why can't you just take me someplace where there are old things that I understand?!" 
          But sadly, no such place exists anymore, except in his memory.  Because of his condition, very little makes sense to him anymore, and so he's surrounded by confusion and frustration---no wonder he loses his temper.   I finally commented sympathetically on how tired he looked, and he responded to the cue, saying that maybe he should just go to bed and not leave until tomorrow.  I helped him to his room and he thanked me for my kindness, all rancor forgotten: "Good night, dear Father," he said, as I closed the door.
          By the time I got to the dough, it was a bit over-risen in the first proof, but bread is forgiving, and caring for my confrere is far more inportant than picture perfect rolls.  Like any family coping with an elderly parent or a special needs child, the monastic community is learning once again to do as St. Benedict urges us in his chapter on good zeal: "Bear with the greatest patience one another's weaknesses of body and behavior." 
0 Comments

A bread lesson for the Loretto Sisters

7/18/2012

2 Comments

 
During my recent visit to St. Louis I stayed with the Loretto Sisters in Webster Groves.  Their Sr. Maragaret was the blood sister of our Fr. John, and I used to stay with them during taping sessions for Breaking Bread.  The kitchen manager of their food service asked for a bread lesson, so we assembled to make a basic roll dough and to shape it in various ways.  As you can see, her slab braids turned out especially nice.  Surprisingly, none of the sisters were interested in getting their hands in the dough--I'll have to work on that!
2 Comments

Cheesy Twist Bread--yum!

7/16/2012

0 Comments

 
Picture
One of the best aspects of traveling around doing bread demos is that you meet lots of happy bakers who want to share recipes--and occasional samples!  This couple attended a special class I taught for KETC/Channel 9 in St. Louis a couple years ago, and they showed up in Smithton as well, bearing a scrumptious cheese twist bread.  Rachel was kind enough to share the recipe with me, and I pass it on to you with the highest recommendation.  You can change the kind of cheese you use for the filling or use a blend. 
CHEESY TWIST BREAD
Dough -
2 packages active dry yeast
1 cup warm water
3 to 3 ½ cups unbleached all-purpose flour
1 teaspoon salt
2 tablespoons sugar
1 teaspoon onion powder
3 tablespoons oil
1 teaspoon dried basil
1 teaspoon chopped sun-dried tomatoes in olive oil
Filling-
4 ounces soft cream cheese
2 tablespoons dry ranch salad dressing powder
¼ cup chopped onions
3 tablespoons chopped sun-dried tomatoes in olive oil
¾ cup shredded parmesan cheese

Stir yeast into warm water and let set a few minutes to dissolve.  Attach flat beater to mixer.  In bowl of stand mixer add 2 cups of flour, sugar, salt, onion powder, basil, and sun-dried tomatoes.  Turn on stir speed to combine.  Add the water and yeast mixture.  Turn on speed # 4 for about 1 minute and beat.  Turn mixer speed down to 2 and add oil.  Continue to add the remainder of the flour a little at a time until the dough starts to clean the sides of the bowl and cling to the paddle.  Switch to dough hook and turn mixer on speed # 2 only and kneed for 4 to 6 minutes until dough is soft and elastic and tacky to the touch.  Take the dough out of bowl and knead into a ball.  Cover and let rest for about 5 minutes.  Roll dough out on a lightly floured surface into a 14x10 rectangle, spread with filling, sprinkle with ¾ cup of cheese over filling.  Starting from the long side, roll dough up tightly, with scissors cut roll in half, lengthwise.  Place halves, filling side up, side by side on parchment lined baking sheet.  Twist together gently and loosely.  Cover and let rise for 20 minutes.  Uncover and bake in a preheated 375 degree oven for about 25 minutes.  Take out of oven and brush with butter.  Put on a cooling rack to cool for about 15 to 20 minutes.  


0 Comments

Three herbal bread recipes

7/14/2012

2 Comments

 
I had meant to get back to the blog a lot sooner after my return from St. Louis, but shortly thereafter I developed some serious adominal pains and spent three days in the hospital.  Still no diagnosis, symptoms have subsided considerably but still pesist.  They have ruled out appendicitis, colon cancer, gall bladder, kidney stones, ulcers, and pregnancy.  Please keep me in your prayers.
          But enough about that.  While I was in St. Louis I was privileged to teach an afternoon class to the advanced pastry students at L'Ecole Culinaire (website here) on Monday.  We took a basic roll dough and made slab braids, bambino bread, and rose rolls.  The students were enthusiastic and made some lovely breads, although some of them need to work on their rolling pin technique--a perennial struggle!
Picture
          Tuesday night I was in Smithton, Illinois for an herb bread demo sponsored by the Metro East Herb Guild in Belleville.  For that presentation I made bacon dill bread, herbal rose rolls, and tomato basil focaccia.  I had hoped to give you links to those recipes, but I'm having trouble logging on to Google Docs, so I'll just post them here. 
Bacon Dill Bread
½ cup warm water (100 to 110 degrees)
2 tsp. brown sugar
2 pkg. active dry yeast
1 c. milk
1 c. cottage cheese
2 Tbs. fresh chopped dill (1 Tbs. dried)
1½ tsp. salt
2/3 cup cooked, crumbled bacon, drained (about 14 to 16 strips)
5 to 6 cups of all-purpose flour
Proof yeast with water and sugar in a small bowl.  Blend milk and cottage cheese in a blender until smooth and warm mixture to 100 to 110 degrees.   Pour milk mixture into a large bowl and add yeast, dill and salt.  Stir in 2 cups of flour until thoroughly incorporated.  Add bacon and mix thoroughly.  Add 3 more cups of flour, one cup at a time, mixing thoroughly each time.  Turn dough out onto a lightly floured board and knead for 6 to 8 minutes, adding small amounts of flour as needed to keep dough manageable.  At the end of the kneading period, dough should be rather soft rather than stiff, but only slightly sticky.  Oil the surface of the dough and place back in the rinsed bowl.  Cover with a towel and allow to rise in a warm place free of drafts for 45 to 60 minutes, or until doubled.  Punch dough down and knead briefly to work out the larger air bubbles.  Dough may be formed into one large or two medium free form loaves and placed on a lightly greased baking sheet, or divided into two and placed in standard loaf pans. (if you make free form loaves, they may not rise as high as in a pan.)  Cover and let rise for 20 to 30 minutes or until nearly doubled.  Bake in a preheated 350 degree oven for 40 to 50 minutes, until lightly brown and loaf sounds hollow when tapped.  Cool on racks.
(Don't have a picure of this yet.)

Tomato Basil Focaccia
Dough
2 cups tomato juice                           
1 pkg. active dry yeast
2 tsp. salt                                 
1/4 cup chopped sun dried tomatoes          
1 cup whole-wheat flour                    
2 Tbs. olive oil                                   
4 to 4 ½ cups white bread flour
2 Tbs. finely chopped fresh basil 
    OR 1 Tbs. dried whole basil leaves 
    OR  2 tsp. ground dried basil     

Topping
olive oil
kosher salt

Scald tomato juice in a saucepan over low heat, but do not allow to boil.  Add the sun dried tomatoes and cool to lukewarm.  Pour into a mixing bowl.  Stir in yeast and 1 cup of whole wheat flour and allow to rest for ten minutes.  Add olive oil and salt and mix well, about 100 strokes by hand.  Add flour, one cup at a time, until you get a soft dough that is rather sticky.  Knead on a lightly floured board for about 5 minutes, until the dough is smooth and elastic but still a bit sticky (be careful not to add too much flour in the course of kneading).  Give the mixing bowl a quick wash, oil the surface of the dough lightly and place it in the bowl.  Let rise, covered with a towel, in a warm place free from drafts, until doubled---about 1 to 1 ½ hours.  Punch down, and divide into two portions.  Flatten each portion into a round, flat loaf, about ½  inch thick.  Place loaves on a baking sheet that has been sprinkled with cornmeal (you may need 2 sheets).  Brush on about 1 Tbs. of olive oil on each loaf.  Allow to rise, uncovered, for 30 minutes.  Dimple dough with your forefinger, each dimple being about ½ inch apart.  Brush top with olive oil and sprinkle lightly with kosher salt.  Bake at 400 degrees until lightly browned, about 20 minutes.  Remove from oven and cool loaves for 10 minutes before serving.
Picture

I often make tomato basil kaiser rolls topped with parmesan for sandwiches or to accompany pasta with cream sauces, but you can also bake this bread into a regular loaf pan and use it to make the best grilled cheese sandwich ever!

Rose Rolls
Use any recipe for one dozen dinner rolls, preferably one that uses milk as the liquid.

On a lightly floured board, roll dough out into a rectangle 12” high by 15” wide.  Brush the dough with the melted butter, leaving 1 inch of the top edge dry.  Sprinkle on about 1/2 cup of fresh chopped herbs.  Roll the dough up jellyroll style.  Lightly brush the top edge with a little water, so it will stick to the roll; pinch to seal.  Using a sharp knife cut the roll into 12 even pieces.  Cut side down, place them one by one into the cups of a lightly greased muffin tin.  Using a pair of scissors cut an “X” in the top of each roll---you should cut about 2/3 of the way through the roll.  Cover and let rise in a warm place until doubled, 30 to 45 minutes.  Bake in the preheated 375 degree oven for 10 to 12 minutes, or until lightly browned.  Remove from pans and place on wire racks to cool slightly.  If desired, brush tops of rolls with more melted butter before serving warm.
Picture
Picture
2 Comments
<<Previous
Forward>>

    Author

    Fr. Dominic Garramone AKA 
    the Bread Monk

    Categories

    All
    Breadhead Bookshelf
    Breakfast Breads
    Buns Rolls And Biscuits
    Craftsy
    Donuts
    Equipment
    Ethnic Breads
    Events
    Gluten Free
    Herbal Breads
    Holidays
    Lake Thunderbird
    Memories Of Mama
    Multigrain Breads
    Pastries
    Pizza
    Places To Visit
    Quick Breads
    Reflections While The Bread Is Rising
    Savory Breads
    Sourdough
    Spirituality
    Stuff Besides Bread
    Sweet Breads
    The Classics
    Tools Of The Trade

    RSS Feed

    Archives

    June 2024
    December 2023
    September 2022
    April 2022
    March 2022
    February 2022
    January 2022
    October 2021
    May 2021
    April 2021
    March 2021
    February 2021
    August 2020
    July 2020
    May 2020
    February 2020
    October 2019
    June 2019
    September 2018
    July 2018
    May 2018
    April 2018
    March 2018
    February 2018
    January 2018
    December 2017
    November 2017
    August 2017
    July 2017
    June 2017
    May 2017
    April 2017
    March 2017
    February 2017
    January 2017
    December 2016
    November 2016
    October 2016
    September 2016
    August 2016
    June 2016
    May 2016
    April 2016
    February 2016
    December 2015
    November 2015
    October 2015
    September 2015
    August 2015
    July 2015
    June 2015
    May 2015
    April 2015
    March 2015
    December 2014
    November 2014
    October 2014
    September 2014
    August 2014
    July 2014
    June 2014
    May 2014
    April 2014
    March 2014
    February 2014
    January 2014
    December 2013
    November 2013
    October 2013
    September 2013
    August 2013
    July 2013
    June 2013
    May 2013
    April 2013
    February 2013
    January 2013
    December 2012
    November 2012
    October 2012
    September 2012
    August 2012
    July 2012
    June 2012
    May 2012
    April 2012
    March 2012
    February 2012
    January 2012
    December 2011
    November 2011
    October 2011
    September 2011

Web Hosting by FatCow